I love when the holidays hit Orlando. There’s this funny mix of sunshine and Christmas chaos—palm trees wrapped in twinkle lights, Santa sweating in flip-flops, and me trying to pull off Christmas cake pops without melting the chocolate. It’s a festive juggling act. But every year, no matter how busy things get, these little treats somehow make it to every party table. They’re cute, easy, and honestly foolproof if you know a few tricks.
That’s the beauty of cake pops—they look fancy, but they’re surprisingly forgiving. You don’t have to be a professional baker or own a single piping tip to make them shine. I’ve found that once you get the hang of the dipping and decorating part, you can crank out a whole batch while watching your favorite Christmas movie. They also make great last-minute gifts, which is my favorite part. Pop a few in a bag with ribbon, and suddenly you look like you’ve got your life together.
In this post, I’m breaking down exactly how to make Christmas cake pops the easy way—without spending all day in the kitchen or half your paycheck on fancy ingredients. I’ll walk through a simple vanilla recipe, share decorating ideas that look expensive but aren’t, and give you a few money-saving hacks I use every year. By the end, you’ll know how to make a batch that looks Pinterest-worthy but costs less than a fancy coffee run.
Let’s talk about how to make the season a little sweeter—one bite at a time.

Some of the links on this site are affiliate links, which just means I may earn a small commission (at no extra cost to you) if you make a purchase. You can check out my full disclosure for all the details.
Why Christmas Cake Pops Are the Easiest Holiday Treat Ever
Here’s the secret nobody tells you: cake pops are basically crumbled cake and frosting on a stick. That’s it. They sound intimidating because they look like something from a bakery window, but they’re made from simple, cheap ingredients.
What I love most is that they work with whatever you’ve got. Maybe your cake breaks coming out of the pan. Perfect. That’s the whole point. You’re going to crumble it anyway. Messy bakers, rejoice—you can’t really mess these up.
Cake pops are also incredibly flexible. You can use boxed cake mix, leftover cake from a party, or even cupcakes that didn’t turn out right. Once they’re rolled, dipped, and decorated, nobody knows the difference. They taste moist and rich, no matter how they started.
A few other reasons they’re the easiest treat ever:
- You don’t need special pans.
- They can be made days ahead and still look fresh.
- You can freeze them for later.
- Everyone thinks you spent hours making them.
When it comes to holiday entertaining, that’s my kind of recipe. They’re bite-sized, travel well, and make a perfect addition to dessert tables. And because you can make them in any color or theme, they fit right into every Christmas celebration—from work potlucks to neighborhood parties.
I’ve noticed they always get eaten first, too. People grab them without hesitation. Maybe it’s the stick. Maybe it’s the guilt-free size. Either way, they disappear fast, and that’s all the validation I need that Christmas cake pops belong on every festive menu.
Simple Recipe for Christmas Cake Pops
Let’s start with a basic vanilla cake pop recipe. It’s easy, budget-friendly, and pairs beautifully with all the classic holiday flavors and colors.
Servings: about 24 cake pops
Prep time: 30 minutes
Cook time: 25 minutes
Chill time: 1 hour
Ingredients:
1 box vanilla cake mix (plus ingredients listed on the box)
½ cup vanilla frosting (store-bought works fine)
12 ounces white chocolate or vanilla candy melts
Sprinkles, crushed peppermint, or edible glitter for decorating
24 cake pop sticks or lollipop sticks
Instructions:
- Bake the cake as directed on the box. Let it cool completely.
- Crumble the cake into a large bowl. Make sure there are no big chunks.
- Add frosting a little at a time. Start with ¼ cup and mix with your hands until the texture holds together like dough. Add more if needed.
- Roll the mixture into small balls, about one inch in size.
- Place them on a baking sheet lined with parchment paper.
- Melt a few candy melts and dip the end of each stick in the melted chocolate before inserting it halfway into each cake ball. This helps it stay secure.
- Chill in the fridge for at least an hour, or in the freezer for 20 minutes if you’re in a rush.
- Melt the rest of the candy melts according to package directions until smooth.
- Dip each chilled cake pop into the melted coating, gently tapping off the excess.
- Decorate immediately before the coating sets.
You can add crushed peppermint, shimmer dust, or metallic sprinkles for a grown-up holiday look. Once decorated, stand them upright in a foam block or cake pop stand to dry.
These vanilla cake pops are a blank canvas. From here, it’s all about the Christmas twist.
Decorating Ideas
Now for the fun part—turning those plain white pops into mini holiday art pieces. Decorating is where you can get creative without spending much. You just need color, texture, and a little sparkle.
A few festive ideas:
- Snowball Pops: Roll white-dipped pops in shredded coconut for a snowy look. Add a silver sprinkle on top.
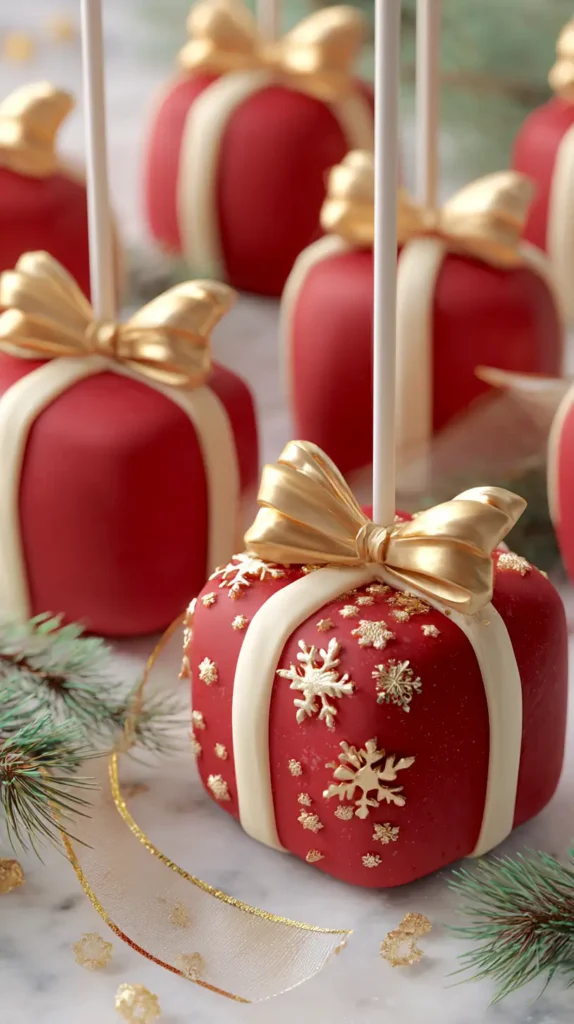
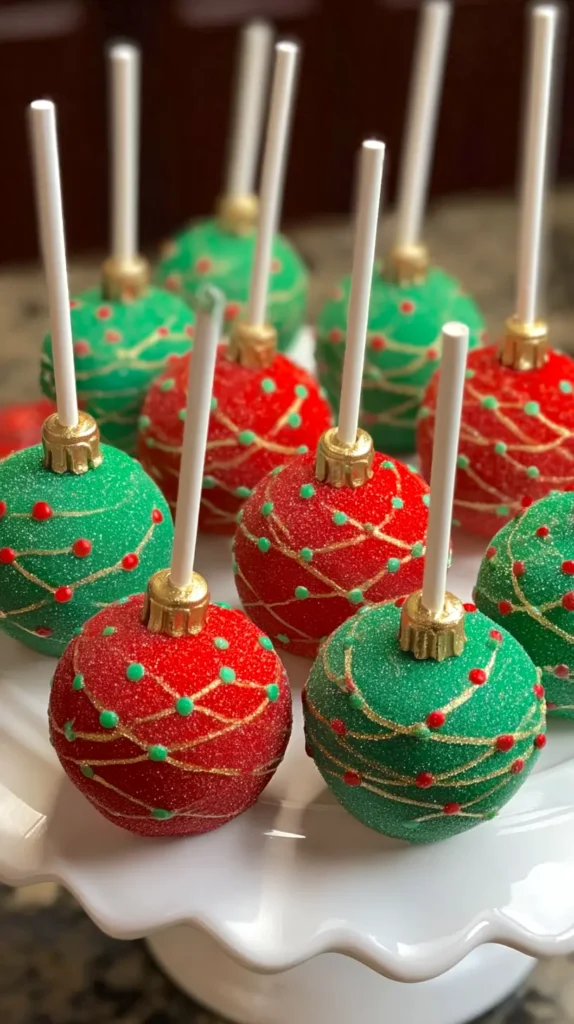
- Ornament Pops: Use red, green, or gold candy melts. Add tiny metallic dragees or edible glitter. Finish with a small bow at the stick base.
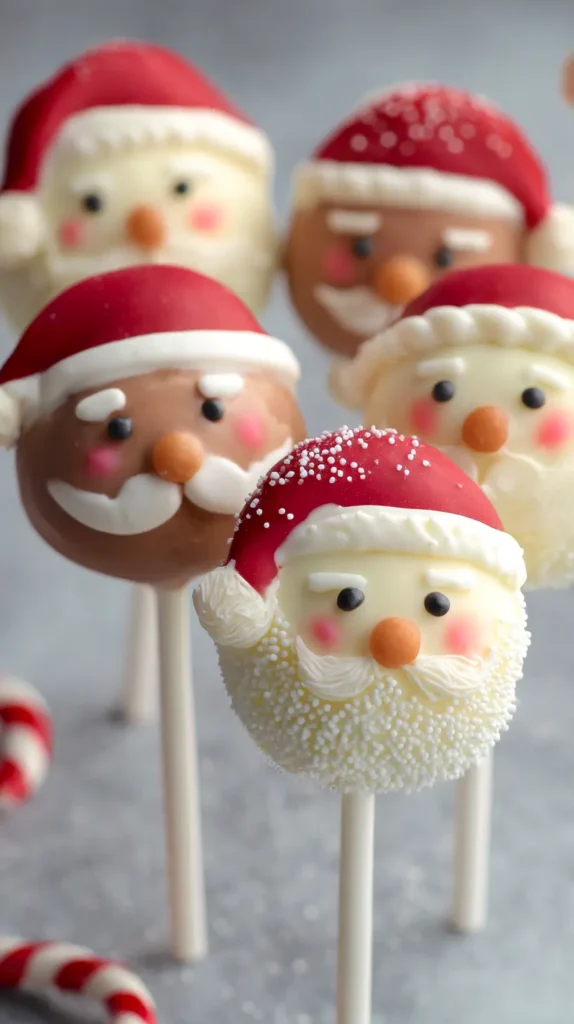
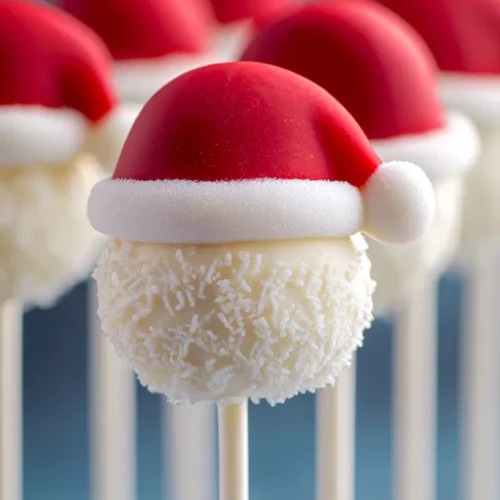
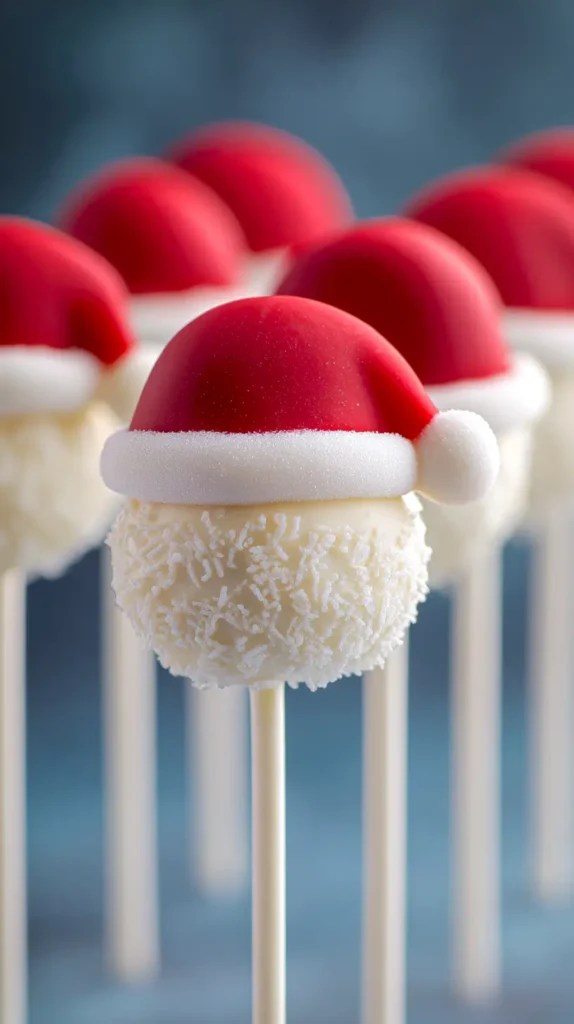
- Santa Hat Pops: Dip halfway in red melts, then roll the tip in white nonpareils for the “fur.”
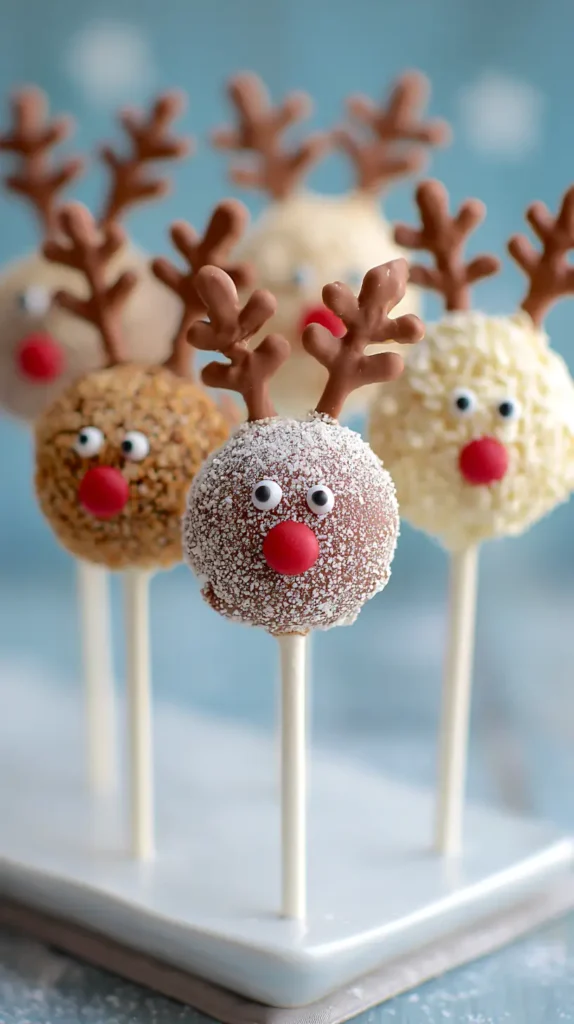
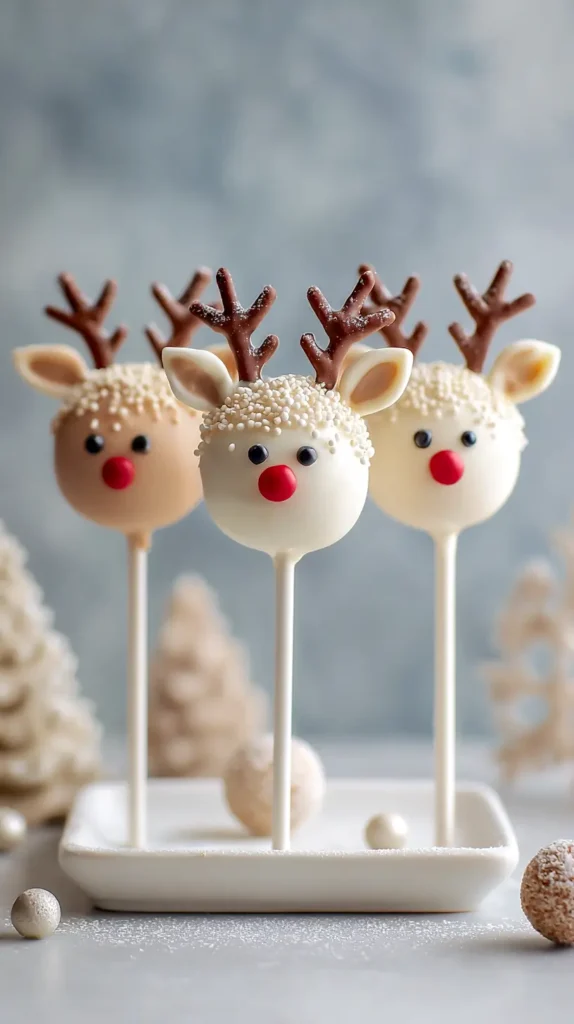
- Reindeer Pops: Use pretzel antlers and mini chocolate chips for eyes.
- Gingerbread Pops: Tint the coating light brown and draw on icing lines with white chocolate.
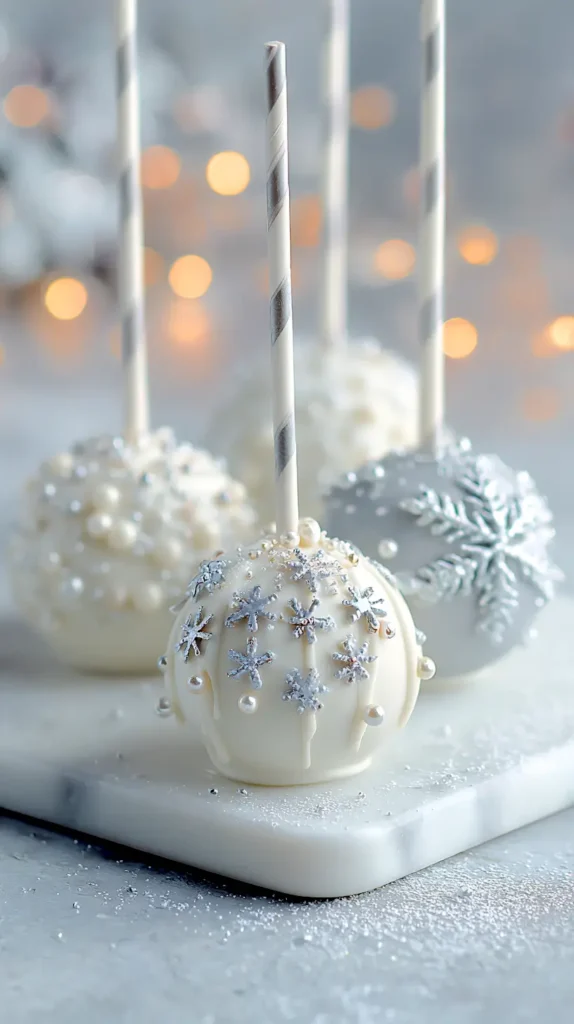
If you want that clean, minimal look that’s trending this year, go for one solid color with subtle gold dust or edible pearls. It feels upscale but takes minutes.
A few quick decorating tricks I’ve learned:
- Keep the melts smooth by stirring in a little coconut oil.
- Chill pops again after dipping if your kitchen’s warm.
- Don’t overload with decorations; less is often more for that elegant Christmas style.
This is where Christmas cake pops really shine—they’re small enough to try multiple designs without committing to a full cake theme. You can mix snowballs, ornaments, and reindeer in one batch, and it’ll look like a professional dessert spread.
The Secret Life of a Christmas Cake Pop
You know what nobody talks about? The social life of a cake pop. Hear me out. These little desserts have range. They show up everywhere—office parties, cookie swaps, family gatherings—and somehow always fit in. They’re like the extroverts of holiday desserts, mingling with brownies, chatting up the fudge, and stealing glances from the sugar cookies.
But here’s where they really shine: presentation strategy. Everyone’s seen the standard cake pop bouquet. Cute, sure, but expected. So what if you staged them differently? I started noticing how event planners display food vertically—like dessert towers or champagne walls—and realized cake pops can do the same thing. Imagine a mini “pop wall” made from a foam board wrapped in wrapping paper, with pops arranged in neat rows like ornaments. It costs next to nothing and instantly looks designer.
Or think of them as edible name cards. Skip paper place cards and stick one pop into a small espresso cup with a name tag on the stick. Guests find their seat and get a built-in dessert. It’s smart, it’s affordable, and it’s pure Pinterest gold.
And here’s another fresh angle: cocktail pairing. Why not serve Christmas cake pops with after-dinner drinks? A spiked eggnog pop next to actual eggnog. A white chocolate pop beside a peppermint martini. It feels luxe, but it’s easy—no catering required. You’re just pairing flavors and letting presentation do the heavy lifting.
Sometimes the best holiday ideas are the ones that blend pretty with practical. Cake pops aren’t just dessert—they’re a conversation piece. And when something looks like art but takes fifteen minutes to assemble, that’s a Christmas win in my book.
Budget-Friendly Tips to Save on Christmas Cake Pops
There’s no reason to spend a fortune making something that gets eaten in two bites. I’ve figured out a few tricks over the years to make cake pops look high-end for less.
First, skip the fancy cake pop kits. A regular box of cake mix and canned frosting work perfectly. No one’s judging the brand under all that chocolate coating. Dollar Tree often carries candy melts, sticks, and even mini sprinkles—stock up early before they sell out.
A few more simple money-saving ideas:
- Buy candy melts in bulk after Halloween or Thanksgiving when they go on clearance.
- Reuse Styrofoam blocks year after year to hold your pops upright while drying.
- Use plastic treat bags with ribbon instead of expensive boxes for gifting.
- If you need different colors, buy white melts and add a few drops of food coloring oil.
Presentation makes a big difference too. Wrap them in cellophane, tie with gold ribbon, and suddenly they look boutique-worthy. You can make 24 of them for under ten dollars if you plan ahead.
Another small trick: bake your cake the night before so you can assemble the next morning. You’ll feel more relaxed, and it keeps the process stress-free.
When the holidays get busy, I remind myself that simple doesn’t mean boring. These little treats add sparkle to a table, and when made smartly, they fit any budget. That’s what Christmas cake pops are all about—making something festive that still feels doable.
Creative Ways to Use Christmas Cake Pops
Here’s where your creativity really pays off. Cake pops aren’t just dessert—they’re decor, gifts, and conversation starters. Once you have your batch ready, think beyond the plate.
Use them as edible ornaments on a dessert tree. Stick them in foam cones to make a centerpiece. Wrap a few in cellophane and tuck them into stockings or attach one to each gift tag.
More ideas that work beautifully:
- Arrange them in a vase with greenery for a dessert bouquet.
- Include them in a holiday charcuterie board with candies and cookies.
- Hand them out at the office for an affordable gift everyone actually wants.
- Use gold and silver pops as part of a New Year’s spread too—they carry right into January celebrations.
Another fun twist is hosting a cake pop decorating night with friends. Everyone brings a topping, and you share supplies. It’s cheaper than dinner out and doubles as a gift-making party.
And if you’re planning a party, a tiered stand of Christmas cake pops makes a big impact with little effort. They’re neat, easy to grab, and save you from cutting or serving anything. No forks, no plates—just a lot of compliments.
When it comes to getting festive on a budget, these little treats check every box.
Christmas Cake Pops (Vanilla)
Ingredients
- 1 box vanilla cake mix
- Ingredients listed on the cake mix box usually eggs, oil, and water
- ½ cup vanilla frosting
- 12 ounces white chocolate or vanilla candy melts
- 24 cake pop sticks
- Sprinkles or toppings of choice
Instructions
- Bake the vanilla cake according to package instructions and let it cool completely.
- Crumble the cooled cake into a large mixing bowl, making sure no large pieces remain.
- Add ¼ cup of vanilla frosting and mix with your hands until the texture holds together like dough.
- Add more frosting in small amounts only if needed to reach a dough-like consistency.
- Roll the mixture into 24 one-inch balls and place them on a parchment-lined baking sheet.
- Melt a small amount of candy melts and dip one end of each cake pop stick into the melted coating.
- Insert each stick halfway into each cake ball and set them upright.
- Chill the cake pops in the refrigerator for 1 hour or in the freezer for 20 minutes.
- Melt the remaining candy melts in a microwave-safe bowl, heating in short intervals and stirring until smooth.
- Dip each chilled cake pop into the melted coating, turning to coat it evenly.
- Gently tap off excess coating and decorate immediately with sprinkles or toppings before the coating sets.
- Stand the cake pops upright in a foam block or cake pop stand and allow them to dry completely before serving.
Final Thoughts
Every Christmas in Orlando has its quirks—like decorating sugar cookies in shorts or sipping cocoa under palm trees. But that’s what makes it special. It’s a mix of cozy tradition and a bit of chaos, which is exactly why I love recipes that make life simpler. Christmas cake pops fit right into that rhythm.
They’re easy to make, easy to share, and easy to make look impressive even when your to-do list is packed. There’s something about pulling a tray of glossy pops out of the fridge and realizing you made them yourself that feels satisfying.
I’ve found they’re also one of those treats that photographs beautifully. If you’re like me and live on Pinterest during the holidays, these are gold. People love saving and sharing them. Whether you go with minimalist gold pops or full-on Santa faces, they’ll stand out.
And honestly, that’s the whole point of holiday baking for me—not perfection, but joy. These little pops remind me that it’s okay to keep things simple, to make something fun, and to savor it between the madness of wrapping paper and grocery runs.
So this season, grab that cake mix, melt some chocolate, and let the Christmas chaos be sweet instead of stressful. You might just start a new tradition—one stick at a time.