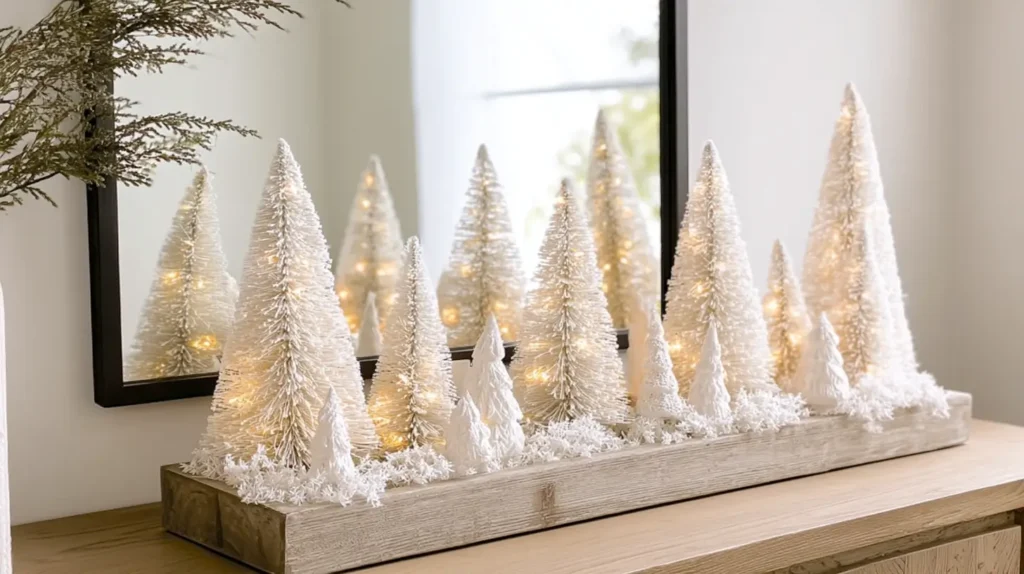
A Christmas centerpiece like this snowy bottle brush forest can take even the plainest table and give it a full holiday moment. I’ve found that these tiny trees create magic faster than anything else I put out in December. They’re cute, they’re charming, they’re dramatic in that soft holiday way, and they always get the most attention. People lean in. They whisper things like, “Where did you get that?” And the best part is watching their faces when they realize it didn’t come from Pottery Barn.
This year’s trends make it even better. Everyone online is obsessed with Ralph Lauren Christmas and Grandma’s Christmas. Rich reds. Deep greens. Tiny gingerbread touches. Little splashes of nostalgia. Cozy textures that feel like childhood but with a stylish twist. This forest fits right in. It looks like something you’d spot on a coffee table in an old holiday movie. And sure, Pottery Barn carries their own version for one hundred fifty dollars. But you can make the same look for around twenty-four dollars using Dollar Tree supplies and a little confidence.
Living in warm, sunny Orlando means I get sunshine instead of snowfall. So I make my own winter whenever I want. A little fake snow here. A few warm lights there. Suddenly the room goes from everyday to holiday-warm in under half an hour. This forest never disappoints. It glows in the most flattering way. It adds personality without shouting. Plus, it gives your home the look that people think costs a lot of money.
And it’s honestly so easy to make that you may end up creating more than one.
This site has some links that are affiliate links. This means that if you buy something, I might get a small commission at no extra cost to you. You can check out my full disclosure for all the details.
Things You Need for Your Christmas Forest Centerpiece
The magic starts with simple supplies, and Dollar Tree carries almost all of them. These bottle brush trees come in gold, green, white, champagne, and even a few wild-card colors if you’re lucky. They sell out early. They vanish fast. And when they’re gone, they’re gone. So if you see them, grab them in every size. They’re the whole personality of this Christmas centerpiece, and the variety keeps it from looking flat.
Here’s what you need before you start:
• Bottle brush trees in multiple sizes
• A flip-over Dollar Tree sign or a sturdy piece of cardboard
• White sprigs with that frosty look
• Faux snow or fluffy batting
• A strand of warm fairy lights
• Scissors for trimming tree toppers
• Hot glue plus extra glue sticks
Some trees come with tiny star toppers. They’re cute, but they don’t always match the elegant Pottery Barn vibe. Snip them off if you want a cleaner look. Keep them if you want something more whimsical. The choice depends on your style, but trimming them makes the trees look pricier.
Grab sprigs with texture. Dollar Tree’s white frosted branches work beautifully because they hide the base and add visual depth. Don’t skip this part. These sprigs make the forest look soft instead of stiff.
Before you dive in, set up your workspace. Keep everything within reach so the process feels smooth. Try arranging your supplies like this:
- Group the trees by height
- Lay out the sprigs so you can grab them fast
- Check the fairy lights to make sure they work
- Keep faux snow open and ready
- Heat your glue gun so it’s ready to go
Gathering everything upfront keeps your momentum. It’s easier to stay playful and creative when you don’t have to hunt for a missing piece halfway through. Once everything is set, the fun begins.
Creating Your Layout And Building The Forest Base
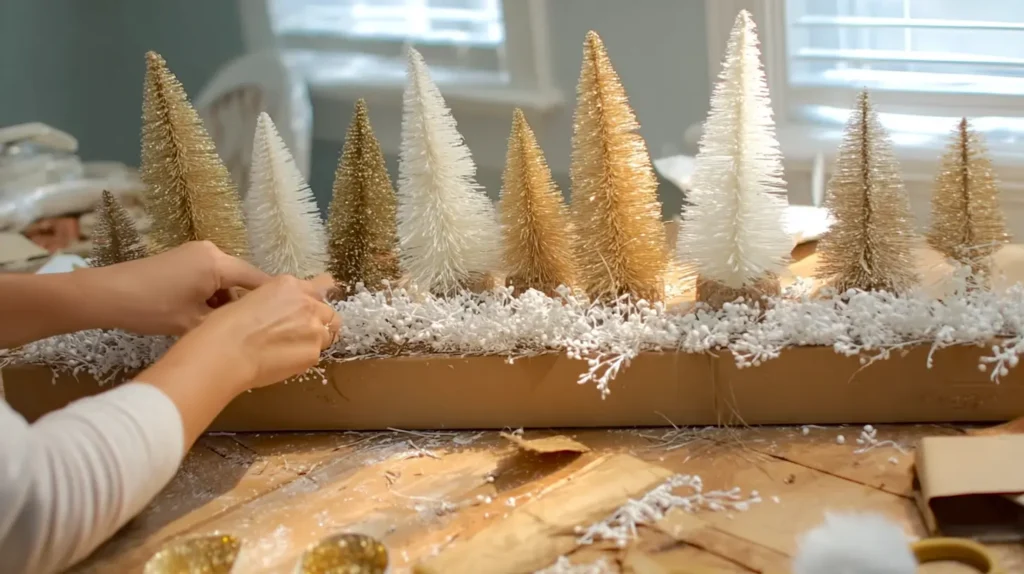
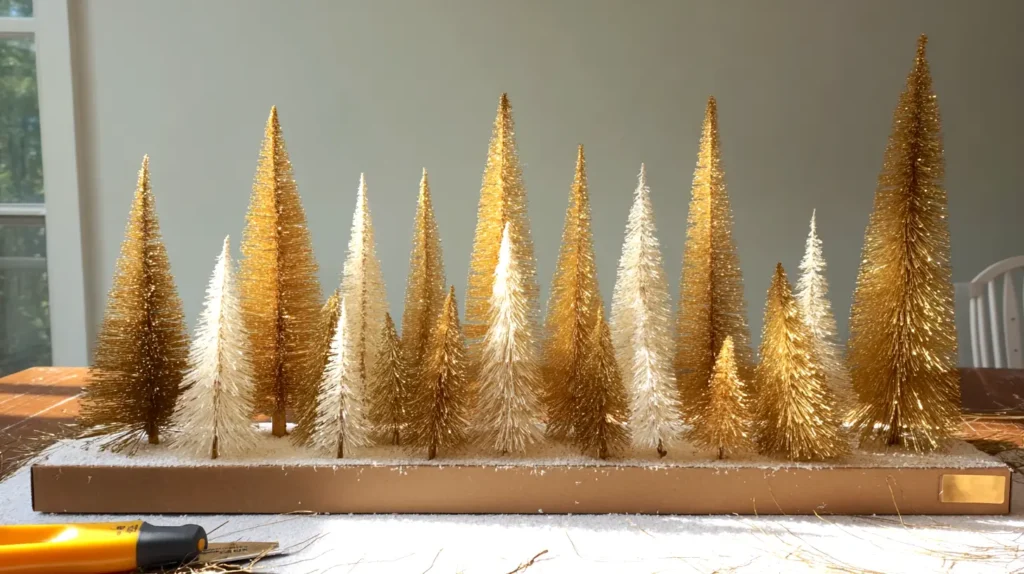
This step is where the Christmas centerpiece comes alive. You’re arranging a forest, not a lineup, so placement matters more than perfection. Bottle brush trees look adorable alone, but when you cluster them tightly, the whole thing levels up. It starts giving designer-dupe energy with almost no effort.
Begin with your tallest trees. They call the shots. They decide the height and direction of the entire forest. Angle them slightly. Never put them in a straight row. You want the layout to feel natural, like a snowy cluster you’d stumble across in a winter village.
Next, weave in the medium trees. These fill the middle layer and soften everything. Place them where they bridge the tall ones together. You’ll see the layout start to look full.
Finish with the smallest trees. These little ones tuck into tight spaces and bring the whole scene together. They add personality without taking over. They’re the secret ingredient for that lush look.
Here’s the Christmas centerpiece formula that always works:
• Tall trees create the shape
• Medium trees fill the middle
• Small trees brighten the empty pockets
• Angled trees feel real
• Tight spacing boosts the luxury vibe
Once the trees feel balanced, glue them down. Hot glue locks everything in place fast. Hold each tree for a few seconds so it doesn’t shift.
Now add the sprigs. These hide the base and make everything look intentional. Dollar Tree sprigs are perfect because they already look frosty. Lay them around the forest edges. Overlap them slightly so the base disappears. The forest starts looking fluffy and rich.
Step back for a moment. This quick pause helps you see if one side looks heavier than the other. Shift a sprig if needed. Nudge a tiny tree. Adjusting now saves you trouble later.
Your forest is almost ready for the best part: the glow.
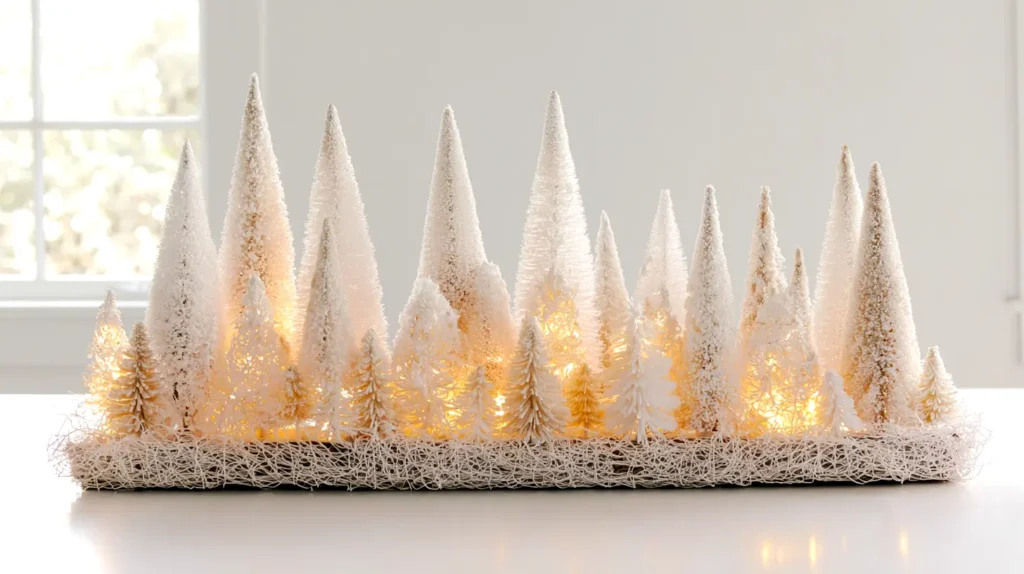
Adding Lights And Snow For That Soft Pottery Barn Glow
This is where the magic happens. Lights turn this forest from cute to breathtaking. Even the simplest bottle brush trees look expensive when they glow. The lights create little pockets of warmth that bounce around the snow and sprigs. It feels dreamy in that quiet holiday way.
Start by weaving the fairy lights through the forest. Move slowly. Tuck some bulbs deeper into the trees so the light glows from the center. Let a few bulbs sit closer to the tips for extra sparkle. Bottle brush trees grab the light beautifully, and warm white bulbs always look the richest.
Try this lighting pattern:
• Wrap lights loosely around a few bases
• Tuck bulbs into the taller trees
• Let some bulbs rest between branches
• Keep spacing soft
• Test the glow after every few placements
If you happen to score any pre-lit Dollar Tree trees, even better. Layering an extra strand of lights makes everything richer.
Now add the snow. This is your moment to make the forest look like a Pottery Barn display that somehow wandered into your house. Use faux snow for sparkle and batting for fluff. Mixing them creates depth, which feels more expensive.
Here’s a layering method that always works:
- Sprinkle faux snow lightly across the base
- Tuck batting into the sprigs
- Add extra snow around the tallest trees
- Let some drift up the sides
- Step back and adjust for balance
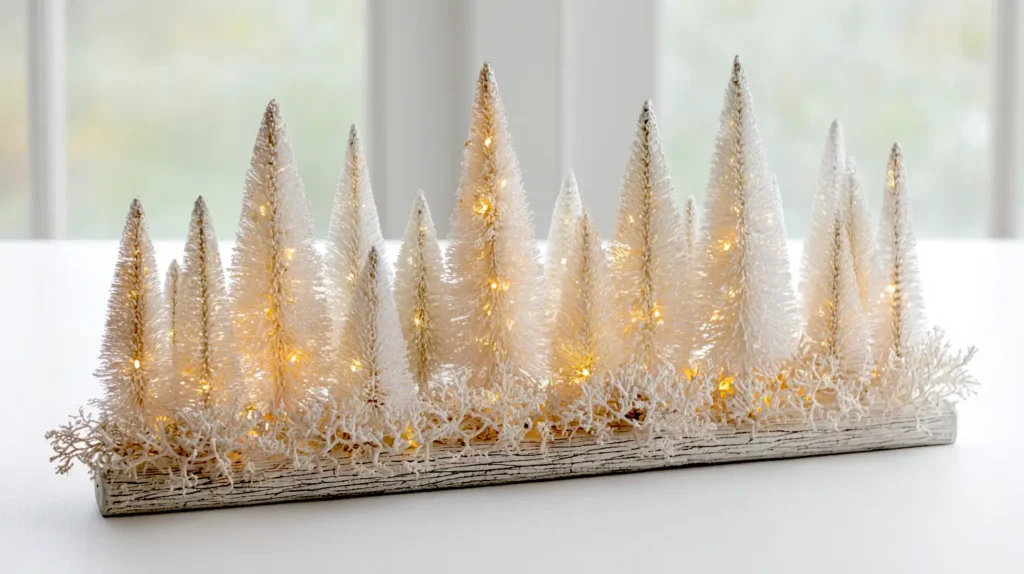
Covering everything with snow makes the display feel full. It hides the glue, the base, and any tiny gaps. The whole scene becomes fluffy, snowy, and impossibly cute.
Turn off the overhead lights. Turn on the fairy lights. The glow hits the snow, and the forest suddenly looks cozy enough for a holiday movie. It has that sweet Pottery Barn shimmer without the price tag.
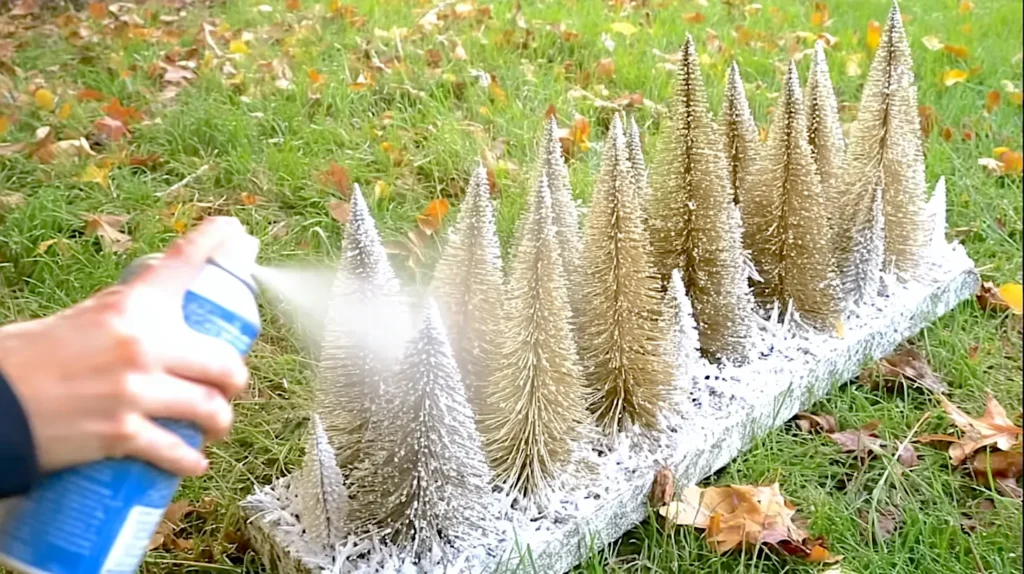
Spraying On That Frosty Snow Coat
I always take the whole centerpiece outside for this part because things get messy fast. The bottle brush trees look cute already, but the faux snow pulls everything together. I’ve found that the snow gives them that frosted, high-end finish without any effort. And it hides the bases so everything blends into a full winter moment.
I hold the can a few inches above the tallest trees and work my way down. Short bursts help me control the coverage. The spray settles into the bristles and gives them a soft, snowy texture that looks handmade in the best way. The trees turn from shiny gold and white into a dreamy mix of cream, frost, and sparkle.
• Short bursts keep the flocking even
• A wider angle makes the trees blend together
• Extra spray along the front edge hides the sprigs
• A second coat adds that Pottery Barn glow
The whole thing transforms right in front of you. Each tree picks up the snow at a different rate, which gives the centerpiece dimension. The warm lights peek through the flocking and make the snow sparkle. It looks expensive, but the cost stays tiny.
I like to rotate the entire piece once so the back gets the same coverage. Even though most people only see the front, the back matters because the glow shines through from every angle. The snow also softens the edges of the sprigs and makes the entire forest look seamless. The moment the snow dries, the piece feels done. And it looks like it came straight out of a holiday catalog.
Styling Your Snowy Forest Around The Home
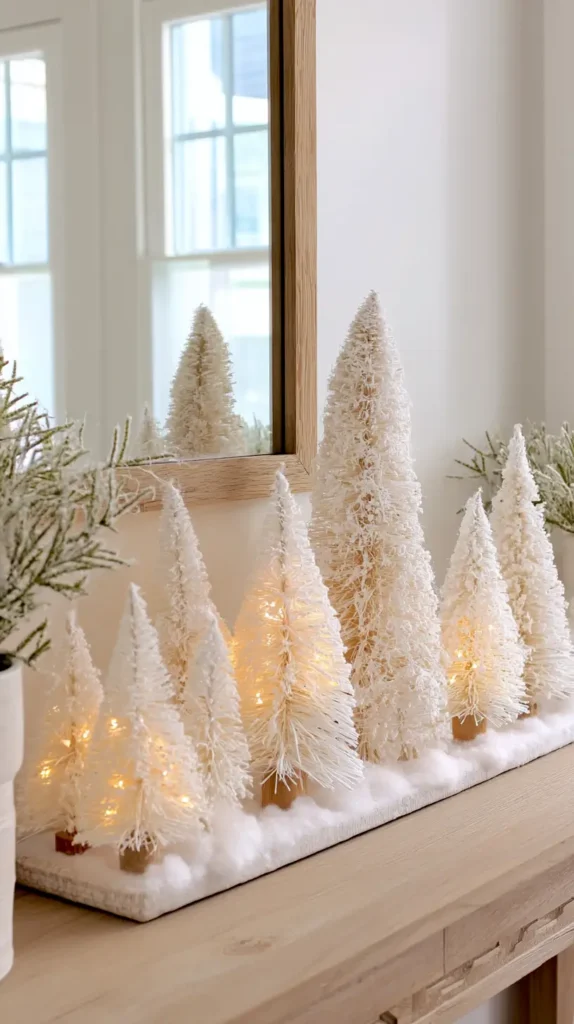
Now that your forest is glowing, it’s time to place it somewhere it can work its magic. This Christmas centerpiece is low enough to fit almost anywhere, and the glow makes every surface feel special. It’s portable, lightweight, and incredibly easy to style.
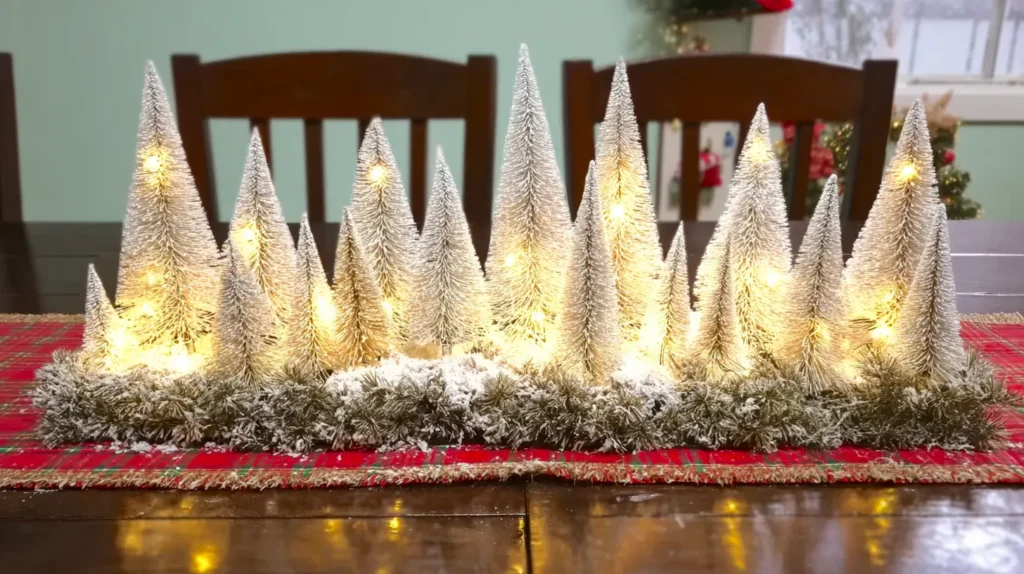
Dining tables are a natural choice. The forest stretches across the middle and adds instant holiday atmosphere. Even the simplest table settings feel more intentional with that soft glow running down the center.
Coffee tables give the forest a cozy, intimate vibe. People see the texture and snow up close. It becomes a conversation starter without even trying.
Here are the best places to style your forest:
• Dining table
• Coffee table
• Entryway table
• Fireplace mantel
• Kitchen island
• TV console
• Bedroom dresser
You can style around it with a few simple touches, but the forest doesn’t need much. It carries the whole mood on its own.
Try these styling combos:
• Add pinecones for a rustic lodge vibe
• Layer a tartan runner beneath it for classic charm
• Place gold candlesticks nearby for warmth
• Set a mirror behind it for double the glow
• Sprinkle small ornaments around the edges
Because the colors stay neutral, this centerpiece blends with any theme. It works with gingerbread décor, traditional décor, minimal décor, or glam décor. The snow keeps everything cohesive.
If you want something that feels rich, warm, and nostalgic without blowing your budget, this little forest delivers. It looks more expensive than it is. It feels like something you’d spot in a holiday window display. And it gives your home that cozy winter glow every time you walk by.
My Last Few Festive Thoughts on Christmas Centerpieces
This Christmas centerpiece proves that simple materials can create a huge impact. I’ve found that projects like this make the season feel more special without asking for a big budget. The glow, the snow, and the tight cluster of trees bring that soft, nostalgic holiday mood that people love.
Living in Orlando means I get sunshine instead of snow. So when I want that frosty winter look, I make it myself. This forest brings that calm, snowy energy into the room without needing actual cold. It glows at night in the prettiest way and adds a peaceful moment to the holiday rush.
It’s also incredibly Pinterest-friendly. The glow photographs beautifully. The snow adds texture. The whole forest feels styled without being fussy. People love saving this idea because it looks luxurious but stays budget-friendly.
What makes it so great is how fast it comes together. The steps feel simple. The materials cost almost nothing. And the finished result feels like something from a designer catalog. You get that warm, layered, cozy holiday feeling without spending more than twenty-four dollars.
This snowy little forest brings joy, charm, and glow into any space. It proves you can create something beautiful with the simplest supplies. And it adds a tiny bit of winter magic to your home, even in the Florida sunshine.