I love a good Christmas craft when the season hits, especially when it saves money without looking cheap. I always notice big ornaments because they look expensive even when they don’t cost much. I’ve noticed that big statement pieces give a room that holiday wow without needing much else. They fill up space, add color, and feel fun and daring. I like that mix during the holidays.
I live in warm Orlando, so I lean on indoor décor a lot because we don’t get the cozy winter weather that sets the mood for us. Oversized ornaments help bring that festive feeling inside. They make my living room feel cheerful without turning it into a crowded store aisle. I want décor that feels collected, not chaotic.
I’ve found that large pieces also give me permission to keep the rest simple. That takes pressure off my holiday budget. And honestly, the holidays bring enough pressure already. I want crafting to lower stress, not add more.
I’ve played with many types of holiday décor through the years, but oversized ornaments keep winning because they sparkle without much effort. They also feel customizable. That makes them perfect for anyone who wants style without spending a full paycheck on decorations.
This guide walks you through making your own oversized ornaments, what materials you need, how to hang them, and how to decorate around them. I keep things simple and affordable. I also keep the tone fun because crafting should feel fun. Let’s make your home shine without draining your wallet.
Some of the links on this site are affiliate links. This means that if you buy something, I might get a small commission at no extra cost to you. You can check out my full disclosure for all the details.
Turning Everyday Items Into Oversized Ornaments
Oversized ornaments might look fancy, yet they start with the simplest materials. I like using lightweight items because they hang safely from almost any hook. Because they’re light, they also move with your air conditioning and give that gentle sway that looks magical. Even so, these pieces feel bold once they’re finished. That contrast feels fun.
I turn basic supplies into stylish décor. You can grab foam balls from the craft store. You can even use beach balls, which always cracks me up because summer gear makes perfect Christmas décor. Beach balls offer size options for almost nothing. And since they inflate, they store easily. That alone saves money and space.
Here are starter bases that work well:
- Foam floral spheres
- Plastic play balls
- Inflatable beach balls
- Large paper lanterns
- Round lampshade forms
Foam spheres give structure. Plastic balls work when you want durability. Paper lanterns give that soft glow when you add twinkle lights nearby. I love options that let me mix looks without raising costs.
You can cover these bases in simple ways. Spray paint gives an instant finish. Acrylic paint works too because it sticks to almost everything. Glitter spray adds shimmer without coating your house in loose glitter. Ribbon creates clean lines. Adhesive gems give that vintage ornament look. String helps create stripes or color blocks.
Because these bases are smooth, your design stays crisp. That’s helpful when you want a luxury look. I love how a little ribbon transforms a basic ball into something gift-worthy. You can even wrap it crosswise like a present. This looks stylish on large ornaments.
These oversized Christmas pieces truly embody the spirit of creative holiday craft savings. You can skip the pricey ornaments at the store. You can make your own standouts in minutes. That feels empowering and festive. And since each one is unique, your décor will look personal and fresh.
Decorating Oversized Ornaments With Budget-Friendly Materials
Large ornaments need big visual features because small details can get lost. I’ve found that strong color, clear stripes, and high contrast work well. Simple designs scale beautifully. Fancy designs often don’t. You don’t need intricate patterns. You only need clarity and boldness.
Because we’re keeping things budget-friendly, you’ll love this list of affordable materials that still look stylish:
- Satin ribbon
- Wrapping paper
- Spray paint
- Acrylic paint pens
- Adhesive pearls
- Adhesive gemstones
- Bakers twine
- Jute rope
- Fabric scraps
- Metallic tape
Wrapping paper might surprise you. It works well when you wrap foam spheres or lanterns. The pattern looks expensive once smoothed out. Plus, the roll covers many ornaments with one purchase, which stretches your budget.
Spray paint gives even coverage. It makes each piece look store-bought. I like metallic finishes because they reflect holiday lights. Acrylic paint pens work when you want stripes or polka dots. Adhesive pearls add a sweet vintage charm. And yes, jute rope gives rustic cottage energy.
Here’s a simple method I love. First, paint your base. Second, add a stripe or two. Third, place a decorative top piece like a plastic cup or small jar lid to mimic the ornament cap. Hot glue works well here. Finally, add ribbon as a hanging loop. The steps stay easy, yet the final look feels polished.
You can personalize these too. Kids love helping add stickers. Adults enjoy creating coordinated sets in different color palettes. And since decorating these pieces requires no special skill, the project always feels achievable. Additionally, this craft gives you instant décor with maximum impact.
Reinventing Oversized Ornaments With Surprising Everyday Fillers
Oversized ornaments look impressive on their own, yet they become even better when the inside does some of the work. I’ve found that stuffing these large pieces with unexpected fillers changes their look in a clever way. Because big ornaments sometimes lose shape over time, using lightweight filler adds structure without adding weight. Even better, these fillers help you customize the ornament’s sound, glow, or balance in ways most people never think about.
You can drop a small handful of jingle bells inside if you want movement to create a faint holiday chime each time the ornament sways. The sound stays subtle, not loud, which makes your décor feel more intentional. Also, the bells help hold the base shape when you use inflatable or hollow forms, which keeps the ornament looking polished through the entire season.
You can add battery-free LED tea lights inside paper lantern ornaments to create a soft inner glow without opening the lantern again. The light reflects inside the curved surface and creates a warm halo that looks expensive even though it costs almost nothing. Additionally, this trick works beautifully near windows because the glow intensifies as the sun sets.
You can even place a small sachet of cinnamon sticks inside foam ornaments. The scent slowly releases and warms the room without overpowering it. This idea gives a holiday sensory layer that people rarely expect from a Christmas craft, which makes your décor feel thoughtful and custom.
You can seal the fillers inside before finishing your design. The ornament stays lightweight, balanced, and structured. And because the fillers require no maintenance, the ornament remains fuss-free all season. These tiny hidden upgrades elevate the look and add personality without raising your budget.
Hanging Oversized Christmas Ornaments Indoors Without Damage
Oversized ornaments look best when they float. They look festive when they hang from ceilings, windows, or doorframes. Luckily, you don’t need nails or complicated tools to hang them. Lightweight materials make them easy to display almost anywhere.
I like starting with simple hardware. Clear command hooks work great. They blend into walls. They remove cleanly. Adhesive ceiling hooks also work in rental spaces. I love that they hold lightweight décor without stressing the surface. And since our ornaments stay light, the weight never becomes an issue.
You can also hang them from curtain rods. This gives height without hardware. Ribbon tied around the rod creates a gentle drape. Additionally, hanging ornaments at staggered lengths looks elegant. It mimics store displays without the store markup.
Here are easy indoor hanging ideas:
- Tie ornaments to a curtain rod
- Hang them above a dining table
- Suspend them in a reading corner
- Place them in stairwell air space
- Line a hallway with floating ornaments
- Hang them over your kitchen island
Air space in the stairwell makes for a dramatic moment. Because oversized pieces fill that tall area, the impact feels huge. You don’t need much else. And the height makes them look intentional.
If you want your displays even easier, you can use tension rods. These fit between walls or inside door frames. No tools needed. You can tie ribbon to the rod and hang ornaments at different lengths. This trick saves time and money.
I love using removable hooks because they allow adjustments all season. You can reposition ornaments to play with spacing. And since our goal is affordability, this method stays cost-effective. You reuse the hooks every year.
Your Christmas craft project becomes functional décor at this point. You’re not simply making pretty items. You’re creating an indoor display that feels expensive, intentional, and balanced. When oversized ornaments float in clusters, the room transforms. That transformation feels holiday-ready without effort.
Crafting Coordinated Christmas Ornament Clusters for Big Impact
Clusters make oversized ornaments look editorial. You’ve probably seen this style in fancy hotels or themed restaurants. The grouping draws the eye. It makes a corner feel complete. And best of all, clustered décor works even when you decorate small areas.
Because we want clarity and intention, I stick with three rules. I keep color palettes limited. I vary sizes slightly. And I space each piece enough to prevent crowding. These three rules create harmony instantly.
For color pairings, here are beautiful sets:
- Gold, ivory, and champagne
- Emerald, navy, and silver
- Red, pink, and gold
- Copper, cream, and forest green
- Pastel blue, pastel pink, and white
You can choose one palette and stick with it. Or you can create two palettes for different rooms. I love options that feel festive but not chaotic.
Once you choose colors, focus on shape and scale. Adding one larger piece to two medium pieces creates balance. And staggering lengths gives movement. You can hang clusters near a window where natural light hits the ornaments. This adds a soft sparkle.
Additionally, ornament clusters make great focal points. They fill empty space above consoles, entry tables, or corner chairs. They also soften darker areas of the room. And because they’re so light, you can move them later without trouble.
Here’s a simple cluster method:
- Pick two or three base sizes
- Paint them in your palette
- Add ribbon stripes or metallic tape
- Tie each one with ribbon loops
- Hang them at three different lengths
- Adjust spacing until it feels right
This Christmas craft method makes it easy to plan your project. It gives your home a custom holiday feel. And since you’re making everything yourself, the cost stays low.
Adding Texture to Oversized Christmas Craft Ornaments for a Designer Look
Texture creates dimension. It turns simple shapes into standout décor. I’ve found that layering textures makes oversized ornaments feel more expensive. You don’t need many materials. You only need contrast and repetition.
Start with your base coat. Once it’s dry, you can layer texture in creative ways. Because these ornaments are large, texture shows up well. That makes simple choices feel intentional.
Here are affordable texturing options:
- Velvet ribbon
- Tinsel garland
- Yarn
- Jute rope
- Puffy paint
- Cotton batting
- Fabric strips
- Glitter tape
- Tissue paper scrunched gently
Velvet ribbon gives a luxe feel. Jute rope gives rustic charm. Yarn wraps make soft winter looks. Puffy paint creates raised designs. Cotton batting gives a snow-like finish. Additionally, you can mix two textures for a custom style.
I love the tissue paper trick. You dab glue, press tissue paper lightly, and paint over it. The wrinkles create depth. It dries fast and looks boutique-worthy.
You can also wrap sections of the ornament. Wrap the middle for a belt effect. Wrap the top third for a dipped-décor feel. And wrap the bottom for weight and contrast. These wraps create natural breaks for color.
Glitter tape is a great way to add a little sparkle. It sticks cleanly, doesn’t shed, and outlines patterns. And since glitter tape lasts, you can reuse it next year.
Because texture adds personality, this step helps you create pieces that feel custom. They look far more expensive than the materials used. That supports the budget-friendly mission perfectly.
Your Christmas craft becomes a chance to explore textures in a fun way. You can try one ornament first. Then build a small collection. The results look polished, cohesive, and festive. And they pair well with the clusters you created earlier.
Turning Oversized Ornaments Into Statement Centerpieces
Oversized ornaments don’t need to hang. They look beautiful sitting on tabletops too. You can place them in bowls, trays, baskets, or on cake stands. I’ve found that tabletop displays add charm to rooms that need quiet touches rather than height.
Because we’re working with large shapes, the presentation matters. You want them visible but not overpowering. That balance creates a collected look.
Here are quick centerpiece ideas:
- A trio of large ornaments in a shallow bowl
- Two ornaments on a cake stand with greenery
- One large ornament next to candles
- A cluster in a woven basket
- A pair of ornaments near a framed holiday print
You can put them on an entry table, tuck them into your bookshelf, or put them next to a pile of wrapped gifts. These ideas look intentional and cozy.
Additionally, you can add fairy lights. They bounce off shiny ornament surfaces and create warm reflections. You can also add greenery. Simple clippings from artificial garlands soften the shapes.
Since centerpiece displays use fewer pieces, they cost even less. And they don’t require special tools. They simply require placement. I love how effortless this feels.
You can coordinate these displays with your hanging ornaments. Matching palettes tie the room together. And since oversized ornaments dominate visually, they make your décor feel abundant without needing many items.
Your Christmas craft transforms from a project into a room design element here. You’re creating décor that fills space thoughtfully. Choosing simple arrangements that feel expressive. You’re keeping things budget-conscious while still feeling stylish.
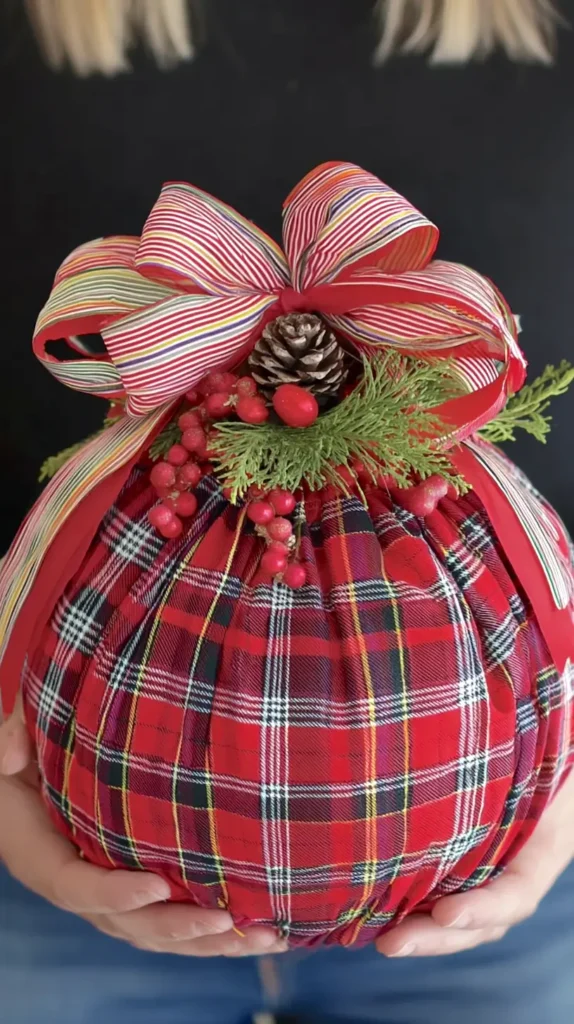
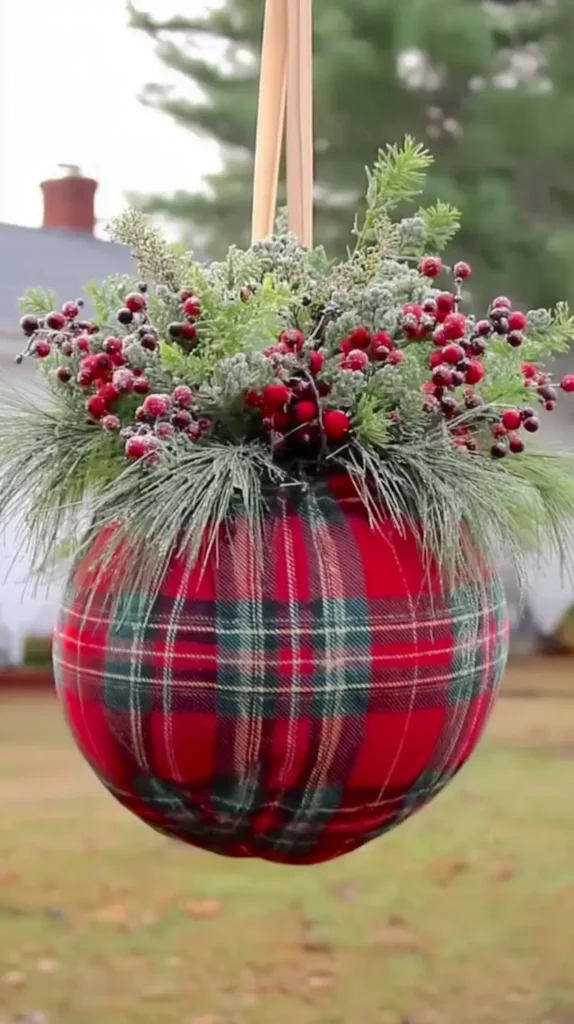
How To Make Plaid Oversized Ornament Spheres
These plaid ornaments look expensive, yet they start with the most budget-friendly supplies. I like using large plastic play balls or lightweight foam spheres because they give that full shape without adding weight. You can wrap them tight without wrinkles, and they hang beautifully without stressing hooks.
Start by choosing a soft plaid fabric you love. Cut one large square that fully wraps the ball with extra room at the top. Pull the fabric up and around the ball like you’re wrapping a giant piece of candy. Keep smoothing the fabric as you go. Tug gently to remove any loose folds. Because the fabric has stretch, it’ll form a clean, rounded shape with a polished finish.
Gather the excess fabric at the top and secure it with a strong rubber band or zip tie. It stays hidden later under ribbon and greenery, so don’t worry about perfection. Trim the extra fabric if needed.
Add faux pine stems, berry picks, small pinecones, or anything that gives a winter feel. Hot glue the stems right above the gathered fabric. Then tie a big, beautiful ribbon over everything. The bow hides the mechanics and makes the ornament look intentional.
Finish with a hanging loop made from wired ribbon or jute rope. The loop helps the ornament hang straight instead of tipping forward. Once displayed, the plaid pattern catches the light and makes the whole piece look custom and cozy.
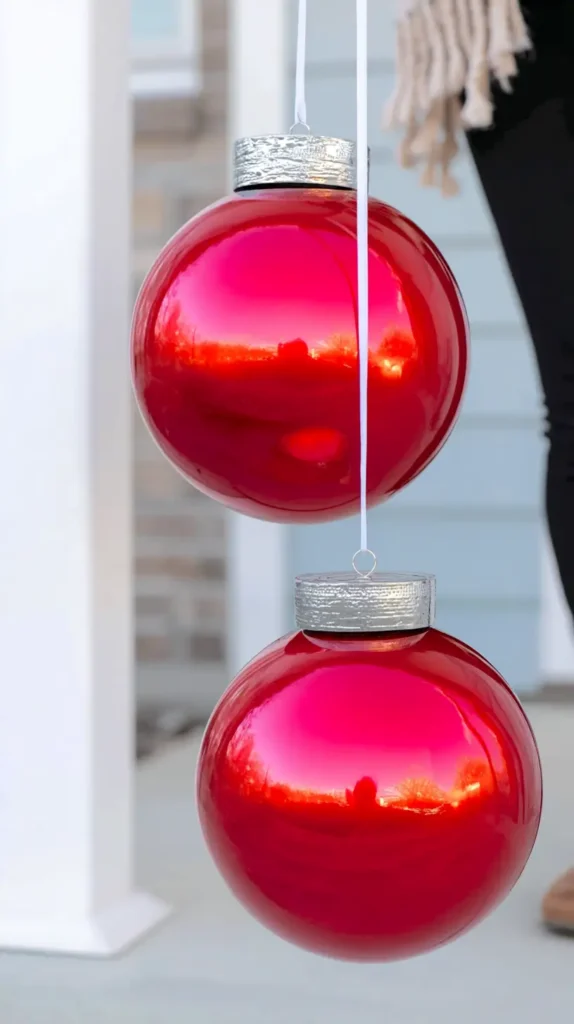
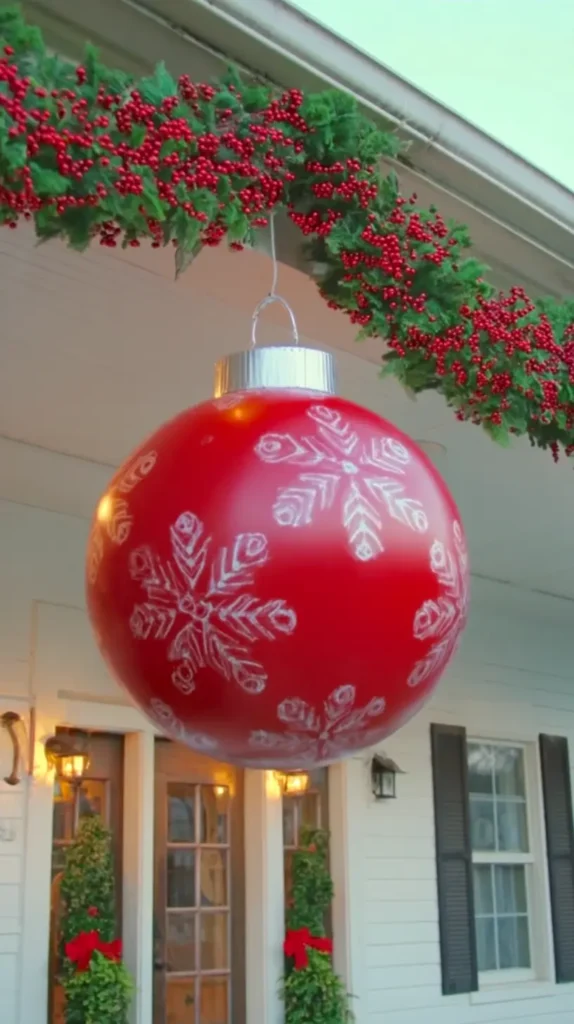
How To Make Giant Outdoor Porch Ornament Balls
These porch ornaments look bold and dramatic, but the base is unbelievably simple. You start with a plastic light-up holiday ball or even a beach ball. The goal is smoothness and shine, so choose a base shape that won’t warp. Because these hang outside, durability matters.
Spray the ball with glossy red outdoor-safe spray paint. Rotate it slowly as you spray to avoid drips. A glossy finish makes it instantly look store-bought. Once the paint dries, add gold or white stripes using painter’s tape and spray or acrylic paint. Simple patterns scale the best because oversized ornaments need clarity.
For the top, flip a small metal bucket, round food container, or floral tin upside down. Paint it silver, then glue it to the top of the ball. This piece becomes the “ornament cap,” and it tricks the eye in the best way.
Attach a thick ribbon or rope through a drilled hole in the cap or glue it securely along the inside edge. Because these ornaments hang from porch beams, use a sturdy hook that can support movement from wind.
Hang it at eye level or slightly above. The clean lines and shine make your porch look decorated with almost no effort. And since the materials are weather-friendly, the ornament lasts the entire season without sagging or fading.
How To Make Glossy Pink Oversized Ornaments
These glossy pink ornaments look sleek, modern, and bright. The trick is starting with smooth round plastic balls, like lawn play balls or inflatable toy balls. They’re cheap, light, and hold spray paint beautifully.
Give the ball two coats of glossy spray paint in your favorite shade of pink. Rotate the ball during painting for an even finish. The shiny surface gives that candy-coat look that feels playful and bold.
For the ornament cap, use a disposable aluminum baking pan or a small metal bowl. Cut a hole in the center if you want a centered ribbon hanger. If not, glue the ribbon to the inside rim and let it drape cleanly. Spray the cap with metallic silver paint for a chic finish.
Attach the cap to the ball using strong adhesive or hot glue. Press firmly until it bonds. Then tie on a long satin ribbon for hanging. Glossy ornaments look best when they hang low, because the light catches the curves.
Hang them from a porch light, entry beam, or indoor staircase. They give instant holiday cheer and look expensive even though they cost a few dollars to make.
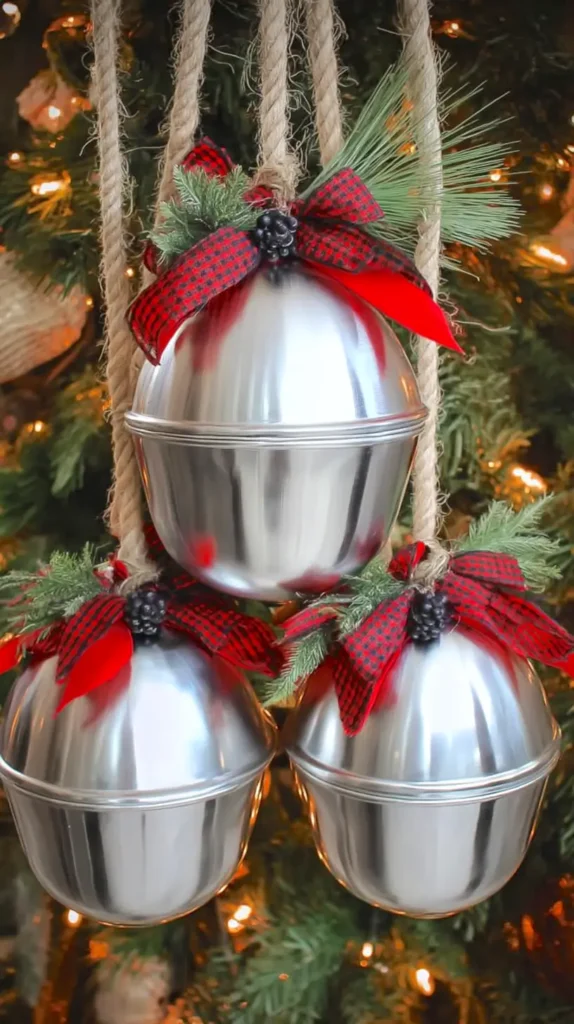
How To Make DIY Oversized Metal Bell Ornaments
These adorable bells are secretly made from mixing bowls. That’s the fun of budget crafts—they always surprise people. Choose lightweight metal or aluminum bowls with a smooth finish. Two bowls create one bell.
Place the bowls rim to rim and glue them together. A bead of hot glue around the edge keeps them secure. Once connected, spray them in a silver or champagne tone. The paint brings everything together and hides the seam.
Drill or punch a small hole in the top to thread jute rope or thick ribbon. If drilling isn’t an option, glue the rope to the top and cover the glue with decorative bows.
Add a faux pine pick at the top. Tuck in berries, a small pinecone, or a touch of sparkle. A festive bow finishes the look and makes the bell feel intentional rather than homemade.
To mimic a real bell clapper, tuck a small ornament inside before closing the bowls. It doesn’t need to touch the sides. It’s purely decorative, but it gives the bell a nice weight.
Hang your new bell ornaments in pairs. Bells always look best when grouped. They add instant drama to trees, mantels, and staircases.
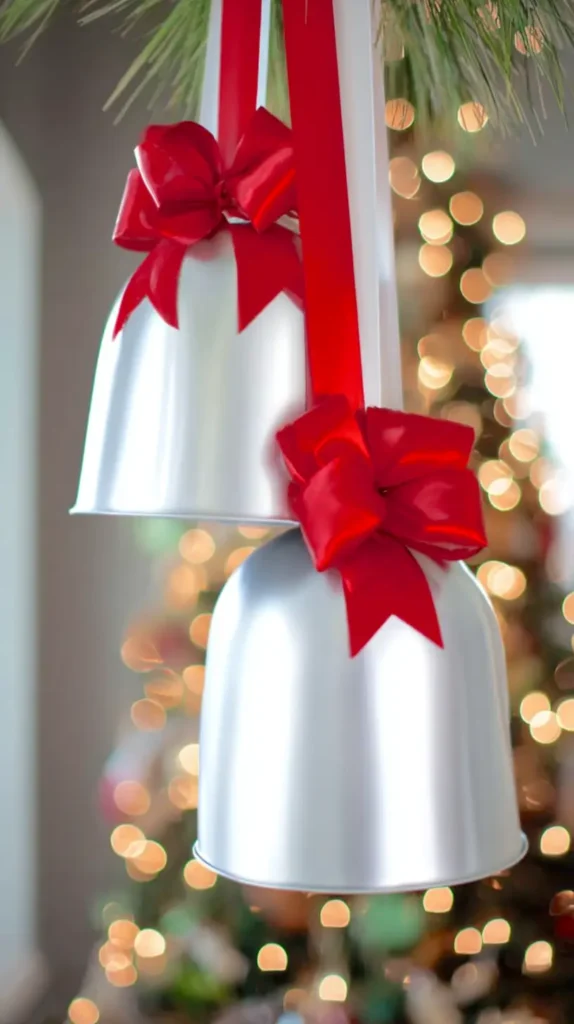
How To Make Sleek Satin Silver Bell Ornaments
This version uses smooth plastic planters or large cups instead of metal bowls. The sleeker shape creates a more elegant bell. Choose a planter with a wide base. Once flipped upside down, it becomes the perfect bell silhouette.
Spray the planter with satin silver or champagne metallic paint. Satin finishes hide imperfections better than high gloss and look soft under Christmas lights.
Thread wide red ribbon through a hole at the top or glue it on securely. A long ribbon tail helps the bell hang straight. Add a statement bow near the top. Bold ribbon balances the clean metallic finish and keeps the bell from looking too minimal.
Glue faux greenery near the bow for added texture. Tiny ornaments or jingle bells can hang beneath for a little movement, though they’re optional.
These bells are lightweight, so they work beautifully on indoor hooks, curtain rods, or doorknobs. They also fill corners of a room with height and shine without needing many pieces.
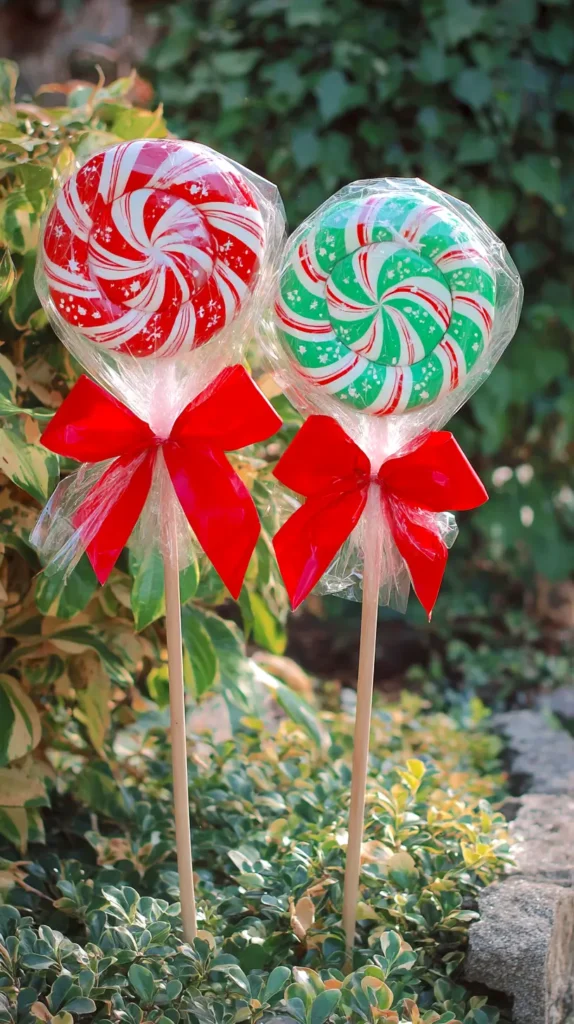
How To Make Oversized Paper-Plate Lollipops
These candy-style lollipops are made from everyday paper plates. That’s the joy of them—they’re simple but look whimsical and bold.
Start with two large round paper plates. Paint bold peppermint swirls using acrylic paint. Red, green, or even pastel shades look great. Let them dry fully.
Glue the plates back to back so the design shows from both sides. Insert a wooden dowel between them before gluing. The dowel becomes the “stick,” so make sure it’s long enough to plant in the ground or display in a pot.
Once everything is set, wrap the entire circle in clear cellophane. Pull it tight like a giant candy wrapper. Gather the bottom around the stick and tie it with a bright ribbon.
The shine from the cellophane makes the lollipop look like store décor. These stand out in yard displays, porch planters, or indoor candy-themed setups.
How To Make Plaid Fabric Wrapped Ball Ornaments
These are perfect when you want soft, cozy, fabric-based ornaments. Start with lightweight plastic balls or thin playground balls. Cut large squares of plaid fabric. The fabric should be big enough to wrap the ball fully.
Place the ball in the center of the fabric square. Pull the fabric up and around tightly. Keep smoothing and adjusting as you gather the fabric at the top. Secure the gather with string, a zip tie, or a rubber band.
Trim excess fabric and hide the gather under a statement bow. Add pine sprigs, berries, and a pinecone. Hot glue everything in place so the top looks full and lush.
Finish with a ribbon loop for hanging. These ornaments look amazing indoors because fabric absorbs light and adds warmth.
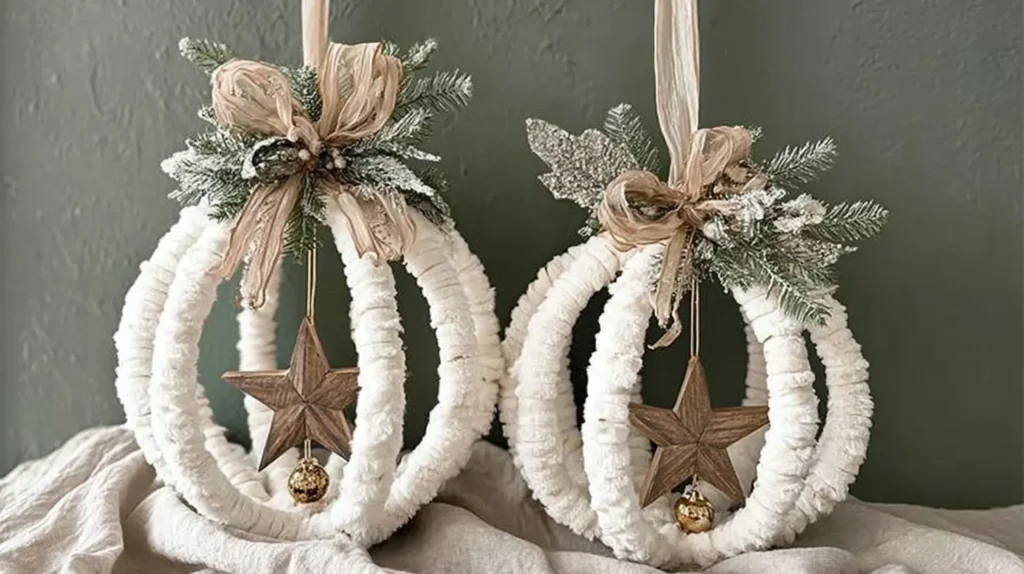
How To Make Textured Loop-Frame Oversized Ornaments
These soft white ornaments use thick chenille-style yarn wrapped around large hoops. That’s why they look fluffy and sculptural. Start with two or three embroidery hoops or foam rings. Wrap each hoop tightly with chenille yarn until fully covered. The texture is what makes this project special.
Once wrapped, arrange the hoops to create an open spherical shape. Hot glue or zip-tie them where they cross. The more hoops you use, the fuller the shape becomes.
Add a wooden or corrugated cardboard star hanging from the center. Tie it with jute or twine so it dangles freely. It creates the perfect focal point.
Decorate the top with frosted evergreen stems, silver ribbon, champagne ornaments, and soft metallic picks. The neutral palette keeps everything elegant and modern.
These ornaments sit beautifully on mantels or entry tables, and they also hang well if you add a ribbon loop. Because the structure is open, they feel airy and high-end.
Final Festive Christmas Craft Thoughts
I love how oversized ornaments let me decorate boldly without buying a full cart of holiday décor. They feel festive, lighthearted, and cozy all at once. I’ve found that these pieces also remove the pressure to decorate every corner. One big statement goes a long way. That alone keeps my budget steady during a season that often asks for too much spending.
I also enjoy the freedom to change colors each year because the materials cost so little. You can make a new set whenever your style shifts. You can also mix and match pieces from past seasons. Each ornament tells a tiny story through its texture or color. The variety keeps my home cheerful without feeling cluttered.
Living in Orlando means I decorate indoors more than outdoors. These big decorations help me bring the feeling of winter inside even when it’s still warm outside. They shine in indoor lights, float over cozy seating areas, and make corners that are usually quiet look taller. I love how playful they feel in a space that needs a little seasonal charm.
Because these oversized designs work well in clusters, centerpieces, and hanging displays, they fill your home with layers of holiday joy. And since everything is affordable, the project never feels stressful. You get beauty without guilt.
This Christmas craft approach also fits beautifully with how I use Pinterest for holiday planning. I pin ideas for color palettes, ribbon styles, and texture inspiration. Those pins help me create ornaments that feel fresh each season. Crafting becomes a relaxing ritual rather than a chore.
I hope you enjoy creating your own oversized ornaments.