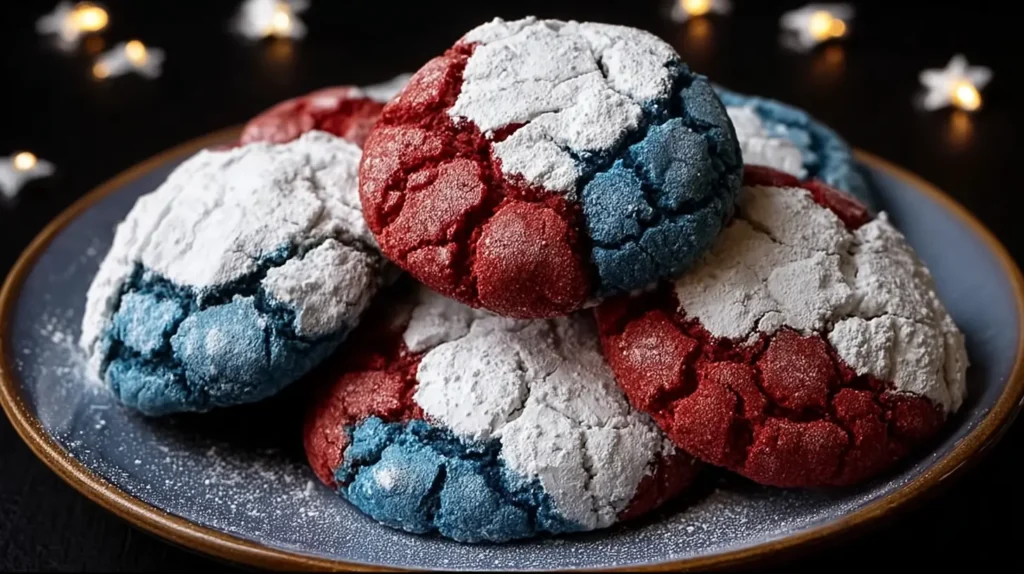
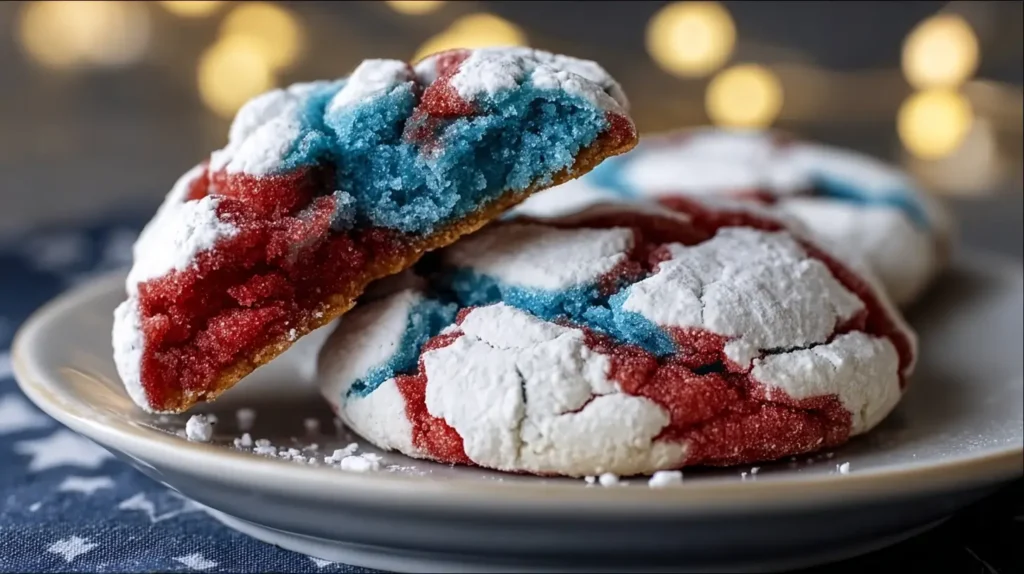
When I think of fun and festive treats, crinkle cookies always come to mind. They’re soft, sweet, and coated in powdered sugar. For this recipe, I’m giving them a red, white, and blue twist. These patriotic crinkle cookies are perfect for the Fourth of July, Memorial Day, or any summer barbecue.
They’re easy to make, too. You don’t need fancy ingredients or baking skills to pull them off. If you can stir a spoon and roll dough into a ball, you’re already ahead. The colors are bright, the texture is chewy, and the whole process is actually pretty fun.
I’m going to walk you through everything step-by-step. You’ll get the full recipe, tips that actually help, and even ideas for storing or gifting them. I’ll also share how I get the bold colors without turning the cookies into little rocks. It’s all about balance—and a few small tricks make a big difference.
This isn’t just about a cute cookie. It’s about making something that stands out on the dessert table. Something that says “yes, I made those,” without being a huge time commitment. These are a great make-ahead option, and they freeze well, too.
You’ll find helpful notes for each step. I made sure the instructions are simple, especially if you’re baking with kids. If you like straightforward recipes with a fun twist, you’re going to love this one.
Let’s get into how to make patriotic crinkle cookies that actually taste good, look cute, and don’t take all day.
You’re going to want to make a double batch. Maybe even hide a few before the crowd shows up.
This site includes affiliate links; please take a look at the disclosure for more details.
Budget-Friendly Crinkle Cookies
You don’t have to spend a lot to make something that looks this good. That’s one of my favorite parts about these red, white, and blue crinkle cookies. They’re festive, but they don’t break the bank. You’re using basic pantry ingredients, which means you can skip a long grocery list.
Most of what you need is already in the kitchen:
- Flour, sugar, and baking powder are all standard staples.
- Oil is cheaper than butter and still makes them soft.
- Eggs and vanilla go a long way in flavor.
- Food coloring gels last a long time and work in other recipes too.
Instead of buying specialty desserts from the store, you can make two dozen cookies with ingredients that cost just a few dollars. Even the powdered sugar can be bought in bulk for savings.
Here are a few budget-saving tips:
- Watch for holiday baking sales on food coloring and flour.
- Skip the fancy sprinkles and let the colors shine on their own.
- Store extras in the freezer so nothing goes to waste.
- Make a double batch to stretch your effort across multiple events.
This is also a smart recipe for large gatherings. You get a big visual impact with a small investment. If you’re bringing these to a party or picnic, they’ll stand out without costing much. People will assume you bought them at a bakery—and you won’t be stuck with leftover ingredients you can’t reuse.
Crinkle cookies are a perfect example of how to keep things fun and festive without overspending. Simple, bright, and budget-friendly wins every time.
Ingredients And Tools You’ll Need
Before anything else, let’s round up what you’ll need. Don’t worry—most of this is probably already in your kitchen. The rest is easy to grab at any grocery store.
Here’s what to pull out:
- 2 cups of all-purpose flour
- 1 cup of granulated sugar
- ½ cup of powdered sugar (for coating)
- ½ cup of vegetable oil
- 2 eggs
- 1½ teaspoons baking powder
- ½ teaspoon salt
- 1½ teaspoons vanilla extract
- Red food coloring gel
- Blue food coloring gel
You’ll also need a few tools:
- Two medium mixing bowls
- One small bowl for the powdered sugar
- A hand or stand mixer (optional but helpful)
- Measuring cups and spoons
- Two baking sheets
- Parchment paper
- A spoon or cookie scoop
I suggest using gel food coloring. It gives you bold colors without adding too much liquid to your dough. The regular liquid drops will work, but the colors won’t be as vibrant. I’ve tried both, and the gel is just easier for red and blue.
One more thing—don’t skip the powdered sugar coating. That’s what gives crinkle cookies their signature look. It also adds a little extra sweetness and texture.
You don’t need a cookie cutter or anything fancy. Just simple tools and a little prep. If your kids want to help, let them roll the dough balls. It gets messy, but in a good way.
Now that you’ve got everything, we can move on to the good stuff: making the dough and baking these patriotic treats.
How To Make Red, White, And Blue Crinkle Cookies
Making the dough is pretty simple. We’ll make one basic dough, then split it to color it. After that, we’ll chill it, roll it, and bake.
Here’s how to do it:
- Start by mixing the oil and sugar in a medium bowl.
- Add the eggs and vanilla extract. Mix until smooth.
- In another bowl, combine the flour, baking powder, and salt.
- Slowly stir the dry ingredients into the wet mixture.
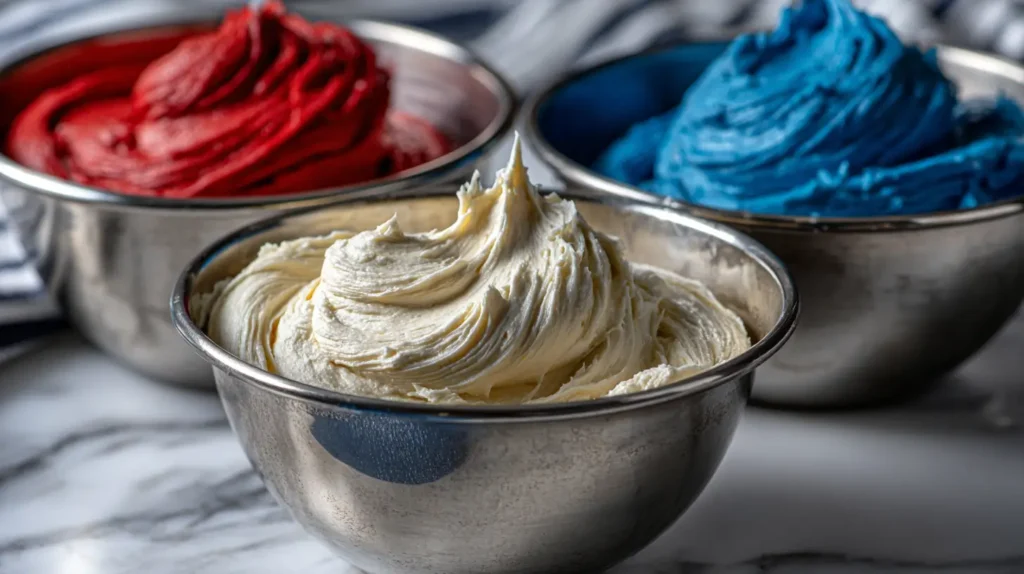
Once you’ve got your dough, divide it into two bowls. Leave one plain (this will be your white). Add red food coloring to one bowl and blue to the other. Mix each one until the color is even.
Now cover all three bowls with plastic wrap and chill them for at least 1 hour. This helps the dough firm up and makes it easier to roll.
When you’re ready to bake:
- Preheat your oven to 350°F.
- Line your baking sheets with parchment paper.
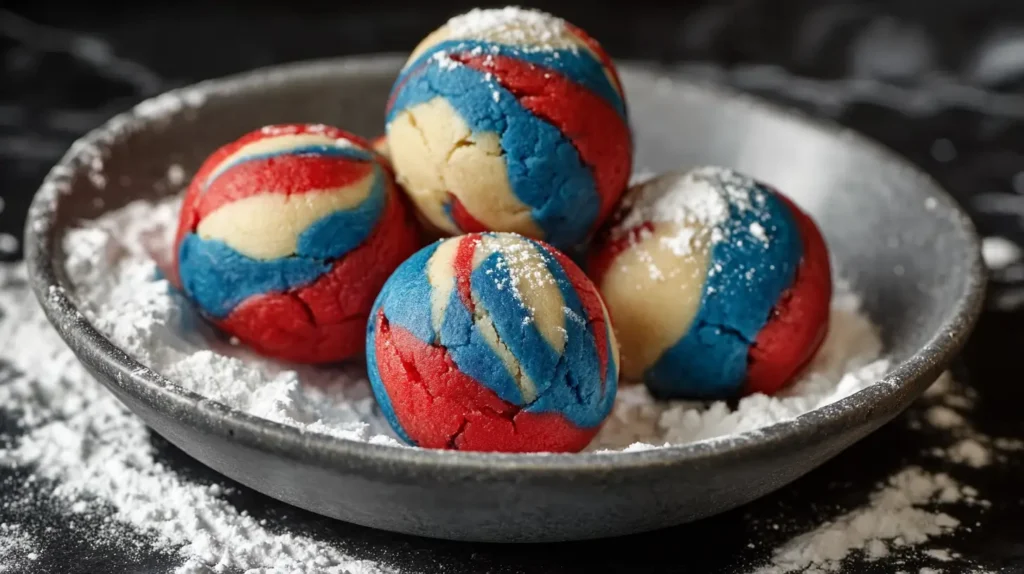
- Roll the dough into small balls, about 1 inch in size.
- Roll each ball in powdered sugar until fully coated.
- Place on baking sheet, leaving room to spread.
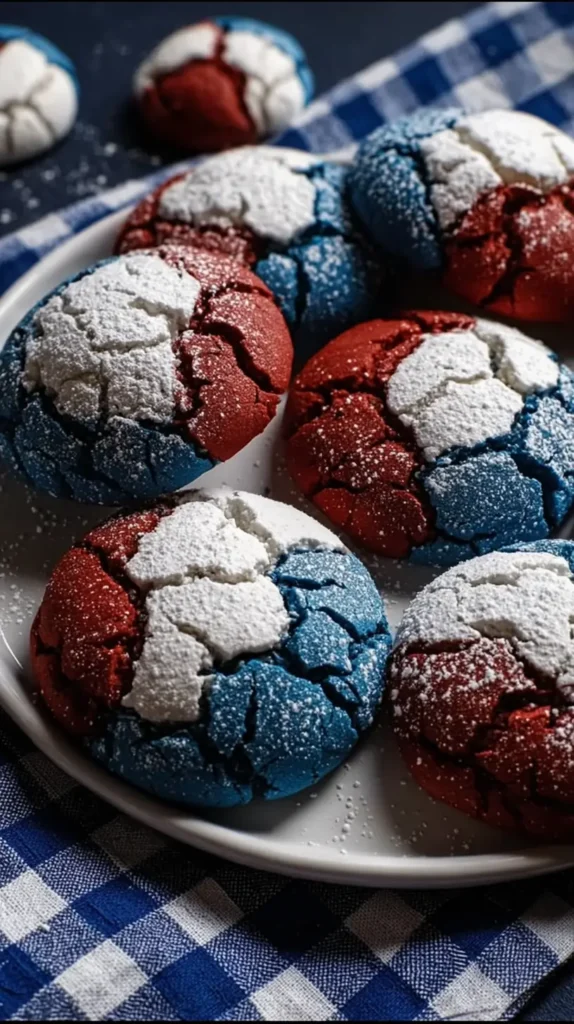
Bake for 10–12 minutes. The cookies should be soft in the center but set around the edges.
Let them cool on the baking sheet for a few minutes. Then move them to a rack to cool completely.
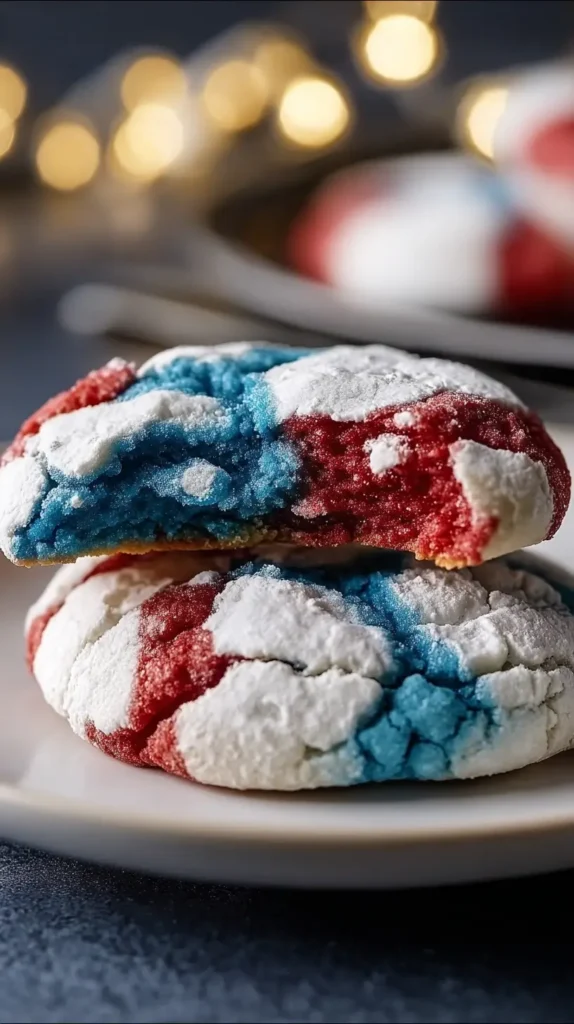
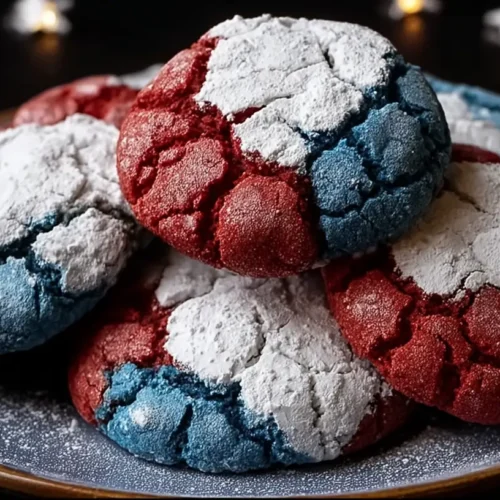
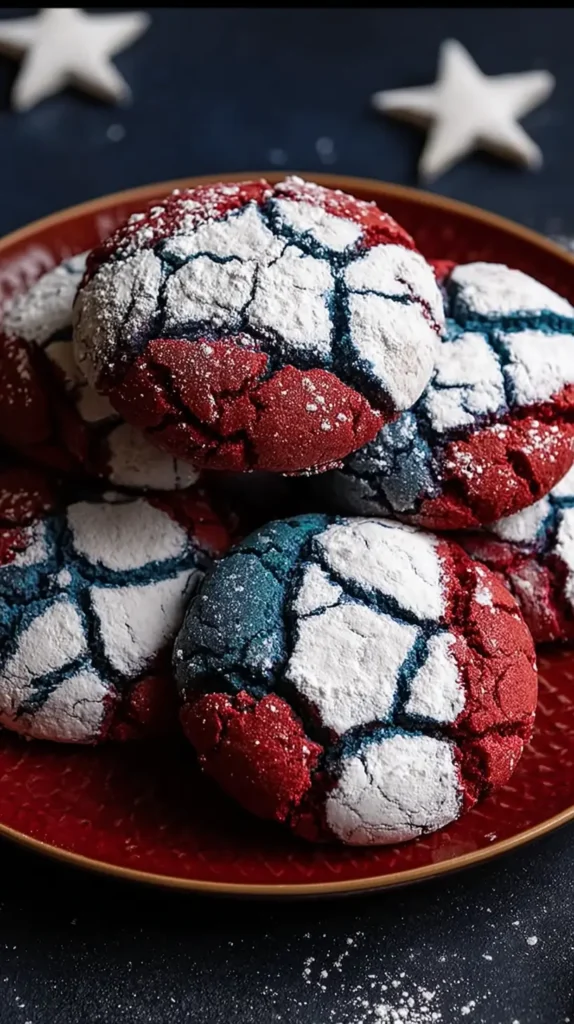
You’ll get a nice batch of red, white, and blue crinkle cookies. They’ll look like little puffs of sugar, and they’ll taste sweet, chewy, and just a little crisp on the edges.
Tips For Getting Bright, Even Colors Without Overmixing
Coloring cookie dough can be tricky. You want bold colors without making the dough tough. It’s a fine line, but it’s doable.
Here’s what works best for me:
- Use gel food coloring, not liquid.
- Add color before chilling. It’s easier to mix that way.
- Don’t overmix. Stir just until the color looks even.
- Use a spoon or spatula instead of a mixer for this part.
If you’re not getting the color you want, try adding a bit more gel. But go slow. A little goes a long way.
Want a fun twist? You can swirl the red, white, and blue dough together. Don’t fully mix them—just press bits of each together when rolling. You’ll get a marbled look that’s just as festive.
Here are a few more color tips:
- Red tends to bake lighter, so go a little darker before baking.
- Blue holds its color better, but still aim for bold.
- The powdered sugar helps make the colors pop once they spread.
If you’re nervous, test a few cookies first. Bake one or two of each color and see how they look. Then adjust if needed.
You’re not looking for perfection. The slight cracks and uneven patches are what make crinkle cookies so charming. They’re rustic, not polished.
And once you add the powdered sugar, any flaws kind of disappear.
How To Store Crinkle Cookies And Keep Them Soft
These cookies store well, but there are a few tricks to keeping them soft and chewy. If you’re making them ahead of time, this will help a lot.
Here’s how I like to store mine:
- Let them cool completely before storing.
- Use an airtight container.
- Add a piece of white bread to the container. It helps keep the cookies soft.
- Store at room temperature for up to 5 days.
Want to freeze them? That works too.
To freeze baked crinkle cookies:
- Let them cool all the way.
- Place in a single layer on a baking sheet.
- Freeze for 1 hour.
- Transfer to a freezer bag or airtight container.
They’ll last about 2 months in the freezer. When you want one, just let it sit at room temperature for 15 minutes or so. You can warm them in the microwave for a few seconds, too.
You can also freeze the dough. Roll the balls and coat them in powdered sugar first. Freeze them on a tray, then move them to a bag. Bake straight from the freezer—just add 1 extra minute.
These patriotic crinkle cookies are a great make-ahead dessert for summer parties. They travel well and look great on a platter.
Even better? You don’t have to make them the day of your event. One less thing to stress about.
Creative Ways To Serve And Share Crinkle Cookies
Now that you’ve baked them, how do you serve them in a fun way? Here are some ideas that are easy and cute.
For a party table:
- Place them in a clear glass jar or wide bowl.
- Add mini American flags on toothpicks.
- Stack them in red and blue napkins for a festive pop.
For gifting:
- Use small treat bags with a twist tie or ribbon.
- Add a label with the name and date.
- Include a little “Keep in airtight container” note.
You can also make cookie platters:
- Mix these with other red, white, and blue treats.
- Add strawberries, blueberries, and mini marshmallows.
- Use a big white tray for the best contrast.
Want to get the kids involved?
- Let them roll the dough balls.
- Have them make name tags for cookie bags.
- Give them the job of setting up the cookie tray.
Cookies also make fun party favors. Bag a few together and hand them out at the end of the party.
These crinkle cookies are so cheerful, they really don’t need much. But a cute display can make a big impact. Especially when people are snapping pics for Pinterest or texting photos to friends.
You made them look good, so let them shine.
Red, White, and Blue Crinkle Cookies
Ingredients
- 2 cups all-purpose flour
- 1 cup granulated sugar
- ½ cup powdered sugar for coating
- ½ cup vegetable oil
- 2 large eggs
- 1½ teaspoons baking powder
- ½ teaspoon salt
- 1½ teaspoons vanilla extract
- Red gel food coloring
- Blue gel food coloring
Instructions
- In a medium mixing bowl, whisk together the vegetable oil and granulated sugar until smooth.
- Add the eggs and vanilla extract, and mix until fully combined.
- In a separate bowl, stir together the flour, baking powder, and salt.
- Gradually add the dry ingredients to the wet ingredients, stirring until a thick dough forms.
- Divide the dough evenly into three bowls.
- Leave one bowl plain for the white dough.
- Add red food coloring gel to one bowl and blue food coloring gel to the other.
- Stir each colored dough until the color is evenly distributed.
- Cover all three bowls with plastic wrap and chill in the fridge for 1 hour.
- Preheat your oven to 350°F.
- Line two baking sheets with parchment paper.
- Scoop 1-inch portions of dough and roll into balls.
- For marbled cookies, press a bit of each color together before rolling.
- Roll each dough ball generously in powdered sugar.
- Place cookies on the baking sheets, leaving space between each one.
- Bake for 10–12 minutes, or until the edges are set and the tops are crackled.
- Let cookies cool on the baking sheet for 2–3 minutes.
- Transfer to a wire rack to cool completely.
- Store in an airtight container at room temperature for up to 5 days.
Final Thoughts On Red, White, And Blue Crinkle Cookies
There’s something special about crinkle cookies. They’re easy to make, but they look like you spent hours on them. That’s a win in my book.
We walked through everything you need:
- Full list of simple ingredients
- Step-by-step directions for the dough
- Tips for coloring without ruining the texture
- Storage tricks to keep them soft
- Creative ways to serve and gift them
They’re chewy, sweet, and full of personality. The powdered sugar gives them their classic look. The colors make them perfect for holidays like the Fourth of July or Memorial Day.
You don’t need to be a baking pro to pull this off. These patriotic crinkle cookies are beginner-friendly, crowd-pleasing, and full of charm.
The best part is how easily you can double the batch. You’ll want extras once everyone starts asking for more. They freeze well, travel well, and brighten up any party table.
If you’re planning a Pinterest-worthy party spread, these cookies are an easy yes. They’re just enough effort to impress but simple enough for a weeknight bake. Add them to your list of go-to holiday desserts.
Now you’ve got a solid recipe that’s festive, fun, and full of color. I hope it becomes one you reach for every summer.
And if you try them once, you’ll probably come back to this again next year. Maybe sooner.
Let me know what other treats you want to see next. I love sharing easy wins like this one.