I love when Halloween sneaks up and suddenly everyone’s front porch looks like a Pinterest board exploded. Pumpkins everywhere, cobwebs on every bush, and lights glowing in colors that make you want to grab a sweater. With five kids, I’ve learned the best Halloween projects are the ones that don’t break the bank but still wow. The thing is, Halloween decorating can get expensive if you let it. I’ve found that DIY Halloween decorations are the sweet spot. They let you create something stylish and festive without feeling like your wallet is under attack.
You don’t need a massive budget or a craft store shopping spree to pull it off. Most of the best ideas start with things you already have around your house. A little spray paint, a hot glue gun, and some creativity can go a very long way. Honestly, it’s half the fun to take something plain and twist it into something spooky.
I’m all about the kind of decorations that look high-end but cost next to nothing. You know that feeling when someone asks where you bought something, and you get to casually say, “Oh, I made it”? That’s the good stuff.
Inside, I’m going to share a mix of ideas for your home, yard, and porch. Some are quick little touches. Others take an afternoon, but nothing here will overwhelm you. I’ll throw in ways to use dollar store finds, repurpose old items, and even give your everyday decor a temporary costume.
If you’ve ever wanted your house to feel festive without being over the top, this is for you. Think chic, moody, playful, but not tacky. We’re skipping the inflatable ghosts and going for things that feel more personal, creative, and even a little clever.
By the end, you’ll have a bunch of ideas you can pull off in an afternoon, spend very little money, and still make your home look like you planned it weeks in advance.
Some of the links on this site are affiliate links, which just means I may earn a small commission (at no extra cost to you) if you make a purchase. You can check out my full disclosure for all the details.
Moody DIY Halloween Porch Decorations
When it comes to curb appeal, the porch is where you set the scene. You don’t need a giant budget to pull off something dramatic. The trick is layering. Instead of buying one big blow-up, mix textures and tones so it feels full.
- Stack pumpkins in different sizes instead of lining them in a row. Mix real with faux.
- Spray paint cheap plastic pumpkins matte black, deep purple, or metallic gold for an instant upgrade.
- Drape gauzy fabric over your railing. Cheesecloth or even old white curtains work just as well.
One thing I always notice is how much light makes a difference. Lanterns with flameless candles, string lights tucked into a basket, or orange bulbs swapped into porch fixtures instantly create a moody glow. Add a broom leaning by the door, and suddenly it looks intentional.
You don’t have to cover every inch. Just choose a few elements and repeat them. Two or three clusters of pumpkins, a fabric drape, and some lighting will pull everything together without looking busy. And since most of this comes from dollar store finds or paint you already own, the cost stays low.
The best part is how easy it is to switch it all up. Next year, you can spray paint the same pumpkins a new color, swap out the fabric, or rearrange the clusters. Simple, flexible, and cheap.
Indoor Touches That Look Stylish
Inside, I like decorations that don’t make the whole place look like a party store. The goal is spooky but still comfortable. That’s where small touches really shine.
- Replace a few framed photos with vintage Halloween prints you find online and print at home.
- Fill glass jars with black sand, plastic spiders, or dried beans to look like potion ingredients.
- Swap your throw pillows with covers in black, orange, or deep jewel tones.
Even things like swapping white taper candles for black ones add a mood without going overboard. One trick I love is stretching black lace over lampshades. It casts the softest shadow and feels chic instead of silly.
DIY Halloween decorations don’t have to scream “boo” at every corner. They can whisper it. Think of it like dressing your home in a costume that’s still comfortable to live in. Just enough to make guests notice, not so much that you trip over fake cobwebs every time you reach for a blanket.
Small changes like these make a big impact, and most cost less than $5 if you shop smart.
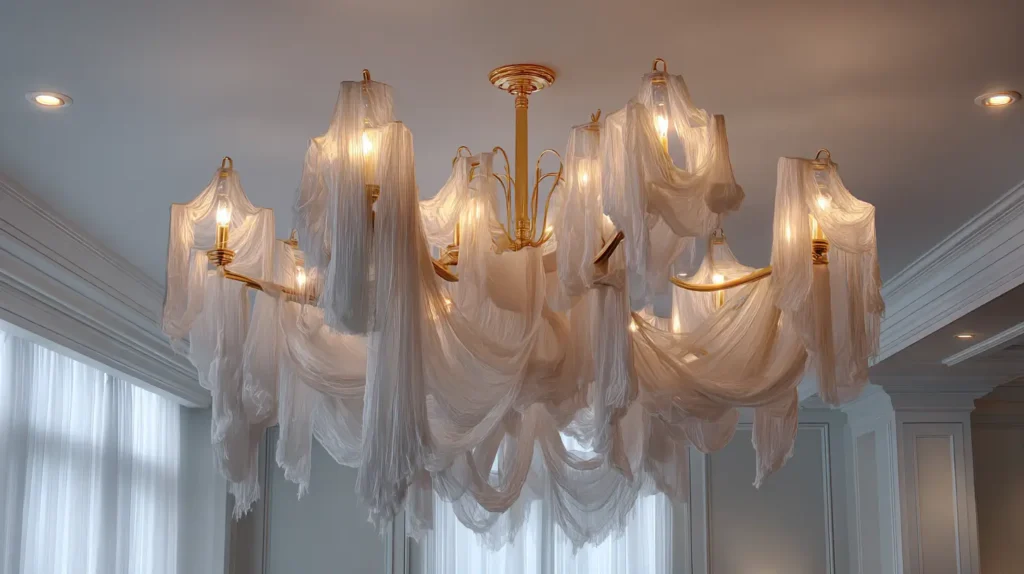
Ghostly DIY Halloween Chandelier Decorations
If you’ve got a light fixture hanging over your table, you can turn it into the centerpiece of the whole season without spending more than a few dollars. The trick is fabric. I take strips of sheer white material—cheesecloth works best because it’s cheap and wispy—and drape them over the arms of the chandelier so they hang down unevenly. When the light shines through, it looks like glowing spirits hovering above the table. It’s the kind of thing that makes people pause and stare, because it feels like the chandelier itself dressed up for Halloween.
To give it even more life, I pull at the fabric until it frays a little, letting the edges go stringy. The imperfect look is what makes it feel eerie. If you want movement, crack a window nearby or let the ceiling fan run on low so the fabric sways ever so slightly. The effect is subtle, but it creates an atmosphere that feels like a haunted dining hall without veering into tacky territory.
What I like about this project is how easy it is to undo. The cheesecloth comes off in seconds, and nothing permanent happens to your light fixture. Plus, you can reuse the fabric next year or layer it onto another project once October is over. It’s low effort, high payoff, and one of those DIY Halloween decorations that makes a big impact for almost no cost.
Dollar Store DIY Halloween Decoration Finds That Don’t Look Cheap
I swear the dollar store is a treasure chest in October. The key is not using things straight out of the package. Upgrade them.
- Plastic skulls? Spray paint them white, black, or metallic, then cluster them in a bowl.
- Plastic spiders? Hot glue them onto candleholders, frames, or wreaths.
- Plain glass vases? Wrap them in gauze or cheesecloth, then stick in dried branches.
Even the cheap foam tombstones look good if you rub some black and gray paint on them. It gives that worn, stone-like finish.
One thing I’ve learned is that repetition makes dollar store items look intentional. One lone spider might look cheesy. A dozen crawling across a mirror suddenly feels dramatic.
You can make a $1 item look like something from a boutique if you give it a quick paint job or group it smartly. That’s the difference between clutter and chic.
And the beauty of these items is that you don’t feel bad experimenting. If something doesn’t turn out, you’re only out a buck.
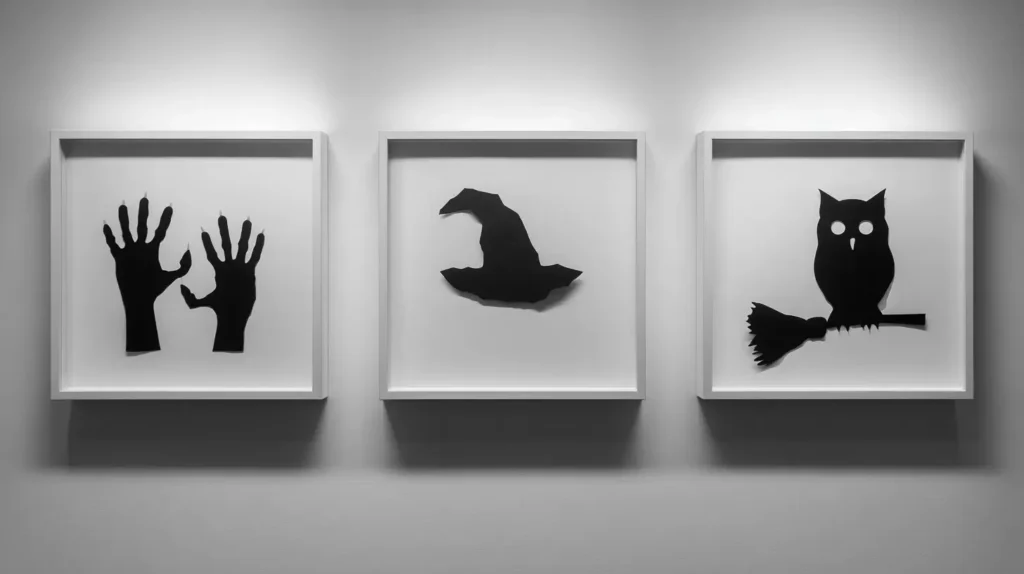
Shadow Frame Wall
One of the simplest ways to add a spooky vibe indoors is to play with shadows. Grab a few cheap picture frames, take out the glass, and stretch black cardstock across the backing. Cut out shapes—think bats, cats, or even bony hands—and glue them in place. Hang the frames in a little cluster on one wall and let the light from a nearby lamp do the work. The silhouettes jump out as soon as the room gets dim, making it feel like something’s lurking just beyond the edges. It’s understated but clever, and once November hits, you just swap the cardstock for something neutral and keep the frames up year-round. It feels like your wall has a secret life every October.
Creepy but Cute DIY Halloween Table Decoration Ideas
Halloween tables don’t need to be plastic tablecloths and cartoon pumpkins. With a few tricks, you can make a dinner spread look chic and a little creepy.
- Black plates over a white tablecloth instantly pop. Add a strip of cheesecloth as a runner.
- Use wine glasses upside down as mini cloches to cover small pumpkins or spiders.
- Add name cards stuck into candy corn for a playful but stylish touch.
One thing I always find fun is mixing pretty and spooky. Like pairing a fancy candlestick with melted black wax dripping down the side. Or setting out your nice serving bowls, then filling them with gummy worms or popcorn dyed orange and black.
It’s about balance. Too much spooky and it feels like a kids’ party. Too much chic and it feels like just another dinner. Combine both, and you’ll have people talking.
The good news? Most of this comes from what you already own. A few add-ons like black napkins or thrifted goblets make it extra.
Creeping Staircase Garland
If your house has a staircase, it’s begging for a seasonal costume. Forget tinsel or plastic garland; instead, weave torn strips of black fabric along the railing, letting them trail down and fray at the ends. Then tuck in a few small, unexpected touches like old keys, dried twigs, or even tiny hand-drawn paper tags that say things like “Do Not Open.” At night, the dim light from a lamp or a battery candle nearby makes the whole thing feel like the stairs themselves are warning you not to climb. It’s eerie without being overdone, and because it uses scraps and small add-ons, it costs almost nothing to pull off. The effect is dramatic, but it takes less than an hour to set up.
Outdoor DIYs That Make an Impact
Outdoor decorations can be expensive, but some of the easiest projects make the biggest statement.
- Trash bag ghosts hung from trees flutter in the wind and cost almost nothing.
- Cardboard cutouts of black cats or bats taped to your siding give a silhouette effect.
- Old milk jugs painted into glowing skulls with a battery light inside look great lined up.
I’ve seen people use sticks to make large spiderwebs across their yard. Just tie the sticks into a frame, then wrap string into the web design. It looks bold from the street but costs pennies.
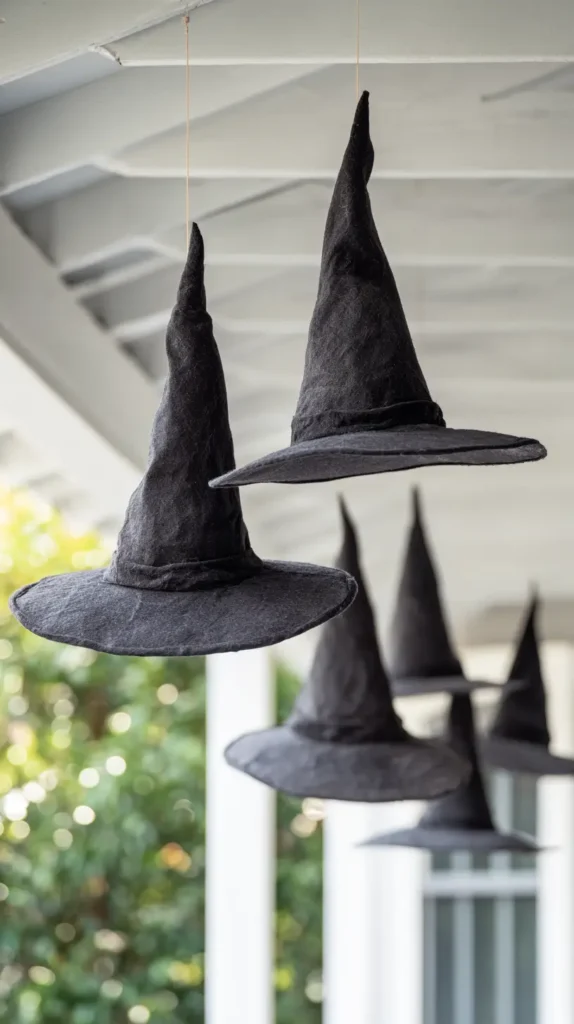
Another trick is hanging witch hats from fishing line across your porch. They sway in the breeze and glow if you pop in battery lights. It looks professional but takes less than an hour.
The best part is that these projects store flat, so you’re not stuffing giant inflatables into your garage. Reusable, cheap, and high-impact—exactly what I love.
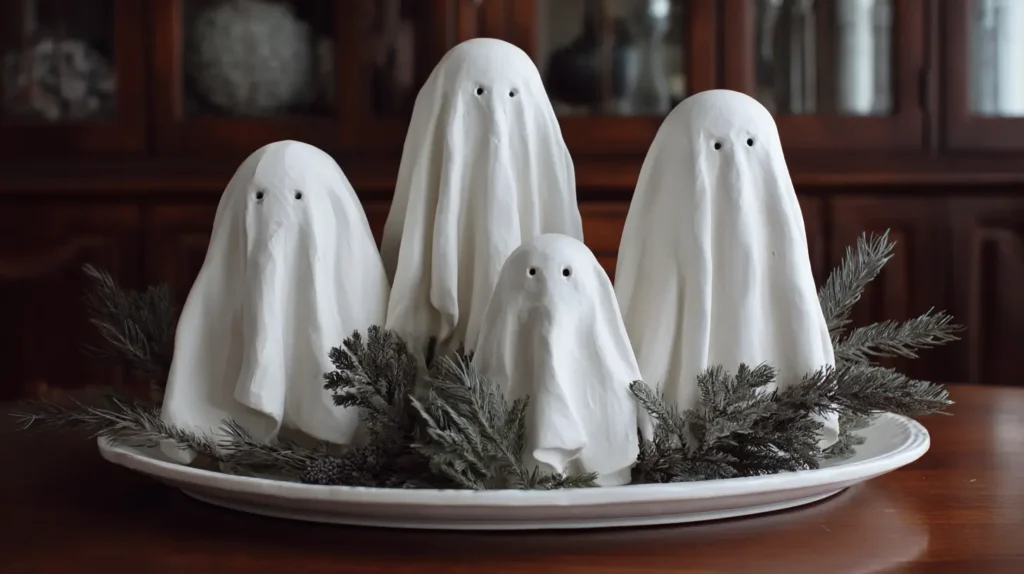
Clay Ghost Centerpiece
Not every Halloween decoration has to lean into blood and gore. Sometimes the spookiest things are also the sweetest. These little clay ghosts are proof. They’re simple, they’re clean, and they can sit right in the middle of your dining table without making the whole place feel like a haunted house. Think of them as the calm cousins of your jump-scare props.
To make your own, you’ll want air-dry clay or oven-bake clay. Roll it out and drape it over small forms—tin foil balls, upside-down cups, or even plastic bottles. The clay should fall naturally, creating folds that look just like flowing ghostly sheets. Use a straw or a skewer to poke out two little round eyes before it hardens. Once the clay dries, you’ll have these perfect little ghost sculptures that don’t need paint or extra details. Their simplicity is what makes them striking.
You can display them on a tray with greenery tucked around the base for contrast, just like a seasonal centerpiece. I love the mix of white clay against dark green branches—it feels spooky but still stylish enough to leave out all October. If you want to add a playful twist, give each ghost a different “personality” by shaping the folds differently. One might look tall and eerie, another small and slouchy. Together, they become a little ghost family.
The beauty of this project is how versatile it is. The ghosts can sit on a mantel, cluster on a coffee table, or even line a shelf. And because they’re sturdy, you can pack them away and reuse them year after year. It’s DIY that lasts, with just enough spook to say “Halloween” without overwhelming your space.
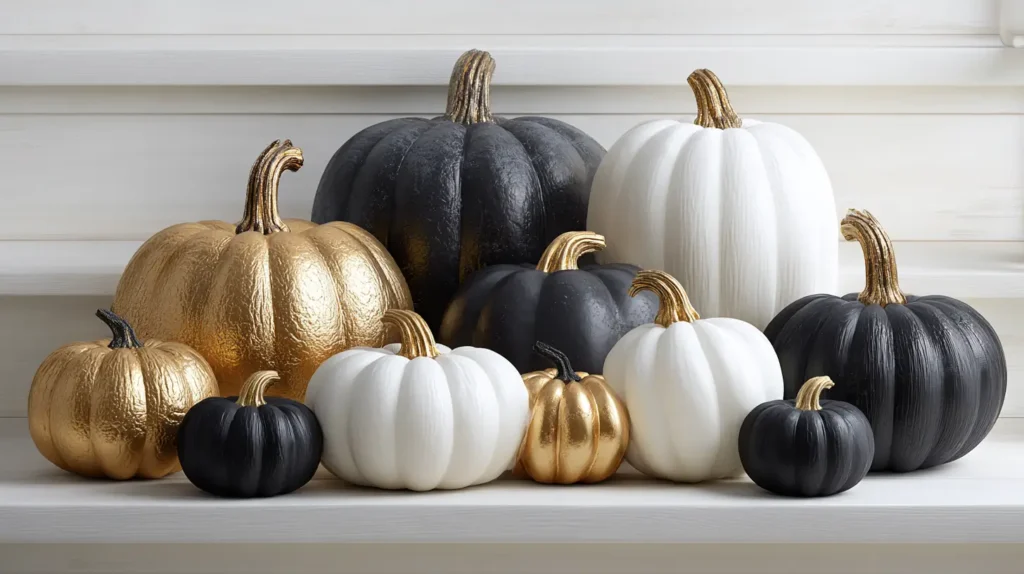
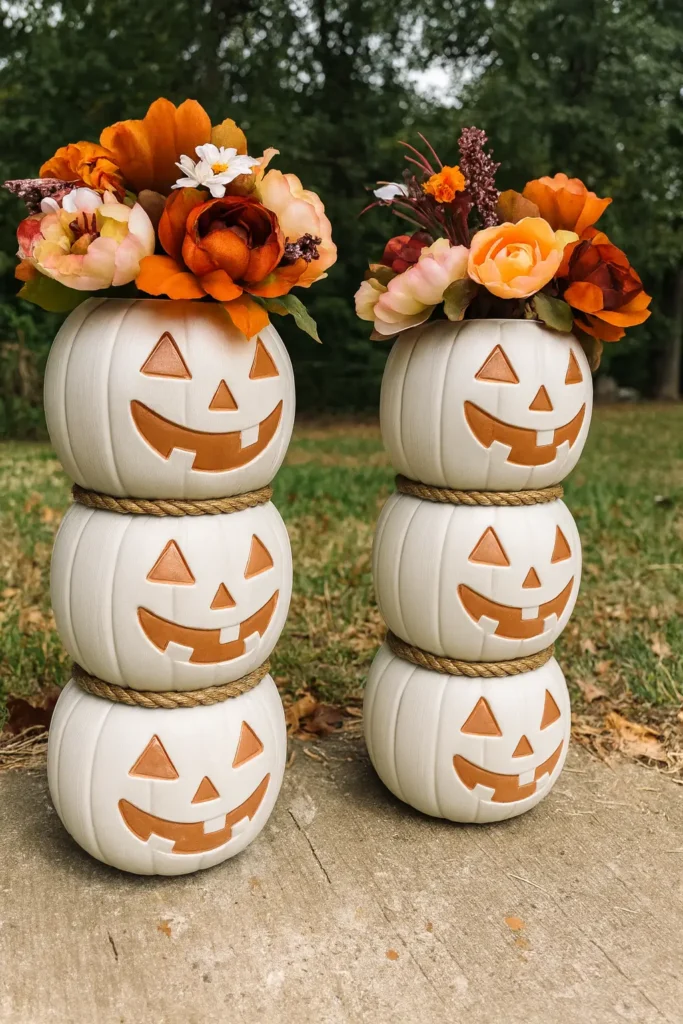
Chic Pumpkin Projects
Pumpkins are the heart of Halloween, but carving isn’t the only option. In fact, uncarved pumpkins last way longer.
- Paint them matte black, then use a gold paint pen for designs.
- Wrap them in lace stockings for texture and contrast.
- Cover small ones in metallic spray paint for a glam cluster.
You can also decoupage pumpkins with black-and-white printed images, like vintage bats or skeletons. Just glue the paper on with Mod Podge. They look like something from a boutique shop.
One thing I’ve found is that mixing carved with painted makes a good balance. Carved ones give that glow, but painted ones add style.
And the bonus? Painted pumpkins last weeks, so you can set them out early without worrying about mushy messes before Halloween night.
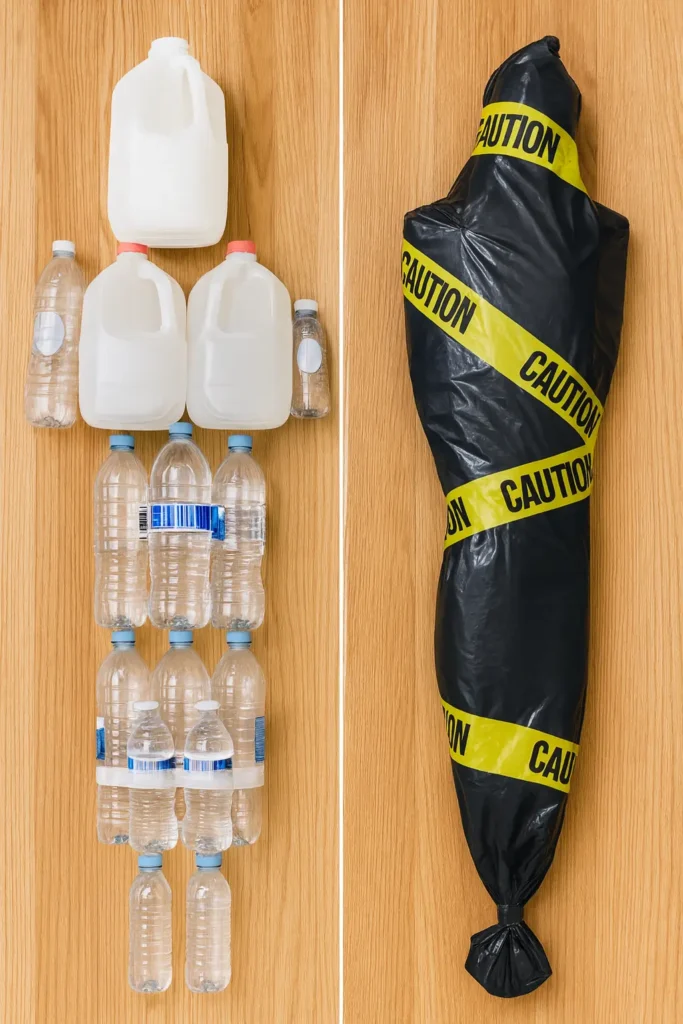
DIY Bottle and Jug Body Bag
If you want a decoration that makes people stop in their tracks, the bottle-and-jug body bag is it. It’s creepy, it’s unexpected, and best of all—it’s made entirely from recyclables and supplies you probably already have. You’ll need a few empty gallon jugs, several water bottles, tape, a big trash bag, and some caution tape.
Start by laying the jugs and bottles out on the floor in a rough human shape. One jug for the head, two side-by-side for the shoulders, then rows of bottles to build the torso and legs. It doesn’t have to be perfect—just close enough that it reads as “body” when you step back. Tape everything together so it doesn’t shift around. Once you’ve got the shape secured, slide it all into a big black trash bag. Tie off the end at the feet so it tapers like a bagged figure.
Now for the part that sells the illusion: wrap the body in yellow caution tape. Crisscross it diagonally, then wrap a few bands straight across for good measure. When you step back, it looks shockingly real—like a wrapped-up crime scene prop straight out of a horror movie. Place it by the front porch, lean it against a wall, or even tuck it halfway under a bush. It gives just the right mix of morbid humor and genuine creepiness.
This decoration works because it’s so simple, yet so bold. You’re literally turning trash into terror. And the best part? It costs next to nothing. If you’ve got recycling and a roll of tape, you’re halfway there.
Pumpkin Terrarium
Instead of carving pumpkins, try hollowing out just the top of a foam pumpkin and turning it into a terrarium. Inside, layer moss, a few twigs, and a handful of tiny plastic critters or even miniature houses from the craft section. Pop a battery tea light in there and suddenly you’ve got a little haunted world glowing from within. It’s like a fairy garden’s creepy cousin, perfect for a mantle or entry table. What makes it fun is that every detail is up to you—you can go gothic with dark moss and skeleton figurines, or keep it playful with neon spiders and glitter. Either way, it feels unique, like you created a tiny story under glass, except the glass is a pumpkin.
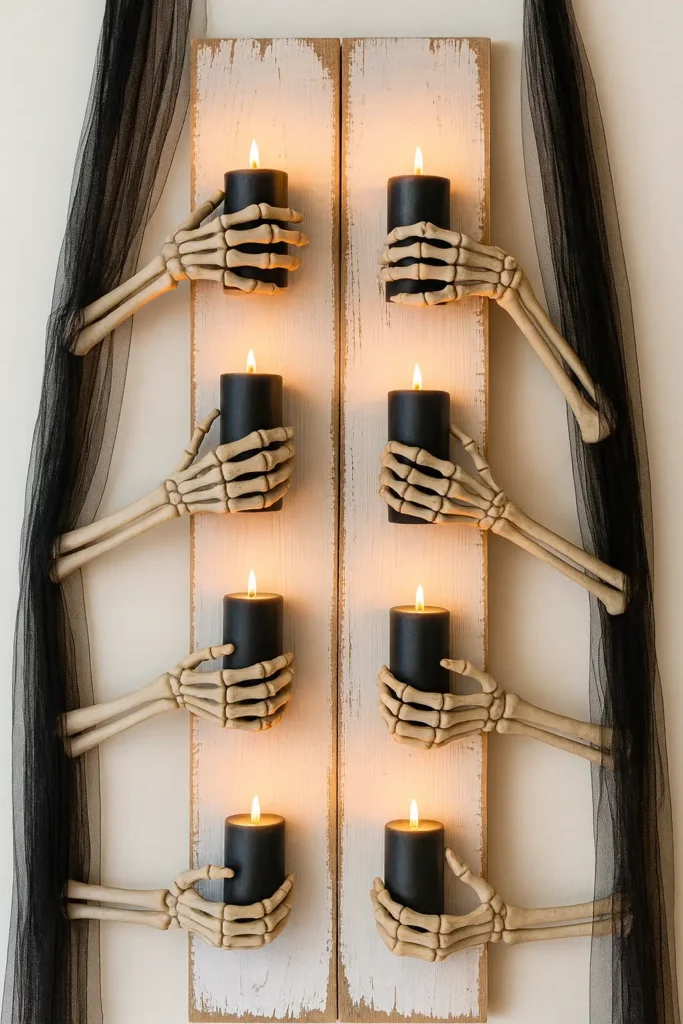
Skeleton Hands Candle Display
There’s something deliciously eerie about skeleton hands offering up glowing candles. It feels like the kind of detail you’d spot in a haunted house, but it’s shockingly easy to recreate at home. All you need is a tall board, some faux skeleton arms, and a handful of candles. If you’re worried about open flames, swap in LED candles—bonus points if they flicker, because the movement adds to the creepy illusion.
Start by giving your board a distressed look with white paint and a little sanding. That makes it feel aged and weathered, like it’s been pulled from an old attic. Next, attach the skeleton arms. You can use screws if you want it sturdy, or heavy-duty glue if you’re keeping things temporary. The trick is to stagger the arms so they create two even columns, each holding a candle. Once that’s in place, slip the candles into their bony hands. Black candles are bold and dramatic, but even simple ivory ones pop against the skeleton’s fingers.
The real magic comes when you dress the setup with black gauzy fabric. Let it drape loosely over the board so it frames the candles and adds movement. Once it’s hung on a door or wall, the whole piece transforms into a gothic focal point. It’s the kind of thing that looks custom-built, like you paid for a designer prop, but it’s all DIY. This project leans less “cute pumpkin patch” and more “old-world haunted estate.” It’s perfect if you want that spooky, chic vibe without spending much.
Lighting That Sets the Mood
Lighting is what ties everything together. Without it, even the best decorations fall flat at night.
- Swap porch bulbs for orange, purple, or even flickering flame-effect bulbs.
- Stick battery candles in every window. From outside, it looks instantly eerie.
- Drop glow sticks inside jars or lanterns for a cheap, colorful effect.
One project I love is filling paper bags with sand and dropping in a tealight. Line your walkway with them. They’re old-school luminarias, and they glow beautifully on Halloween night.
String lights also work wonders. Wrap them around porch railings or tuck them into bushes. Even white ones feel spooky when paired with cobwebs or black fabric.
Lighting might be the cheapest trick, but it’s the one that makes people stop and stare.
My Final Thoughts on DIY Halloween Decorations
Halloween decorating doesn’t have to drain your budget or look like everyone else’s house on the block. I’ve learned that the best ideas often come from mixing what you already own with a few cheap upgrades. DIY Halloween decorations are about being playful and resourceful at the same time.
Living in Florida, I’ve noticed outdoor decorations have to be creative enough to survive heat, rain, the occasional hurricane and curious squirrels.
I love the mix of chic and spooky because it works for all ages. Kids still get the fun, but adults don’t feel like they’re walking into a cartoon. And honestly, making these projects is half the fun. There’s something satisfying about turning a dollar store skull into a centerpiece or hanging witch hats that look like they floated down themselves.
The part I enjoy most is how flexible these ideas are. You can swap colors next year, move things around, or reuse the same pieces in fresh ways. Nothing here locks you into a one-time decoration that ends up in the trash.
And if you’re like me, you’ll probably want to share your creations. That’s where Pinterest comes in handy. A lot of people scroll through looking for inspiration, and it’s fun to see your own version pop up.
Halloween should be fun, not stressful or expensive. These ideas let you enjoy the creativity without worrying about the cost. A little paint, some fabric, a few lights, and you’ll have something that makes your house feel ready for trick-or-treaters and friends alike.
That’s what I love about it—it’s not about perfection. It’s about the vibe. And the vibe is spooky, chic, and budget-friendly.