Halloween cake pops have a way of stealing the spotlight at parties. They’re small, sweet, and oddly charming. I live in Orlando, where fall doesn’t really show up like it does up north. We don’t get crunchy leaves or sweater weather. Instead, we get humid afternoons and pumpkin spice everything in stores. Cake pops become my kind of autumn leaf pile. They’re tiny bites of seasonal fun without melting into mush in the heat.
I’ve noticed that people go wild for them. Guests always grab them before the bigger desserts. Something about a treat on a stick makes it feel less guilty. Like, “Oh, it’s just one bite,” until it’s five later. Honestly, I think that’s the magic of these little guys. They look too cute to resist.
If you’ve ever thought cake pops seemed complicated, stick around. I’ll break it down into steps that don’t require bakery-level patience. I’m all about shortcuts that actually work, not the kind that turn your kitchen into a disaster zone. You’ll get ideas for flavors, decorations, and even clever hacks to save time. And yes, I’ll cover the messy parts, because cake pops always have one.
This isn’t just about making a dessert. It’s about making something playful and memorable for Halloween. Whether you’re planning a classroom party, a neighborhood gathering, or just want a festive snack at home, these cake pops deliver. They bring that “wow, you made this?” moment, even if you’re balancing a million other things.
By the end, you’ll feel confident about whipping up cake pops that fit your Halloween vibe. Cute, spooky, classy, or just plain fun—they’re all on the table.
Why Halloween Cake Pops Always Win
Cake pops are like the little black dress of desserts. They’re adaptable, stylish, and fit any theme. Halloween cake pops just crank that idea up a notch with costumes for your food.
Think about it: cupcakes are fun, but they take up space and can feel messy. A slice of cake is lovely, but plates and forks get involved. A cake pop solves all that in one bite. No fork. No plate. Just grab, eat, and move on to the next pumpkin-shaped snack.
There’s also the charm factor. People love mini things. Mini pumpkins, mini candy bars, mini desserts. Cake pops tap right into that. You could set out a tray of regular brownies, and they’d barely get noticed. Turn them into cake pops shaped like jack-o’-lanterns? Suddenly everyone’s impressed.
I’ve also found that kids are way more likely to grab a cake pop than a cupcake. Something about food on a stick just speaks to them. And let’s be honest, adults aren’t much different. It’s fun to hold. It’s fun to eat. Plus, they’re built-in portion control—unless you keep circling back.
When it comes to Halloween, they give you so many decorating options. You can go creepy with red drizzle that looks like “blood.” You can go playful with monster faces made from candy eyes. Or you can go chic with black and orange sprinkles for a more polished look.
Cake pops also travel better than most desserts. Heading to a school party or friend’s house? Wrap each pop in clear cellophane, tie with ribbon, and you look like you planned ahead. They don’t squish in the car like frosted cupcakes.
At the end of the day, Halloween cake pops win because they check all the boxes. Easy to grab, fun to eat, endlessly customizable, and ridiculously adorable.
The Basics Made Easy
Making cake pops can sound intimidating, but it’s easier once you break it down. Halloween cake pops use the same basic formula as any other. Cake. Frosting. Coating. Decoration. That’s it.
Here’s the simplest path:
- Bake a boxed cake mix. Any flavor works, but chocolate or spice cake feels extra Halloween-y.
- Let it cool. Don’t rush. Warm cake makes mushy pops.
- Crumble the cake into fine crumbs. Use your hands or a fork.
- Mix in frosting, one spoonful at a time. You want the texture of cookie dough, not soup.
- Roll into balls about the size of a ping pong ball.
- Chill in the fridge or freezer so they firm up.
- Melt candy coating or chocolate, dip lollipop sticks, and insert into each ball. Chill again.
- Dip each ball into coating, tap off extra, then decorate fast before it sets.
The hardest part is usually the dipping. Cake pops can slide off the stick if they’re too heavy or warm. That’s why chilling them is key. You’ll also want to melt candy coating slowly, either in a microwave or double boiler. Stir often to keep it smooth.
Another trick: dip the stick into melted coating before inserting it into the cake ball. That little “glue” keeps the pop secure.
Once you’ve mastered the basics, the fun starts. You can turn plain pops into pumpkins, ghosts, or bats with just candy melts and sprinkles. Don’t overthink it. The imperfections often make them cuter.
Halloween cake pops don’t have to be perfect bakery spheres. As long as they’re tasty and festive, you’ve nailed it.
Decorating Your Halloween Cake Pops
This is where cake pops shine. Halloween gives you a license to go wild with designs. Even the simplest ideas look amazing on a party tray.
A few tried-and-true favorites:
- Pumpkins: Use orange candy melts. Add a green candy or pretzel stem. Draw faces with black gel icing.
- Ghosts: Dip in white coating. Let extra drip so they look “floaty.” Add two candy eyes. Done.
- Eyeballs: White coating base. Add a colored candy melt “iris,” then a chocolate chip “pupil.” Red gel for veins.
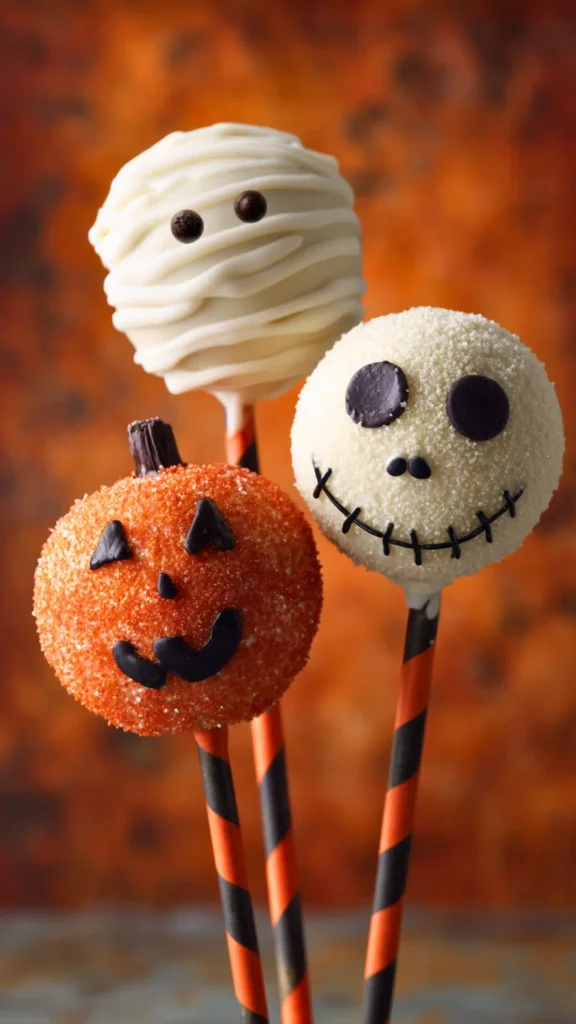
- Mummies: White coating base. Drizzle more white in messy stripes. Stick on candy eyes peeking through.
- Spiders: Chocolate coating base. Add licorice legs and sprinkle on sanding sugar for texture.
If you want something chic instead of spooky, keep it simple. Dip in black or orange coating, then roll in coordinating sprinkles. Tie with satin ribbon for a fancier vibe.
One clever twist is to mix designs on one tray. A mix of pumpkins, mummies, and eyeballs makes the display playful. You don’t need every single pop to look perfect.
I also love using edible glitter for an elegant touch. A little shimmer on black pops makes them feel elevated. You can even mix in gold sprinkles for a more grown-up Halloween party.
If you’re making these with kids, let them handle decorating. Give them bowls of sprinkles, candy eyes, and melted chocolate in squeeze bottles. They’ll create wacky monster pops you’d never think of. And honestly, the sillier the better.
Halloween cake pops are all about personality. They don’t need to look uniform. They just need to bring smiles, giggles, or maybe a little shiver.
Flavor Combos Worth Trying
The classic combo is chocolate cake with chocolate coating. Solid choice. But Halloween cake pops give you a chance to get creative.
A few fun flavor ideas:
- Pumpkin spice cake + cream cheese frosting + white chocolate coating
- Red velvet cake + cream cheese frosting + dark chocolate coating
- Vanilla cake + orange frosting + orange candy melts
- Chocolate cake + peanut butter frosting + milk chocolate coating
- Carrot cake + cream cheese frosting + white chocolate coating
You can also add flavor extracts to candy melts. Peppermint, orange, or even almond extract changes the vibe completely.
For a grown-up twist, brush the cake balls with coffee or espresso before coating. It adds depth and feels less sweet.
Halloween cake pops don’t have to stick to the candy aisle. Think about flavors people crave in fall: caramel, cinnamon, apple, maple. Infuse those into your frosting or cake mix.
If you want to make things even easier, buy a premade pound cake and crumble that. No one will notice. Pair it with a flavored frosting, and suddenly you’ve got a signature recipe.
The best part? You can experiment without stress. Worst-case scenario, you still end up with cake and frosting, which isn’t really a problem.
Hacks to Save Your Sanity
Cake pops can be fun, but they can also test your patience. I’ve collected a few tricks that keep the process smoother.
- Chill your cake balls longer than you think. Fifteen minutes isn’t enough. Aim for at least 45.
- Use a foam block to hold pops upright while drying. No lopsided flat spots.
- Buy candy melts in Halloween colors. Saves time tinting white chocolate.
- Keep a spoon handy to smooth coating if it clumps. It doesn’t have to look factory-perfect.
- Work in small batches. Pops warm up fast, so dip only a few at a time.
- Use less frosting than you think. Too much makes mushy pops that slide off sticks.
You can also skip sticks altogether if you’re short on time. Make “cake truffles” instead—just roll balls, dip, and set them on wax paper. They taste the same and take half the effort.
If you’re decorating with kids, expect chaos. Embrace it. Set out wax paper to catch sprinkles and drips. You’ll save yourself a cleanup headache.
Another sanity saver: don’t aim for Pinterest-perfect. Halloween cake pops are supposed to be quirky. A lopsided ghost or droopy mummy looks more authentic.
The more you let go of perfection, the more fun you’ll have. And trust me, people will still be impressed.
Budget-Friendly Tricks for Chic Halloween Cake Pops
Let’s be real—Halloween cake pops can either eat up your wallet or be ridiculously affordable. It all depends on how you play it. You don’t need to spend like you’re opening a bakery. You just need a few clever swaps.
First, cake mix is your best friend. A box usually costs a couple of bucks, and one box stretches into two dozen pops. That’s like the price of a latte for treats that feed a party. Skip the fancy specialty blends—nobody can tell once frosting and candy coating are involved.
Second, candy melts come in every shade of spooky, but buying every color can get pricey. Stick to white and tint it with food coloring you already have. Or buy one bag of orange and one of black, then use sprinkles to add variety. It’s like mixing and matching outfits—you don’t need ten pieces, just a few staples.
Third, don’t buy decorations in the baking aisle if you can help it. Candy eyes cost more there than in the seasonal aisle. Grab a bag of cheap googly-looking candies, pretzels, or even M&M’s and you’ve got mummies, spiders, and pumpkins without a boutique price tag.
If you’re really pressed, ditch the sticks. Serve them as cake truffles on a tray. You save on supplies, skip the cellophane, and still look chic. Half the time, people eat them before noticing the missing stick anyway.
Halloween cake pops don’t need a gold-plated budget to impress. Think smart, spend less, and you’ll still end up with a platter that looks like it belongs at a Pinterest party.
Serving and Storing Like a Pro
Once your cake pops are made, presentation is everything. A tray full of pops can look like art.
Arrange them in foam blocks covered with tissue paper or in festive jars filled with candy corn. They stand tall and become part of the decor.
If you’re short on time, line them up on a platter. Add fake spider webs or plastic skeleton hands around them for instant Halloween flair.
For parties, wrapping them individually in cellophane with ribbon makes them grab-and-go ready. Guests love taking one home.
Storage matters, too. Halloween cake pops keep best in the fridge, especially if you’ve used cream cheese frosting. Stored in an airtight container, they last about a week.
You can also freeze them before dipping. Just store the cake balls in a freezer bag. Thaw in the fridge before coating. This trick works well if you’re prepping for a big party.
If you want to ship them, use lots of padding. Wrap each pop, place them upright in a box, and cross your fingers. Honestly, though, they’re best enjoyed fresh at home or at a party.
Serving and storing doesn’t need to be complicated. Keep them cool, keep them covered, and they’ll stay just as festive as when you made them.
How These Halloween Cake Pops Are Decorated
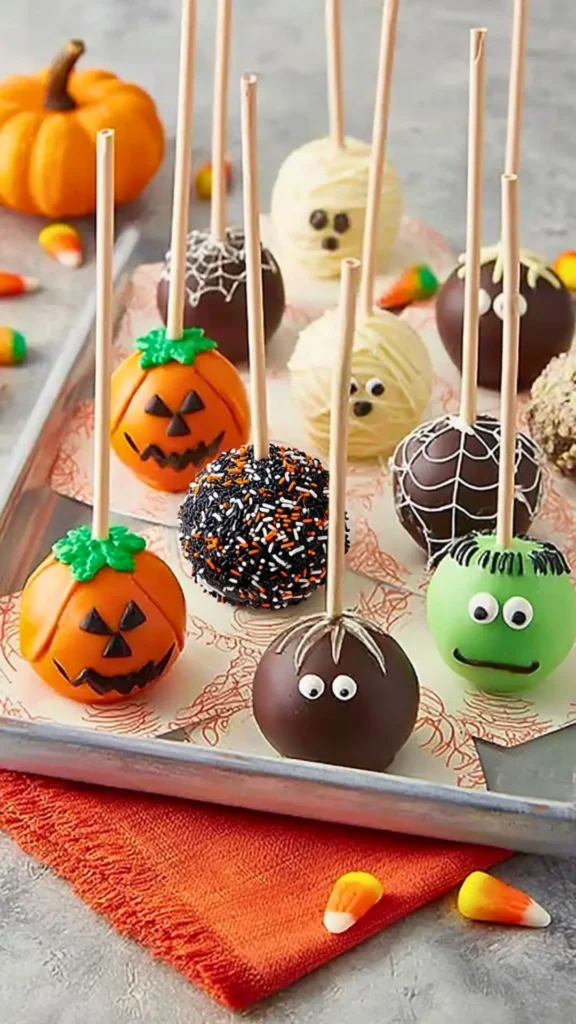
Pumpkin Faces
These pops start with orange candy melts for coating. Once dry, black candy melts or edible gel are used to draw triangle eyes and jagged mouths. For the stem, a dab of green frosting or fondant gives them that pumpkin patch look.
Sprinkle Pops
Dipped in chocolate, then rolled immediately in black, orange, and white sprinkles. The trick is to coat them while the chocolate is still glossy so the sprinkles stick evenly.
Mummies
First, coat the pops in white candy melts. Once set, drizzle more white coating in messy stripes across the pop. Add two small candy eyes peeking through to bring the mummy “to life.”
Spiders
A dark chocolate base sets the stage. Add two candy eyes, then pipe thin lines of chocolate or white candy melt to mimic spider legs or webbing.
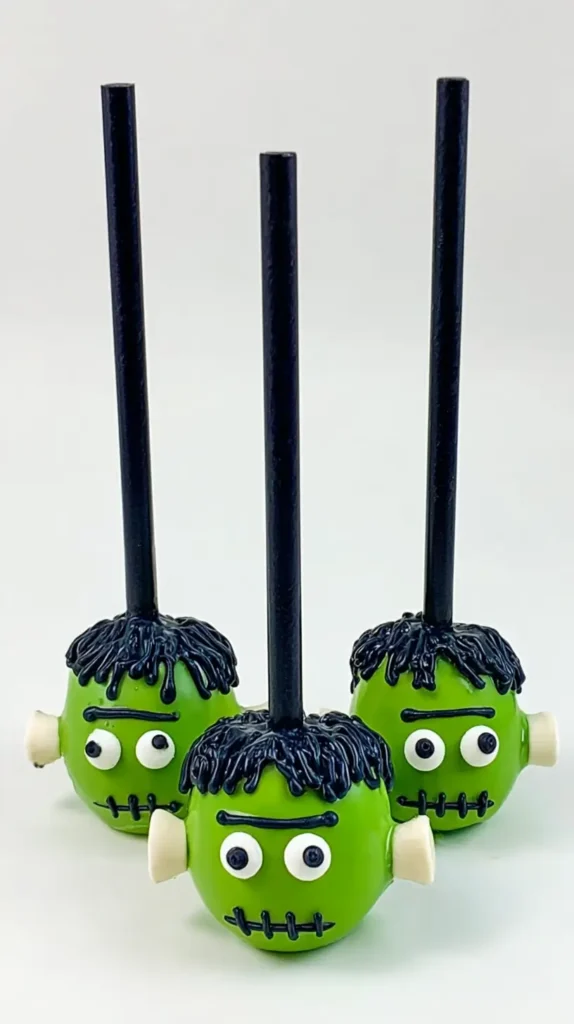
Frankenstein Pops
Coat the pops in green candy melts. Add candy eyes and pipe a stitched mouth. For the “hair,” drizzle black candy melt over the top so it drips slightly. Some versions add white candy bones or fondant bolts on the sides.
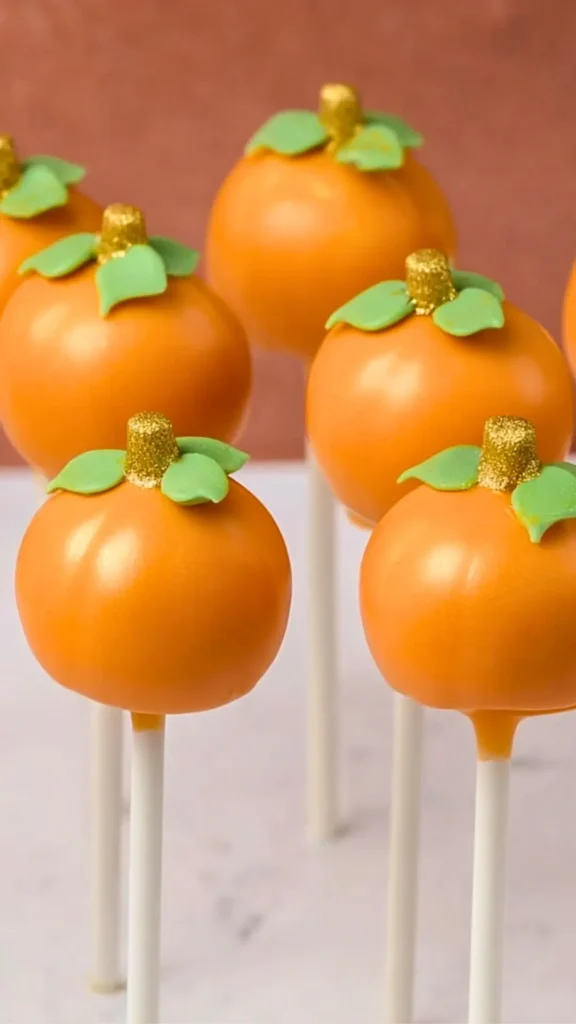
Shiny Pumpkins
These round pops get a glossy orange candy melt coating. A golden sprinkle-covered stem plus green fondant leaves finish the pumpkin look.
Spooky Faces Trio
One pop is a white mummy with striped candy melt bandages. Another is a sparkly orange pumpkin with black candy face pieces. The last one has a sugar-coated white finish with black candy eyes and stitched mouth, like a skeleton grin.
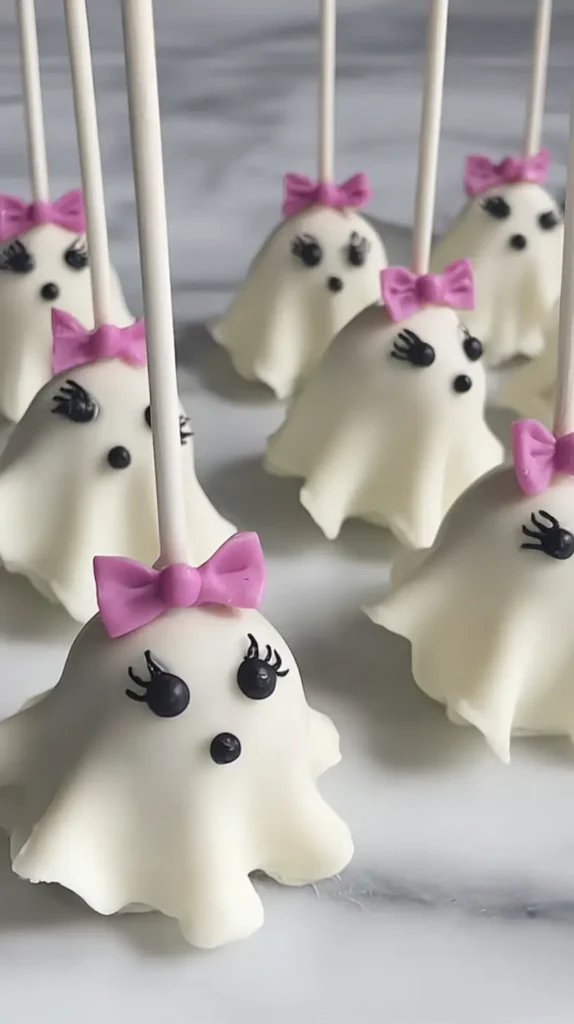
Girly Ghosts
Draped in smooth white candy melt so it flows like fabric. Black candy eyes with long piped lashes make them expressive. A little fondant or candy bow in purple adds the cute twist that turns scary into sweet.
Classic Frankenstein
Green candy melt coating, black piped “hair,” candy eyes, stitched mouth. Marshmallow or fondant “bolts” can be pressed on the sides to finish the monster vibe.
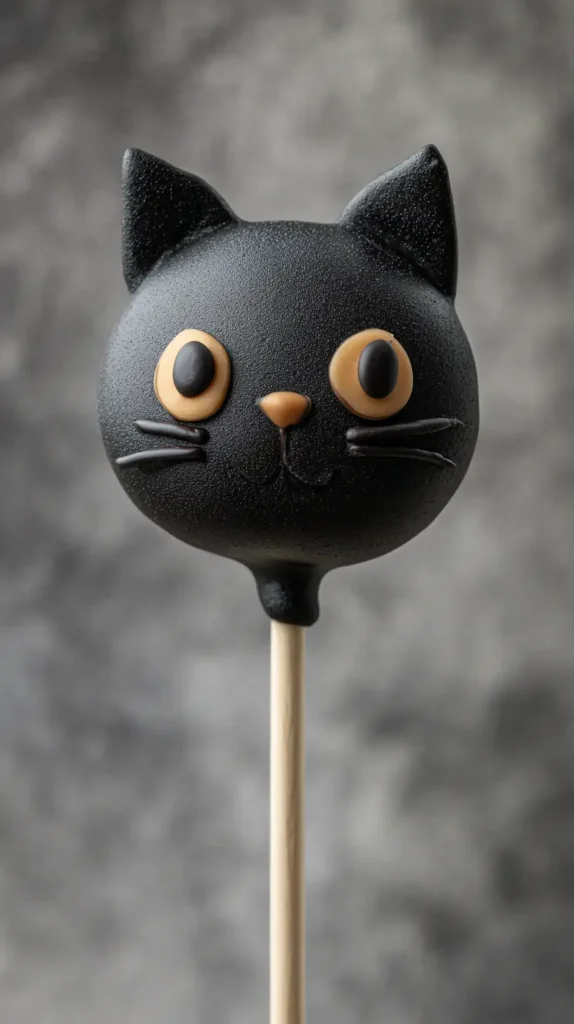
Black Cat
This one starts with a black candy-coated pop. Fondant or piped chocolate ears are attached at the top. Orange candy melts are used for eyes, and thin chocolate piping for whiskers and a small nose.
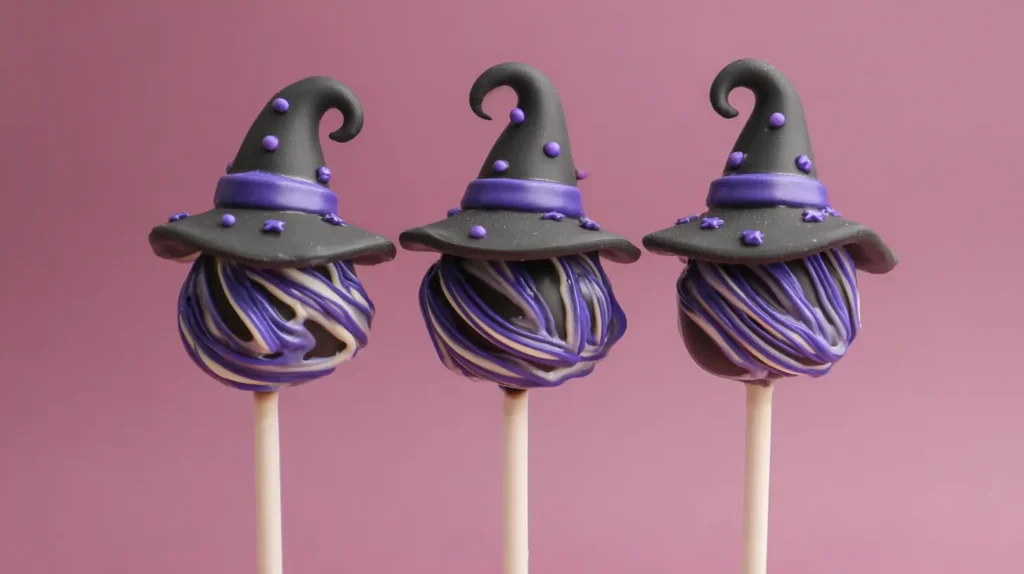
Witch Hats
A dark pop base swirled with purple and white drizzle. On top, a fondant witch hat with purple band and candy stars.
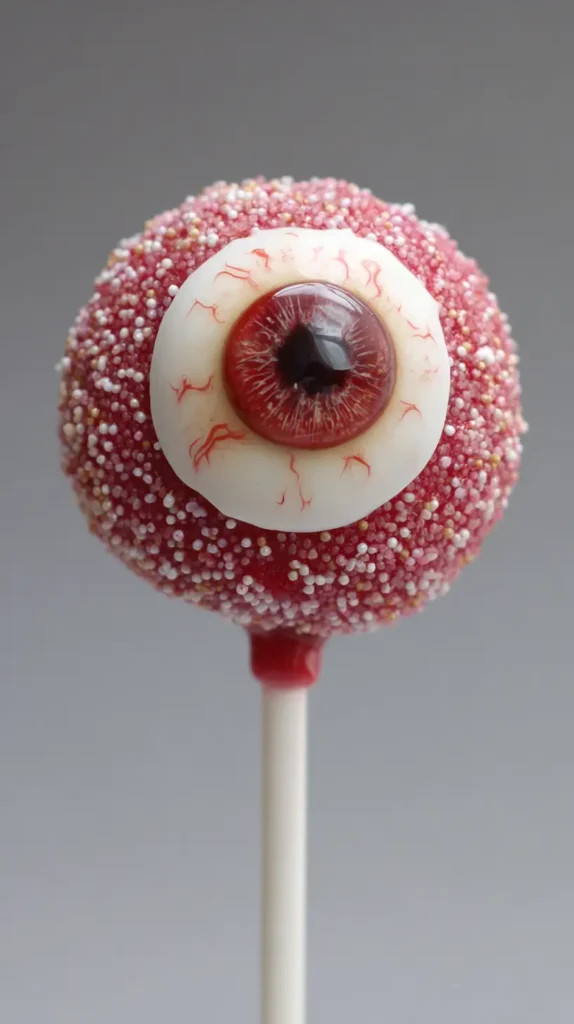
Eyeball Pops
These get a sugar-coated red base to look veiny. A white fondant circle forms the sclera, topped with a colored candy iris and black chocolate chip pupil. Red edible gel adds the final “blood vessel” detail for maximum creepiness.
Final Thoughts
I think Halloween cake pops are one of those desserts that always deliver more joy than effort. They’re the kind of treat that makes people stop, smile, and ask, “How did you make these?” Even if your drizzle is crooked or your pumpkin face looks slightly possessed, it still adds to the charm.
Whenever fall rolls around in Orlando, I feel that pull to add something festive to the table. We may not get crisp leaves or chilly nights here, but cake pops help me fake that cozy, seasonal vibe. They’re like tiny edible decorations that double as dessert.
What I’ve also learned is that people remember the small things. A tray of cake pops can stand out more than an elaborate cake because they’re personal. Everyone gets their own little piece of the celebration. And when you see them disappearing faster than you expected, you know you’ve hit the sweet spot.
If you’re sharing your creations online, especially on Pinterest, don’t stress about perfect styling. Share the fun, the messy, the playful. That’s what makes them so appealing. People want ideas they can actually pull off without a meltdown in the kitchen.
Halloween cake pops aren’t about perfection. They’re about playfulness, sweetness, and maybe a little spookiness. They give you a chance to celebrate without overcomplicating things. And sometimes, that’s exactly what we need in the middle of a busy season.
So grab your sticks, sprinkles, and a sense of humor. Make the pops. Enjoy the smiles. And remember—half the fun is in not taking it too seriously.