If you’ve ever looked up how to make a balloon arch and thought it was too expensive or tricky, you’re not alone. A lot of people assume you need fancy tools or a professional to pull it off. But the truth is, it’s not hard to do—and it’s absolutely doable on a budget.
This post walks through everything you need to make a balloon arch without spending a small fortune. I’ll break down what to buy, how to set it up, and how to get it done quickly, even if it’s your first time. You don’t need helium or special equipment. And no, you don’t need to be crafty either.
I’ll share smart tips for keeping costs low. That includes where to buy your balloons, what size works best, and how to get more out of what you already have. I’ve also added some fun ideas to make your arch pop without extra spending.
This post is especially helpful if you’re planning a birthday, baby shower, or graduation. Even if it’s just a backyard get-together, a balloon arch adds a lot for very little.
We’ll go over things like:
- How to build your arch for under $15
- What tools you really need (and what you don’t)
- Tricks to make your arch look fuller with fewer balloons
Whether you’re hosting something soon or just saving ideas for later, this will help you feel ready. Keep reading to learn how to make a balloon arch that’s both stunning and simple—with zero stress on your wallet.
This site includes affiliate links; please take a look at the disclosure for more details.
What You Actually Need To Make A Balloon Arch
You don’t need a party rental company. You don’t need helium tanks. And you definitely don’t need a degree in balloon design. What you do need are a few basics. You can find most of these at the dollar store or online!
Here’s what I recommend:
- Balloons in 2–4 different sizes
- Balloon decorating strip (or fishing line)
- Balloon pump (hand or electric)
- Sticky dots or glue tabs
- Command hooks or tape to hang it
Go with regular latex balloons. The mix of sizes gives your arch a nice full shape. Use larger ones (like 10–12 inch) for the main base, and fill in gaps with 5-inch ones.
Pick your colors based on your theme. Want to go even cheaper? Stick with one or two solid colors instead of patterns or foil balloons.
The balloon decorating strip is a game-changer. It’s a plastic strip with holes where you pop the knotted balloon ends through. If you don’t have one, fishing line works too. Just tie the balloons around the string. It takes more time, but it still works.
A balloon pump saves your lungs. You’ll need it, especially if you’re doing this solo. Hand pumps are under $5, and electric ones go faster if you’re doing a big arch.
To attach the arch to the wall, use Command hooks. Loop your strip or fishing line around them. You can also tape the arch directly if it’s lightweight.
Here’s a quick tip: Start building your arch on the floor first. Once it’s shaped how you like it, lift and secure it in place. You’ll save time and frustration by seeing the shape before committing.
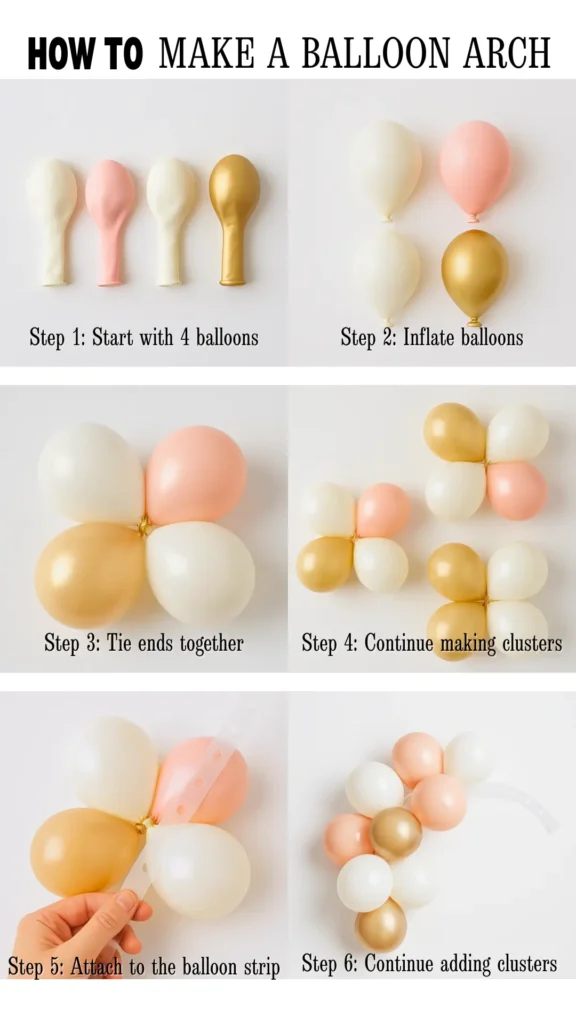
Step-by-Step Instructions for How to Make a Balloon Arch
This part walks you through how to make a balloon arch from start to finish—no stress, no guesswork. You don’t need fancy gear or a big budget. Just a few basics and a little time.
Here’s what you’ll need before you start:
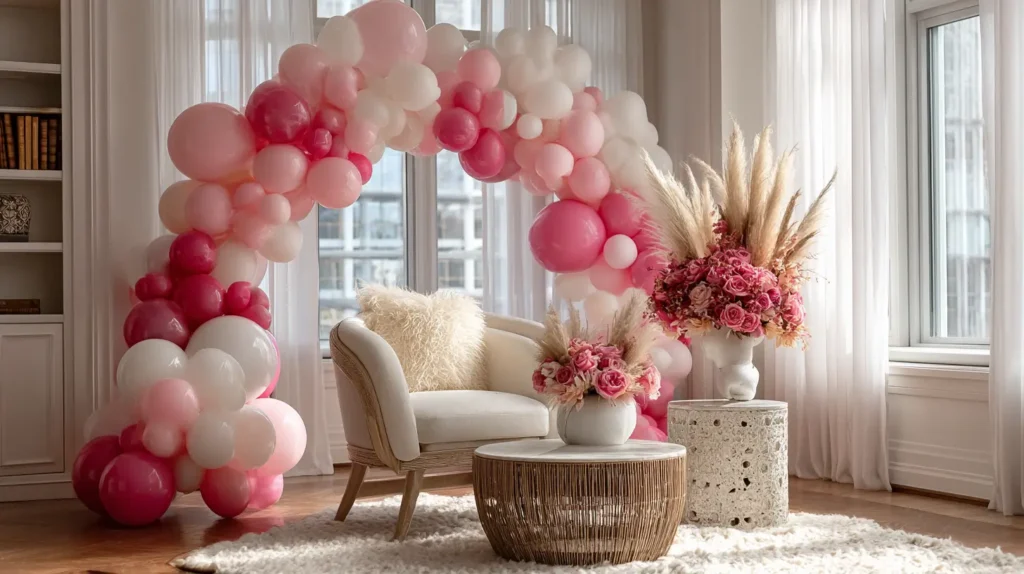
- About 48 latex balloons (mix of blush, white, and champagne works beautifully)
- Balloon strip or fishing line
- Balloon pump (a hand pump works just fine)
- Glue dots or sticky tabs for filler balloons
- Command hooks or tape to hang the arch
Now for the steps:
1. Sort your balloons.
Separate them by color and size. This saves you time when it’s time to assemble.
2. Blow them up.
Use a pump to inflate your balloons. Keep them about the same size so the arch looks even.
3. Make clusters of four.
Tie the ends of four balloons together at the neck. You’ll make lots of these little bundles.
4. Attach to the strip.
Push the knotted ends through the holes on the balloon strip. Keep the balloons tight together.
5. Layer your clusters.
Keep adding more bundles, turning them as you go to make it look full and round.
6. Add filler balloons.
Use glue dots to tuck in small balloons wherever you see gaps.
7. Hang it up.
Use Command hooks or tape to attach the strip to the wall, doorway, or backdrop stand.
That’s it! Now you know exactly how to make a balloon arch without spending a fortune. It comes together faster than you’d think—and once it’s up, it looks like you hired a pro.
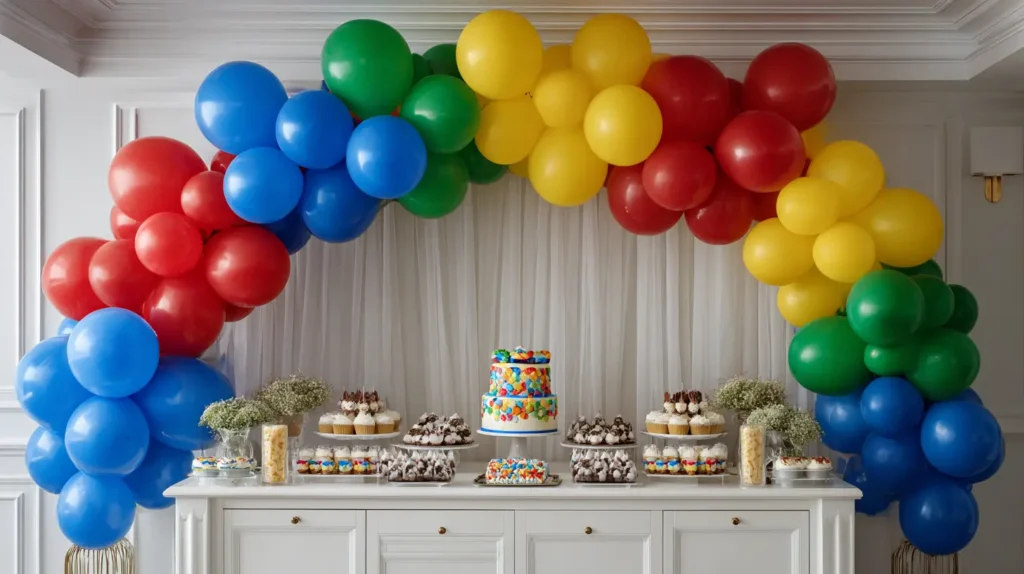
How To Make A Balloon Arch Look Full With Fewer Balloons
Here’s where the real budget magic happens. You don’t need 200 balloons to make your arch look full. You just need a few sneaky tricks.
Try these ideas:
- Use balloons of different sizes to create texture
- Cluster balloons in groups of three or four
- Add a few smaller balloons to cover empty spots
- Twist balloons slightly to get them closer together
- Use sticky glue dots to layer them and fill gaps
If you’re using a strip, alternate sizes as you go. Don’t follow a perfect pattern. A little randomness helps make it look organic. It’s like flowers in a bouquet—too perfect, and it feels fake.
Smaller balloons are super helpful. They’re great for tucking in anywhere you see space. Buy a bag of 5-inch ones. One pack goes a long way.
You can also make mini clusters. Blow up four small balloons, tie them together at the ends, and stick them right into the arch using glue dots. They’re great for hiding weird spots or flat-looking areas.
Another fun trick? Use ribbon, faux greenery, or paper fans to break up the balloons. You’ll use fewer balloons overall, and the arch still looks amazing.
You’re not just saving money. You’re also saving time and energy. Fewer balloons mean less blowing up and less taping.
Smart Ways To Save On Balloons And Supplies
There’s no need to spend a fortune at a party store. You can build your balloon arch with a few smart swaps.
Here are some ways to cut costs:
- Buy balloons in bulk online or at discount stores
- Stick with basic solid colors (they’re cheaper than printed ones)
- Use fishing line instead of a balloon strip if you’re tight on budget
- Skip helium—air works fine and lasts longer
- Ask around before buying—someone may already have supplies you can borrow
You can get a great pack of 100 balloons online for less than $10. Choose a set that includes a few different sizes. Some even come with the strip and glue dots.
Check stores like Dollar Tree or Five Below. They often have basic party supplies that work just fine.
Also, avoid balloon kits with lots of extras you won’t use. Those may seem convenient, but they often charge more for things like confetti balloons or fringe. Stick to what you need and build it your way.
And don’t forget to save what you can for next time. If your strip or pump still works, stash it in a bin for future parties.
Making a balloon arch on a budget is about being creative with what you have. The look doesn’t come from how much you spend—it’s how you arrange it.
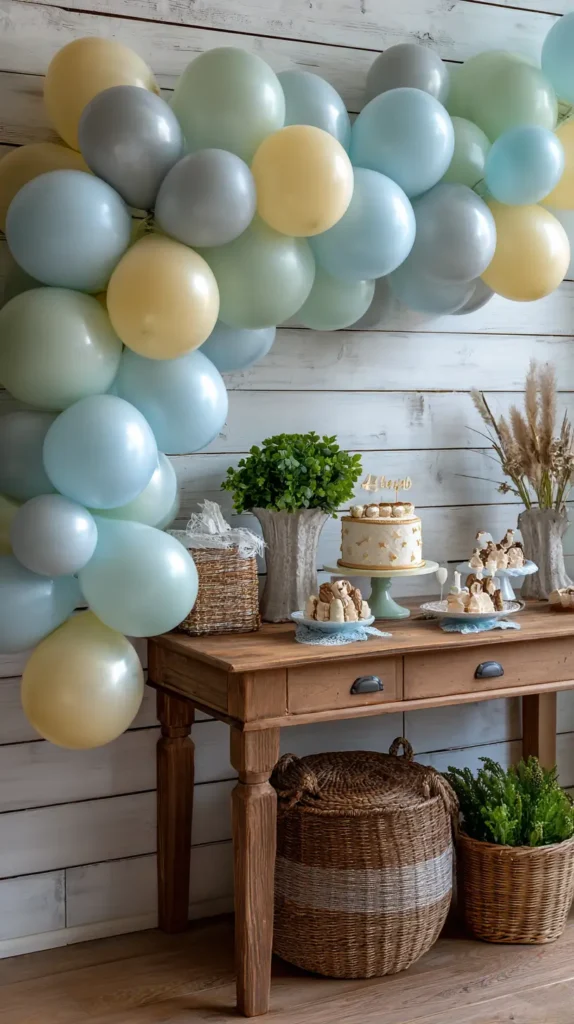
Add Big Visual Impact Without Big Spending
You can make your balloon arch look like it came from Pinterest without blowing your budget. It’s all about adding a few eye-catching details that don’t cost much.
Here are a few low-cost ways to add that wow factor:
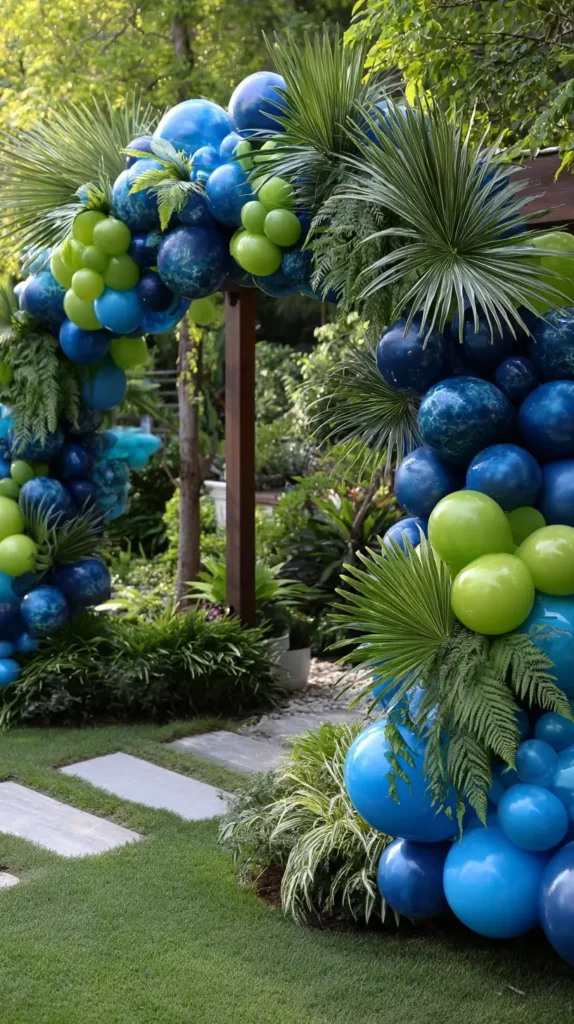
- Mix in different finishes like matte, metallic, and clear balloons
- Add paper fans, streamers, or tissue flowers
- Use fairy lights to wrap around or behind the arch
- Tuck in real or faux greenery (eucalyptus looks amazing)
- Cut shapes from construction paper and tape them to balloons
You don’t have to do all of these. Pick one or two things that match your theme and work with what you’ve got.
A strand of battery-operated lights makes a huge difference. You can wrap them around the base of your arch or lay them underneath for a soft glow.
Paper fans or flowers add color and shape. Stick them to the wall behind the arch or directly to the balloons with glue dots.
Don’t forget the power of good placement. Put your arch over a dessert table, doorway, or photo wall. Even a simple arch looks impressive in the right spot.
It doesn’t take a lot to impress guests. These small touches turn a basic arch into a party highlight. And the best part? You’re still sticking to your budget.

Where To Put Your Balloon Arch For The Most Impact
Once your balloon arch is done, you want it to shine. Where you place it matters more than you think. It sets the tone and makes your space feel festive.
Here are a few smart spots to place your arch:
- Over a cake or treat table
- Around a doorway or entry
- Behind a photo booth setup
- On a blank wall to make a statement
- As a backdrop for gifts or games
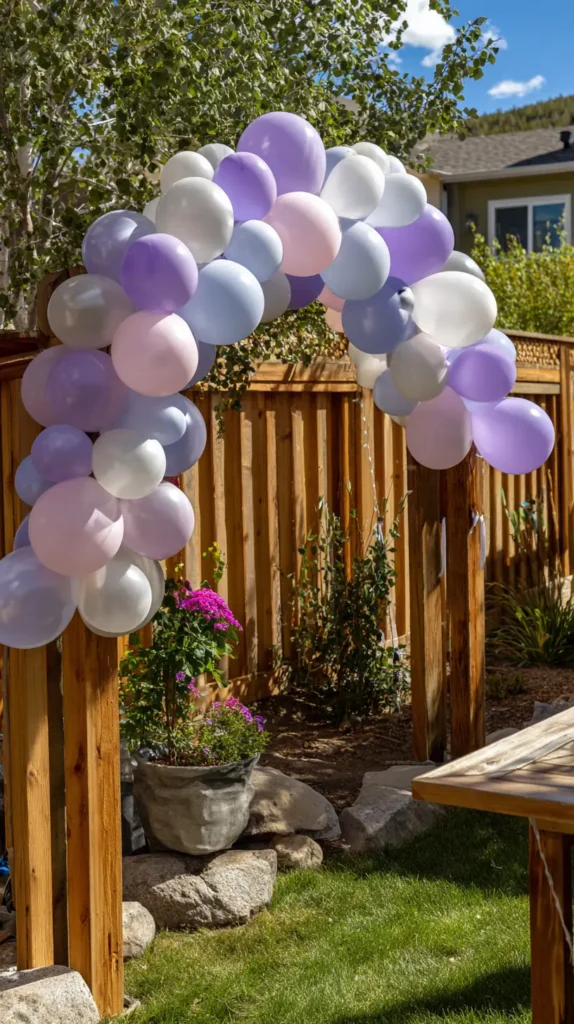
If it’s an outdoor party, you can frame a fence, patio entrance, or garden gate. Just make sure it’s not in direct sun—balloons don’t like heat.
For smaller spaces, hang a mini arch above a table or sofa. You don’t need a massive wall to make an impact. Even a smaller arch can stand out if it’s in the right place.
Use Command hooks or balloon tape to attach it. Make sure it’s high enough that people don’t bump into it but low enough that it stays in photos.
It’s also a fun idea to put your arch near the front of the party. That way, it greets guests right when they arrive. It feels special and exciting, even before they grab a plate of food.
And if you’re short on space, consider a balloon garland across the ceiling or down a stair railing. It’s just as festive and works in tighter areas.
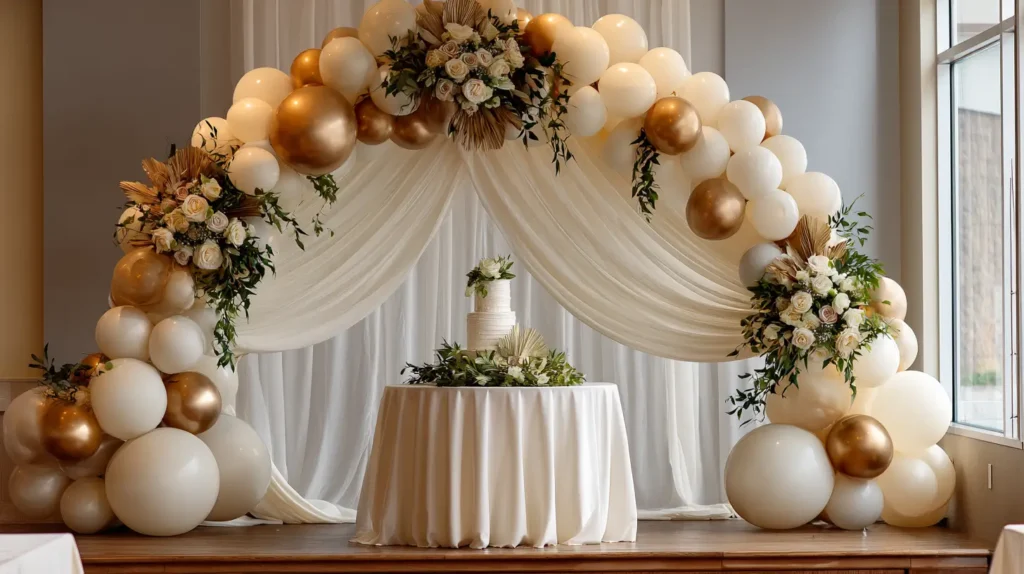
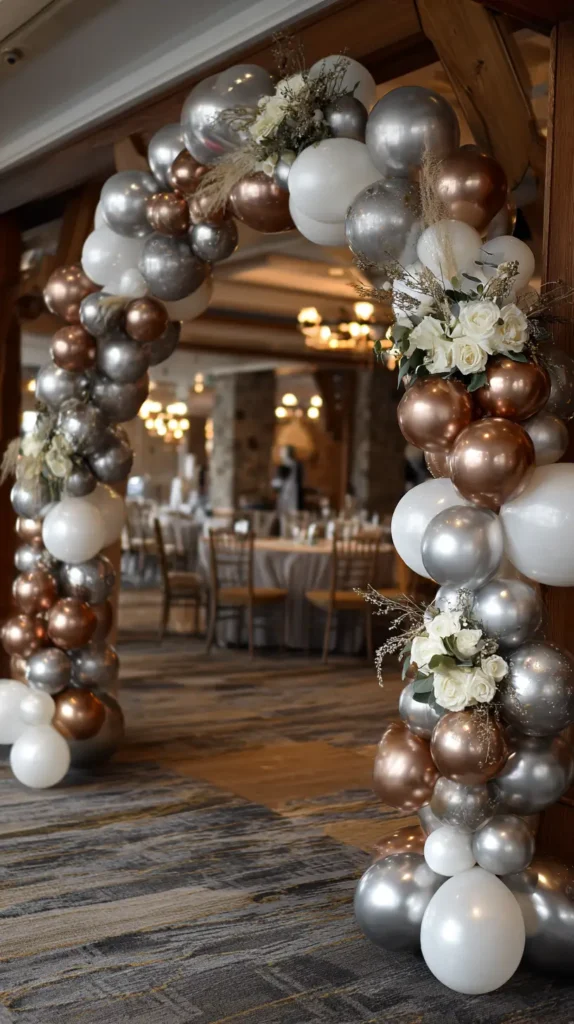
Wedding Balloon Arch Ideas That Don’t Break The Bank
Planning a wedding on a budget doesn’t mean you have to skip the pretty details. A balloon arch can add a lot of charm to your ceremony or reception. And the best part? You can make it yourself without hiring anyone.
You don’t need to figure out how to make a balloon arch from scratch. Just follow a few simple steps and focus on using what fits your style and budget.
Here’s how to keep it wedding-worthy but still affordable:
- Stick to soft, romantic colors like white, blush, or champagne
- Mix in gold, silver, or rose gold balloons for a little elegance
- Add fresh greenery or faux eucalyptus for texture
- Use a circular frame or arch stand for a clean, classic shape
- Hang it behind the cake table, at the altar, or near your photo spot
Want something even more creative? Try adding:
- Sheer white fabric woven through the balloons
- Oversized clear balloons with flower petals inside
- Soft fairy lights wrapped around the arch
These details look fancy but cost very little. A balloon arch can replace expensive floral installs. It takes up space, adds color, and frames moments perfectly—especially in photos.
For a wedding, go for a more balanced and polished look. Keep the colors soft and the shape even. Avoid too much variety or overly bright shades unless it matches your theme.
If you’re doing it yourself, build it the day before and store it somewhere cool. That gives you time to tweak it without stress.
Whether you’re planning a backyard wedding or a small indoor one, this is a fun, budget-friendly way to decorate. And it shows that with a little planning, a wedding balloon arch can look like a million bucks—even when it didn’t cost much at all.
Final Thoughts
Let’s go over what we covered in this post, because you now have everything you need to get started. Whether you’re planning a party next week or bookmarking ideas for later, knowing how to make a balloon arch saves time and money.
Here’s a quick recap:
- You don’t need helium, fancy tools, or a professional.
- Use different sizes and colors of balloons to get that full, styled look.
- Add layers with glue dots and small clusters to hide gaps.
- Stick to basic supplies like a strip, fishing line, or even just tape.
- Dress it up with greenery, paper fans, or lights for extra flair.
- Focus on where you place it for the biggest visual impact.
Balloon arches make a big statement with a small budget. That’s my favorite kind of DIY. They totally bring the fun to any party and make pics look awesome, all while being budget-friendly!
And yes, it really does feel good when someone asks who made it—and you get to say, “I did!”
Pinterest is full of over-the-top inspiration, but this post brings it down to earth. You don’t need to copy every detail. You just need the basics and a few creative tricks.
Try it once and you’ll feel like a party pro. Save this for your next birthday bash, shower, or celebration. You’ll be amazed how much style you can add for under $20.
Now that you know how to make a balloon arch that’s cute and affordable, you’re ready to plan something fun—without blowing your budget.