Snowman crafts always make me smile because they feel simple, cheerful, and easy on the wallet. I love when something cute comes together without blowing the budget. I’ve found that these little winter projects can look stylish even when the supplies come from the dollar aisle. That mix feels right for a home that wants charm without a big price tag.
I often chase that balance between cozy and cost-effective, especially during busy seasons. Many women do the same because we want our spaces to look sweet without stressing our bank accounts. Small decorations can help with that, and crafty pieces offer a fun route. Even a few playful touches can shift a room’s mood. Although styles change, the joy of creating something with your hands stays steady. It feels relaxing and doable, even on full days.
Living in warm Orlando reminds me that winter doesn’t always show up on its own. I bring it in with decor instead. Crafting offers a simple way to get that feeling without spending much, and I enjoy leaning into projects that add personality to my home. Because they’re affordable, I never feel guilty if I change them next season.
This guide dives into the cutest, thriftiest ways to make winter pieces that still look polished. I focus on ideas with charm, clarity, and a sense of fun. You’ll find easy steps, small upgrades, and quick tricks to elevate each project. Every idea works for beginners, busy moms, and anyone who wants stylish results with low effort and low cost.
Let’s talk cute winter creativity in the most budget-friendly way possible.
Some of the links on this site are affiliate links. This means that if you buy something, I might get a small commission at no extra cost to you. You can check out my full disclosure for all the details.
Quick Winter Decor with Classy Faux Marshmallow Snowman Craft
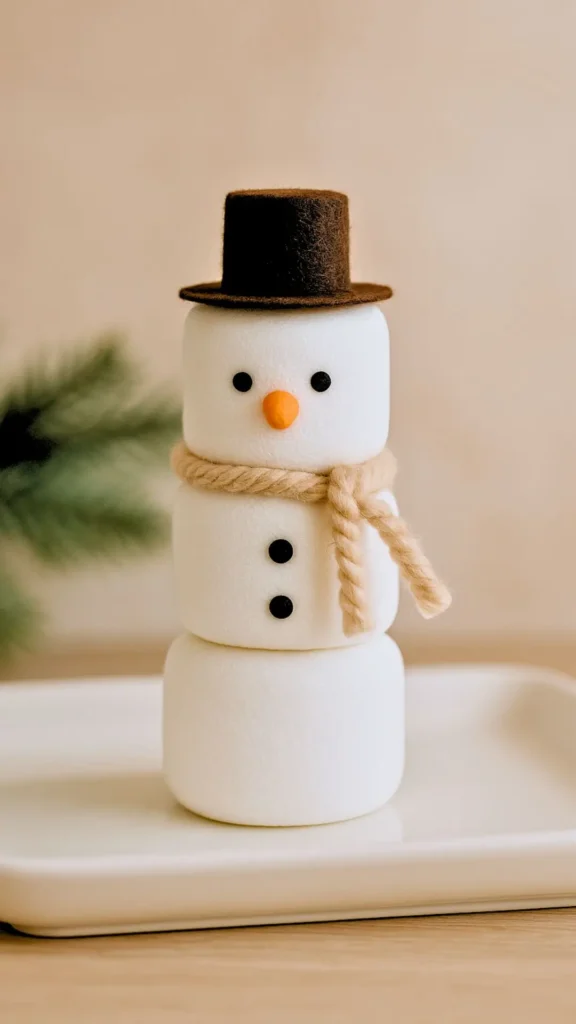
I love when something looks sweet without actually being sweet, and faux marshmallow snowmen give that exact charm. Real marshmallows collapse and get sticky fast, so the secret is using fake ones that hold their shape. They stay cute all season, and they never attract ants. Although they look soft and sugary, they behave more like decor pieces. That practical mix keeps them budget-friendly and stress-free. You get the marshmallow look without the marshmallow problems.
Start with foam marshmallows or simple white cylinders because they mimic the real shape perfectly. I’ve found that air-dry clay works too when you want custom sizes. Keep the finish matte so the final figure feels soft and fluffy. After you shape the bodies, stack three pieces in a tidy line. The clean silhouette feels cheerful without getting messy. You only need a hot glue dot to keep the pieces together.
Add small details to bring each figure to life. A thin yarn scarf gives a cozy look without overwhelming the body. Black dot eyes stay crisp on the matte surface. Use a tiny orange paper cone for the carrot nose because it sits neatly against the foam. A little felt hat finishes the design with a cute flourish. Although the pieces stay simple, they still look polished as winter decor.
These faux snowmen shine on tiered trays, coffee bars, and kitchen shelves. The look feels playful in homes that want a light, airy winter vibe. They blend easily with greenery, candles, or other snowman crafts because their small size fills gaps without clutter. Even one figure brightens a corner with almost no effort.
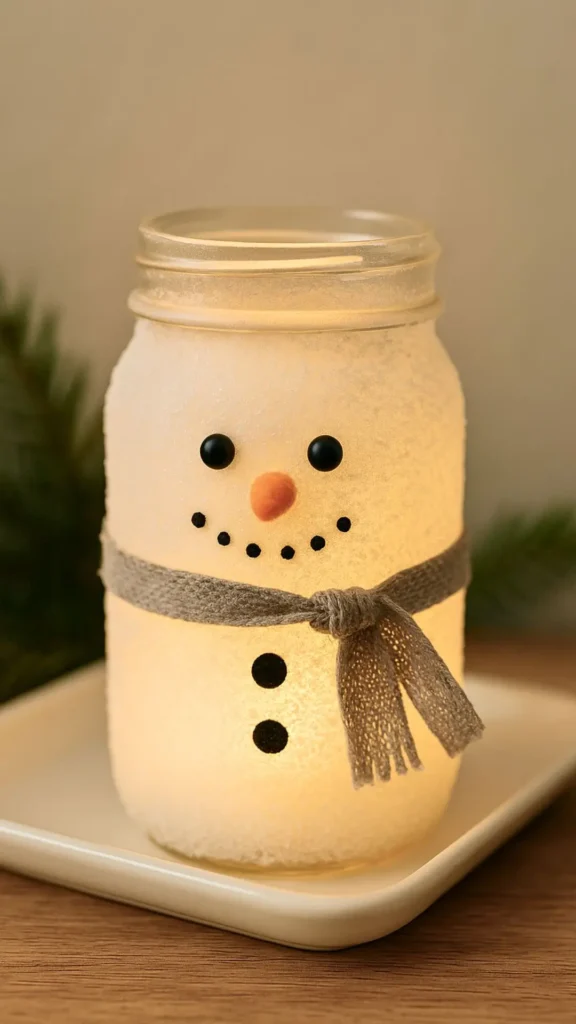
Frosty Jar Lanterns That Give Off a Warm Glow
Glass jars make ideal bases for DIY pieces because they’re cheap, sturdy, and easy to style. Although the look starts simple, it becomes adorable with a few thrifty upgrades. I’ve found that frosty lanterns instantly change a room’s vibe, especially when you add warm lights. This project stays friendly for beginners, yet it still creates an elevated finish.
Start with any empty jar you already own. Mason jars work well, but pasta sauce jars shine too. Because repurposing saves money, this craft fits a budget-focused mindset. After washing the jars, dry them fully so the materials stick. Even a little moisture can make things slide, so dry surfaces matter.
Here’s how to build your lantern:
• Brush the outside with a thin layer of white glue.
• Roll the jar in coarse white glitter or fake “snow.”
• Add a felt nose and button eyes.
• Wrap a scrap fabric strip around the rim for a scarf.
• Place a battery tea light inside so it glows gently.
Lanterns look beautiful on counters, porches, or bookshelves. Because the glow feels warm, it helps bring winter charm to areas that lack natural chill. Although the design stays simple, it feels high-end when you keep the palette neutral and the glitter subtle. Even a single lantern stands out when you style it with greenery.
I often reuse these lanterns for multiple seasons by swapping the scarf fabric. That small change stretches the craft’s lifespan, which keeps me feeling practical. Many women want cute pieces that last beyond one holiday, and this idea works well for that. You get charm, frugality, and flexibility all in one tiny craft.
People love crafts that glow, and this project always gives that cozy finish. It adds personality without clutter. It also blends perfectly into a lineup of winter favorites like other snowman crafts you might create this season.
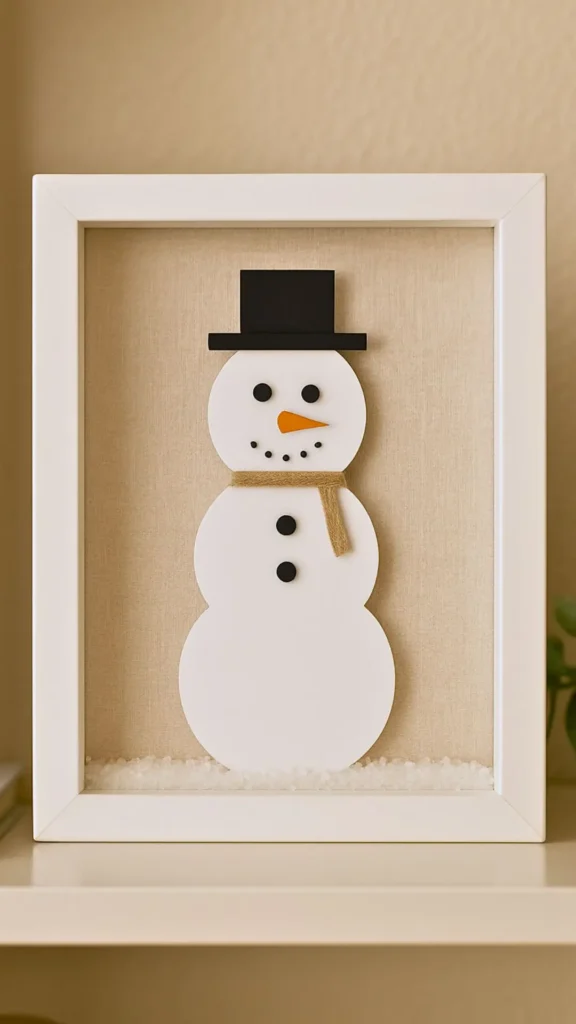
Chic Snowman Shadow Box Crafts That Look Good and Don’t Cost Much
I love it when a craft idea looks modern and clean without trying too hard. Shadow boxes give that vibe because they frame small objects in a way that feels intentional. Although they look fancy, they can come together with dollar-store supplies and a few clever swaps. I’ve found that a snowman theme works beautifully inside them because the shapes stay simple and the lines stay crisp. The finished piece feels elevated, yet you spend almost nothing to make it happen.
Start with an inexpensive shadow box in any size. Remove the backing so you can cover it with textured paper or leftover wallpaper scraps. Even a muted pattern adds depth without distracting from the central design. Many people overlook this step, but it’s the detail that makes the craft look store-bought. After the background sits in place, cut out three circles from white cardstock. Keep the edges clean so the figure feels polished. The circles don’t need to be perfect because the frame hides minor flaws, and that flexibility keeps this project easy.
Glue the circles in a gentle vertical curve instead of a straight line because that tiny shift creates movement. Add a thin strip of black paper for a hat, then shape a tiny carrot nose from an orange paint chip. Even small changes like those help the final design look purposeful. When everything dries, place the artwork back inside the frame, close it, and shake a teaspoon of faux snow across the bottom edge. The snow rests lightly without overwhelming the figure.
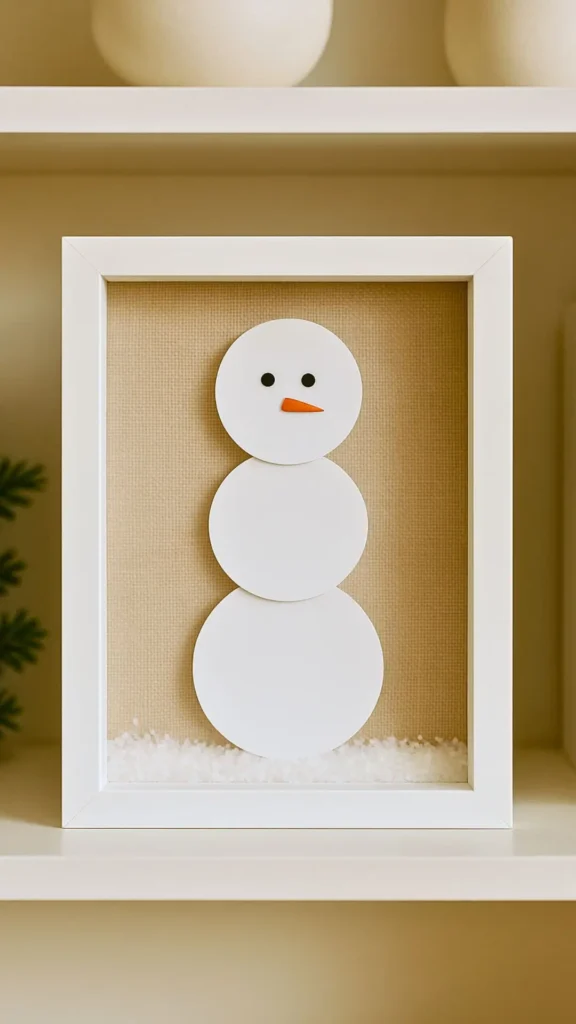
Recommended Circle Sizes for the Snowman Shadow Box
These sizes work for a 8×10 inch shadow box, which is the most common and easiest to style:
If you want a balanced, modern look:
- Head: 2 inches
- Middle: 2.5 inches
- Base: 3 inches
This gives that perfect “tapered snowman shape” without looking cartoony or cramped.
Why these sizes work:
• They leave room at the bottom for the faux snow.
• They center well without touching the frame edges.
• They keep the snowman tall enough to feel intentional, not tiny.
• They align with the visual proportions already shown in the image you generated.
If your shadow box is smaller (5×7):
- Head: 1.5 inches
- Middle: 2 inches
- Base: 2.5 inches
If your shadow box is larger (11×14):
- Head: 3 inches
- Middle: 3.75 inches
- Base: 4.5 inches
Shadow boxes shine on shelves because they act like tiny art pieces. Although the project stays simple, it feels surprisingly designer. This idea works beautifully between other snowman crafts because it breaks up textures and adds a cleaner, more modern moment to the overall display.
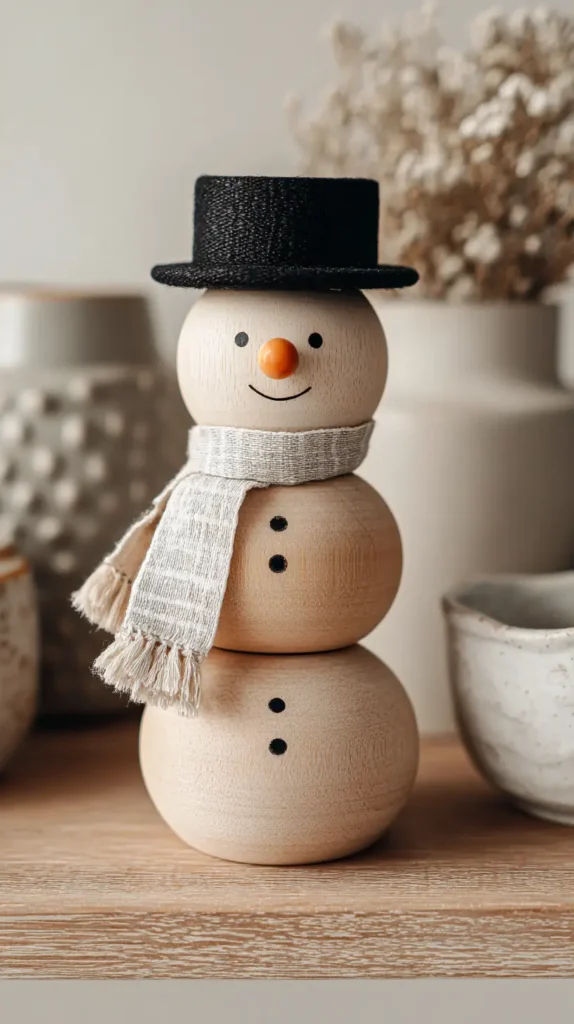
Wooden Bead Snowmen for Modern and Neutral Decor
Wooden beads continue trending because they match every style from boho to farmhouse. I enjoy using them because they’re affordable and timeless. Although they look clean and modern, they also carry warmth that suits winter beautifully. This craft stays simple while delivering major style points.
Start with a few bead sizes so the shape feels balanced. One large bead, one medium bead, and one small bead usually look best. I’ve found that plain, unfinished beads work perfectly because they accept paint or marker details. They also stay neutral if you prefer a natural finish. Either option feels chic and uncluttered. That flexibility helps you avoid buying extra supplies.
Here’s a quick list of what you need:
• Three wood beads
• A craft marker
• Hot glue
• Ribbon scraps
• A tiny hat or felt
• Optional twine for hanging
Although the project uses few materials, the outcome looks professionally made. The little snowmen sit well on trays or hang nicely on trees. Because the beads come in multipacks, you can make many figures for a low cost. That’s ideal when decorating several rooms or prepping small gifts.
To assemble your snowmen, glue the beads in a vertical stack. Draw the face with a fine marker so the lines look clean. Add a felt hat by rolling a small rectangle into a tube and gluing a circle to the top. Wrap a ribbon scrap for a scarf. It feels charming without effort.
You can also thread twine through the top bead before stacking for an ornament version. Although the design stays minimal, it still conveys personality. These snowmen fit perfectly into homes that prefer calm colors and soft textures.
I love how wooden bead pieces blend with greenery, neutral knits, and soft holiday lights. These tiny figures help fill shelves without making them feel crowded. Even better, they complement almost any winter DIY, including other snowman crafts you might try.
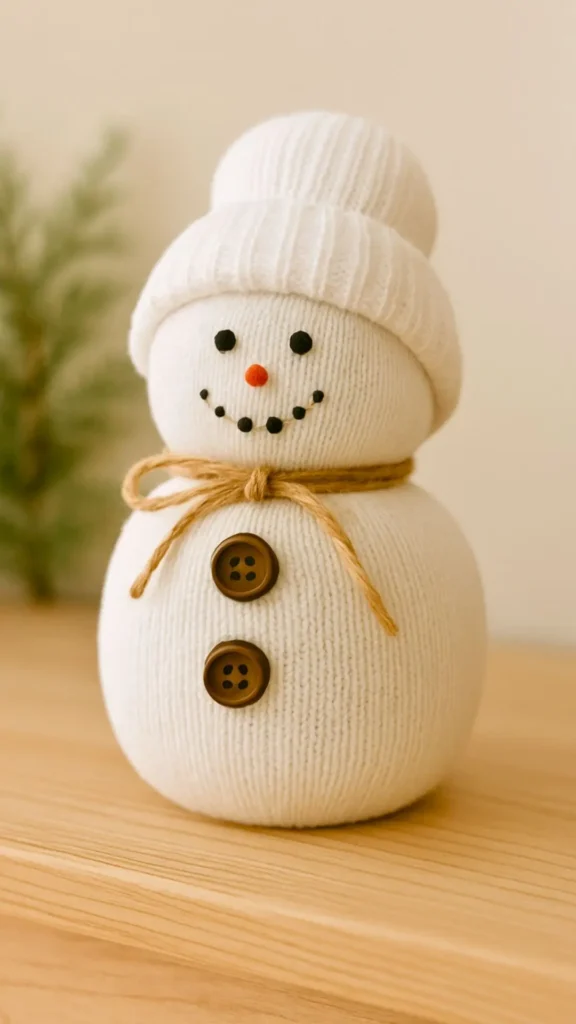
Easy Sock Snowmen for Soft and Adorable Decor
Sock crafts might be the best secret in budget-friendly decor because they turn everyday items into charming pieces. I love how they feel soft and cozy, especially when styled with winter colors. Although they start as simple socks, they transform quickly into sweet figures. Even kids enjoy helping because the steps stay simple.
You only need one clean white sock, a handful of rice, some string, and a scrap of fabric. The cost stays low because most people already have these supplies. Even better, the project looks polished when you add tiny details. I’ve found that neutral tones give the finished snowmen a stylish studio look.
Here’s what to gather:
• One white sock
• Rice or polyfill
• String or twine
• Buttons
• Ribbon
• Markers for the face
• Small fabric scrap for hat
Fill the sock with rice until it holds a round shape. Tie off the top. Use another string piece to create a smaller head shape. Although the body stays soft, it still stands well on shelves. Add button details, draw a little face, and wrap a scarf around the neck. Roll the leftover sock top into a tiny hat. It’s simple but adorable.
Because these snowmen weigh a bit from the rice, they stay put even on smooth surfaces. That makes them great for entry tables or kitchen counters. They also look cute grouped in threes. You get a polished look without paying store prices, and that helps you stay budget-conscious.
People love how customizable they are. You can match scarf colors to your home palette or switch outfits each season. This playful craft pairs well with other winter pieces, including snowman crafts that use beads, jars, or marshmallows. It all blends into one charming, cohesive theme.
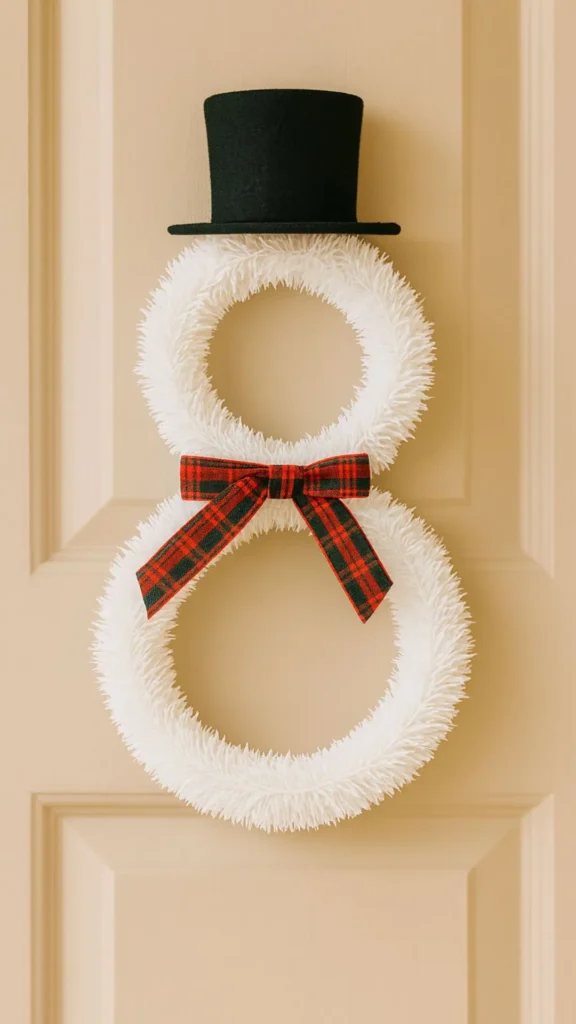
A Dollar Store Snowman Wreath That Looks Fancy
Wreaths set the tone for a home because they greet every visitor. I enjoy making versions that look high-end without high-end costs. Although store-bought wreaths can run pricey, you can create a beautiful snowman version for very little. The secret is using two wreath forms instead of one.
Start with a large wreath form and a smaller one. Attach them using wire or zip ties. Once they connect, the snowman outline appears instantly. It feels cheerful and classic, yet still modern. Because wreath forms often cost only a few dollars, you keep spending low from the start.
Here’s how to style it:
• Wrap both forms with garland or tinsel.
• Add a ribbon scarf around the neck area.
• Use a black hat cut from felt.
• Add white mesh for texture.
• Finish with small picks or berries.
Although the design sounds simple, it looks full and impressive. You can choose supplies that match your home’s palette so the final piece feels intentional. I’ve found that mixing matte and shiny textures adds depth without adding cost. Even a dollar store garland can look lush when layered well.
This wreath works on doors, entry walls, or porch spaces. Because it uses lightweight materials, it hangs easily. Even better, you can repurpose the form each year by changing the scarf or hat. That little flexibility stretches your budget further.
A snowman wreath also pairs well with indoor winter decor. It helps carry the theme from your porch to your living room. Although the style stays simple, it still looks polished enough for guests. People love themed pieces that stay charming and not too busy. This craft gives you that perfect blend.
If you enjoy finishing your home with affordable seasonal accents, this wreath fits right in. It also complements the rest of your snowman crafts and sets a cheerful winter mood.
Last Wintery Ideas for Crafts with Snowmen
I love winter projects that feel fun, stylish, and easy on the budget. I’ve found that snowman crafts deliver that blend every time because they offer charm without costing much. They also work well across different spaces, which makes decorating simple. Even small pieces can shift a room’s energy and make it feel more welcoming.
I enjoy using materials that stretch far because they help me stay smart with spending. Many women want this balance too. Cute home touches should feel joyful, not stressful. These projects give that feeling because they’re simple and flexible. You choose the colors, textures, and details that match your home’s personality. Each small change keeps things fresh.
Living in Orlando means I don’t get natural winter weather. I bring it in through decor instead. Crafting offers a fun, affordable way to create those seasonal moments I crave. I enjoy when my home feels cozy without going overboard.
These ideas also help you build a collection you can reuse in future years. That long-term value matters because it stretches every dollar. Even when trends shift, handmade winter pieces hold charm. Playful touches never go out of style.
I also love how these projects inspire creativity on Pinterest because people enjoy saving cute winter ideas. When a craft looks stylish and budget-friendly, it grabs attention fast. Many women love pieces that look handmade yet polished, and these projects offer both.
Your home deserves personality without pressure. These small crafts give you that happy middle ground. Snowman crafts keep things light, cute, and completely doable.