Ham and cheese sliders are one of those simple, low-cost meals that somehow feel like more than just a sandwich. If you’re trying to stretch your grocery budget, these little baked sliders can go a long way. They’re warm, cheesy, filling, and honestly pretty fun to make. This post is packed with practical tips to make them even cheaper, how to serve them for different occasions, and how to keep things simple without losing flavor.
I’ve included ideas that help save money on ingredients, like ways to use up leftovers or swap things out when the fridge is looking bare. Whether you’re making dinner for your family, prepping for a party, or just trying to use up that pack of Hawaiian rolls, I’ve got you covered. You’ll also find creative ideas to dress them up or down depending on the situation.
You don’t need fancy tools or hard-to-find ingredients either. Most of what I’m sharing can be done with what you probably already have in your kitchen. I made sure this post fits into any budget and makes your time in the kitchen a little easier, too.
We’ll cover how to build the best ham and cheese sliders, tips to prep them ahead, how to serve them for crowds, and even what to pair with them. I’ve also included ideas for picky eaters, busy days, and super cheap grocery weeks.
If you like meals that feel special but don’t break the bank, keep reading. This is the kind of meal that works for moms, families, or anyone looking to feed a group without stress. Let’s talk sliders, saving money, and keeping things easy.

This site includes affiliate links; you can check the disclosure for more details.
Smart Budget Meal
Ham and cheese sliders hit the sweet spot when it comes to cost, convenience, and crowd-pleasing flavor. You don’t need much to make them, and they stretch well for feeding several people without costing a lot. For anyone sticking to a budget, this is a win.
Here’s what makes them budget-friendly:
- You can use leftover ham, deli slices, or even frozen ham
- Cheese doesn’t need to be fancy—use slices, shredded, or whatever is on sale
- Buns can be store-brand rolls, mini buns, or even dinner rolls
- Sauce ingredients are pantry basics—no need for anything special
They also don’t take long. You can have them in the oven in under 10 minutes. That makes them great for busy nights when you don’t want to spend hours cooking.
Here are some other reasons I think these sliders are smart:
- They freeze well, which means fewer wasted leftovers
- You can make a whole batch for under $10
- Everyone eats them—kids, teens, husbands, guests
- You can stretch pricier meats by mixing in cheaper ones like turkey or chopped bacon
I also love that you can prep them in a pan all at once. It saves time, saves dishes, and saves you from standing over a stove.
And since ham and cheese sliders are easy to carry, they work great for potlucks or family get-togethers. You don’t need to spend a lot to bring something warm and delicious.
If you’re looking for meals that check every box—easy, filling, cheap, and loved by all—this is one worth keeping on rotation.
Best Bread Options for Ham and Cheese Sliders (And Ways to Save)
You don’t need fancy bakery rolls to make ham and cheese sliders taste amazing. The bread is just the base, and there are so many ways to save here.
The classic choice is sweet Hawaiian rolls. They’re soft, slightly sweet, and perfect for these sliders. But they’re not always the cheapest. Here’s how to swap and save:
- Store-brand Hawaiian rolls: Usually $1–$2 cheaper than name brands
- Leftover dinner rolls: Cut them in half, they work the same
- Hot dog or hamburger buns: Cut into slider sizes
- Homemade rolls: If you bake, this is the cheapest option
- Day-old bakery rolls: Many stores discount these at the end of the day
You can even slice a full loaf of soft bread into squares if you’re really in a pinch. Just lay the slices in your pan, build your layers, and you’re good.
Tips for stretching the bread:
- Slice rolls thinner to make more layers from the same pack
- Use crusty edges for kids—they love the crunch
- Toast the bottoms slightly to keep from getting soggy
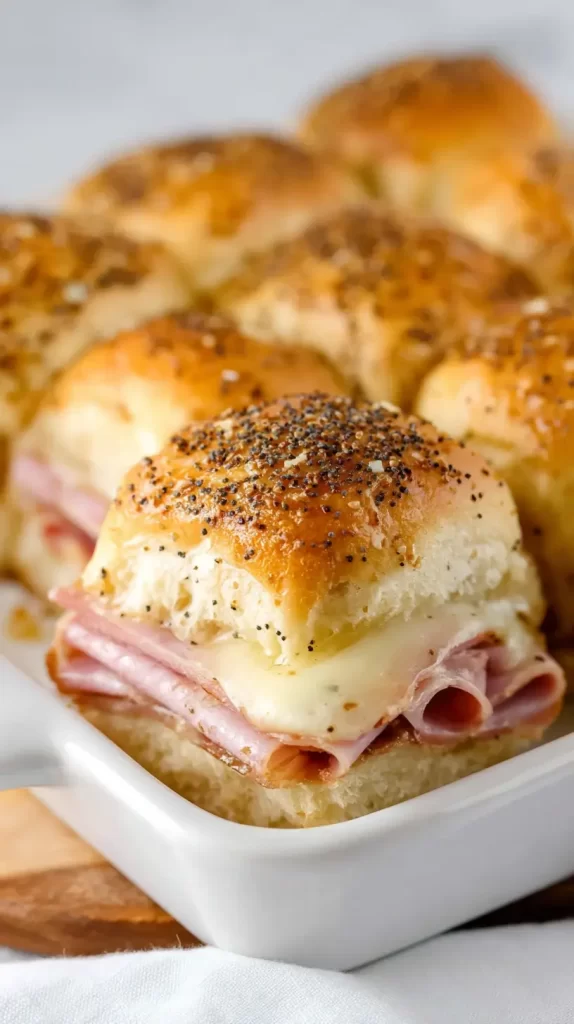
Want to make it look fancy without the cost? Brush the tops with melted butter and sprinkle with sesame seeds or everything seasoning. It gives that bakery look without paying extra.
Bread is a great place to get creative. Just remember, it’s what’s inside that really makes it shine. And with ham and cheese sliders, what’s inside is always good.
How to Build Ham and Cheese Sliders That Taste Amazing
Building great ham and cheese sliders is simple, but there are a few tricks that make a big difference. You want every bite to be cheesy, warm, and full of flavor.
Start with your bread. Keep it soft and split the rolls all together so they stay in one piece. This makes assembly quick and easy.
Layer like this:
- Bottom rolls
- Thin layer of mustard or mayo (if using)
- Layer of ham (folded or flat)
- Layer of cheese (sliced works best)
- Top rolls
Now for the secret sauce. Mix melted butter with a little Dijon, onion powder, and poppy seeds. Pour it evenly over the top. Let it soak in for a few minutes before baking.
More ways to boost the flavor:
- Add sliced pickles for a tangy twist
- Use two types of cheese for variety (cheddar and Swiss work great)
- Sprinkle garlic powder into the butter sauce
Then, cover loosely with foil and bake until the cheese is melted and the tops are golden. Usually 20 minutes at 350°F does the trick.
Make sure not to overload the sliders with meat or cheese. You want them balanced, not messy. A little goes a long way, especially when you’re trying to save money.
When they come out of the oven, let them rest for a minute. Then cut them into individual sliders and serve warm. These are one of those meals where people always go back for seconds.

Easy Add-Ins and Substitutions to Use What You Have
If you don’t have all the classic ingredients for ham and cheese sliders, don’t worry. These are one of the easiest meals to tweak. You can swap or stretch ingredients and still end up with something delicious.
Cheese substitutions:
- American cheese
- Mozzarella
- Provolone
- Shredded cheese blends
Ham substitutions:
- Turkey
- Roast beef
- Cooked bacon
- Rotisserie chicken
If you’re low on deli meat, you can chop it up and mix it with shredded cheese to stretch it out. Add a few thin tomato slices or some sautéed onions to bulk it up with what’s in the fridge.
Sauce swaps:
- Ranch dressing
- Garlic butter
- Italian dressing
- A mix of mayo and hot sauce
Bread options, again, can be anything soft. Even a sliced loaf of sandwich bread works if you arrange it in layers.
Want to hide veggies inside?
- Thinly sliced spinach
- Grated carrots
- Sautéed mushrooms
These are easy ways to add nutrition without complaints.
Using what you have keeps your food waste down and your grocery costs lower. That’s the beauty of ham and cheese sliders. You can always make it work with what’s around.

How to Prep Ham and Cheese Sliders Ahead for Busy Days
Busy days happen. Whether it’s a school night, church event, or sports practice, dinner sometimes needs to be grab-and-go. The good news? Ham and cheese sliders are super easy to prep ahead.
Here’s how I like to do it:
- Assemble the sliders completely but don’t add the butter topping yet
- Wrap the pan tightly in foil
- Stick them in the fridge for up to 2 days
When it’s time to eat:
- Uncover and pour the butter topping over the sliders
- Bake as usual, adding 5 extra minutes if baking straight from the fridge
Want to freeze them?
- Wrap individual sliders in foil
- Freeze flat in a freezer bag
- Reheat in the oven wrapped, then uncover for the last few minutes
If you’re feeding just one or two people, bake a few at a time. Keep the rest in the fridge until needed.
Prepping ahead saves you stress and avoids last-minute takeout. It also keeps you in control of your food budget.
Other make-ahead tips:
- Pre-mix the butter topping and store in a small jar
- Chop the deli meat and cheese for easy assembly later
- Use disposable pans for easy cleanup when taking them to events
Ham and cheese sliders are perfect for planning ahead. They’re flexible, fast to reheat, and taste just as good the next day.

Side Dish Ideas to Go With Ham and Cheese Sliders
Sliders are the main event, but sides can stretch the meal without spending much more. You don’t need anything fancy. Just a few filling and affordable ideas.
Easy, budget-friendly sides:
- Bagged coleslaw
- Potato chips
- Fruit salad with in-season fruit
- Roasted carrots or broccoli
- Macaroni salad or pasta salad
- Pickle spears
Hot options if you’re serving guests:
- Baked beans
- Hash brown casserole
- Oven fries
Cold lunches? Pair sliders with:
- Applesauce
- Cut veggies and dip
- Pasta tossed with olive oil and herbs
You can even turn sliders into a meal board. Add:
- A pile of sliders in the middle
- Bowls of chips and dips
- A few sliced veggies
- Something sweet like brownie bites
No one will feel like they’re eating on a budget when it’s presented like that.
And if it’s just a casual family night, keep it easy:
- Popcorn
- Sliced apples with peanut butter
- Cucumber salad
Sides don’t have to cost much. Just choose things that are in season or already in your fridge. Simple is always enough when the main dish is warm, cheesy, and filling.

Ham and Cheese Sliders
MoneyMattersMama.comIngredients
- 1 12-count package Hawaiian sweet rolls
- 1/2 pound deli-sliced ham
- 1/2 pound sliced Swiss cheese
- 1/4 cup mayonnaise optional
- 1/4 cup Dijon mustard optional
Butter Topping
- 1/2 cup 1 stick unsalted butter, melted
- 1 tablespoon Dijon mustard
- 1 tablespoon poppy seeds
- 1 teaspoon onion powder
- 1/2 teaspoon garlic powder
Instructions
- Preheat the oven to 350°F.
- Slice the Hawaiian rolls in half horizontally, keeping the top and bottom halves intact.
- Place the bottom half of the rolls in a 9×13-inch baking dish.
- If using, spread a thin layer of mayonnaise on the bottom rolls.
- Layer all the sliced ham evenly over the bottom half of the rolls.
- Add a layer of Swiss cheese over the ham.
- If using, spread Dijon mustard on the inside of the top half of the rolls.
- Place the top half of the rolls over the cheese to form a sandwich slab.
- In a small bowl, whisk together the melted butter, Dijon mustard, poppy seeds, onion powder, and garlic powder.
- Pour the butter mixture evenly over the tops of the rolls, spreading it gently to coat.
- Cover the baking dish loosely with foil.
- Bake for 15 minutes, then remove the foil and bake uncovered for 5 more minutes or until the tops are golden.
- Remove from oven and let sit for 5 minutes before slicing into individual sliders.
- Serve warm.

Final Thoughts on Serving and Saving With Ham and Cheese Sliders
Ham and cheese sliders are one of those meals that just make sense. They’re budget-friendly, easy to prepare, and everyone seems to love them. You can dress them up or keep them simple, and they still work for almost every situation.
Here’s a quick recap of what we covered:
- How to save money using different breads, meats, and cheeses
- Ways to prep ahead for busy nights or events
- How to freeze them so you always have a meal ready
- Budget-friendly side ideas that stretch your meal
- Substitutions that let you use what you already have
These sliders are a go-to option for anyone trying to feed a group without overspending. You don’t need to follow the recipe exactly to get great results. The key is being flexible and using what’s on hand.
They’re also a great way to avoid waste. Leftover ham, bits of cheese, and day-old rolls all have a place in this meal.
If you’re into Pinterest, these are definitely worth pinning. They show up a lot in meal plans, party spreads, and freezer prep boards because they’re just that versatile.
Next time you’re planning your grocery list, think about adding ham and cheese sliders to your meal rotation. They’re fast, affordable, and a little more exciting than a plain sandwich.
And best of all, they’re the kind of meal that works for any day—whether you’re feeding a crowd or just trying to avoid the drive-thru.

