There’s a specific kind of denial that happens every spring when I look at my sad, empty patio and pretend it’s “minimalist.” Then Instagram shows me another gorgeous outdoor lounge setup for basically nothing, and I remember the whole DIY patio furniture thing is very real and very doable. Living in Orlando means my patio is basically a second living room for about nine months a year, so this stuff genuinely matters to me. Somewhere between the sunshine, the humidity, and the guilt of another empty corner, I decided it was time to stop scrolling and start building.
Here’s the thing nobody tells you upfront: you don’t need power tools, a garage full of lumber, or a design degree to make this happen. What you do need is a little patience, a decent glue gun, and a willingness to mess something up on the first try. I’ve found that the projects everyone assumes are complicated are usually the easiest ones once you start.
Budget matters here too, since nobody wants to drop a car payment on a chair. I tend to notice that the pricier “boho outdoor” look often comes from cheap materials styled with confidence, not from expensive brands. That realization alone changed how I shop for supplies.
So grab a lemonade, sit down, and let me walk you through the pieces, the materials, and a couple of mistakes I’d love for you to skip. There’s one hack coming up later that genuinely changed how I think about outdoor seating, and I promise it’s worth the wait.
Some of the links on this page are affiliate links, which means I may earn a small commission if you purchase through them. It never costs you extra. You can always peek at my full disclosure if you’d like the details.
Why DIY Patio Furniture Is Having a Moment
Everyone and their neighbor seems to be building outdoor furniture right now. I don’t think that’s a coincidence. Store-bought patio sets got expensive fast. A lot of them still look like they came from the same three catalogs. I tend to notice that handmade pieces just have more personality, even when they’re a little imperfect.
There’s also the practical side of things. Florida weather is brutal on furniture, honestly. I’m not about to spend hundreds of dollars on something that fades in one humid summer. Building it myself means I can pick materials that hold up. I can also swap out cushions or finishes whenever I get bored.
Can we talk for a second about how satisfying it is to say, “I made that”? There’s a real confidence boost that comes from building your own coffee table. It’s nothing like assembling one from a flat box. That feeling is closer to cooking a great meal from scratch, except this one lasts for years.
The other part of this trend people don’t mention enough is flexibility. When you build your own patio pieces, you’re not locked into one style forever. You can start simple, then add cushions, paint, or new hardware as your taste changes.
Here’s my honest opinion: most people skip DIY patio furniture because they assume it needs serious carpentry skills. It really doesn’t. Plenty of these projects involve cinder blocks, wood planks, and a few screws. That means almost anyone can pull this off in a weekend. That accessibility is exactly why the trend isn’t going anywhere soon. It’s also why I keep coming back to it every season.
The Cheap Materials That Don’t Look Cheap
I’m going to let you in on a little secret from every budget DIY blog ever. Expensive-looking DIY patio furniture almost never uses expensive materials. It’s mostly clever choices and good styling. Once you know which materials to grab, the whole project gets a lot less intimidating.
Here’s what I reach for again and again, in no particular order:
- Cinder blocks and untreated wood planks for benches and side tables
- Wood pallets, sanded down and stained for a warmer look
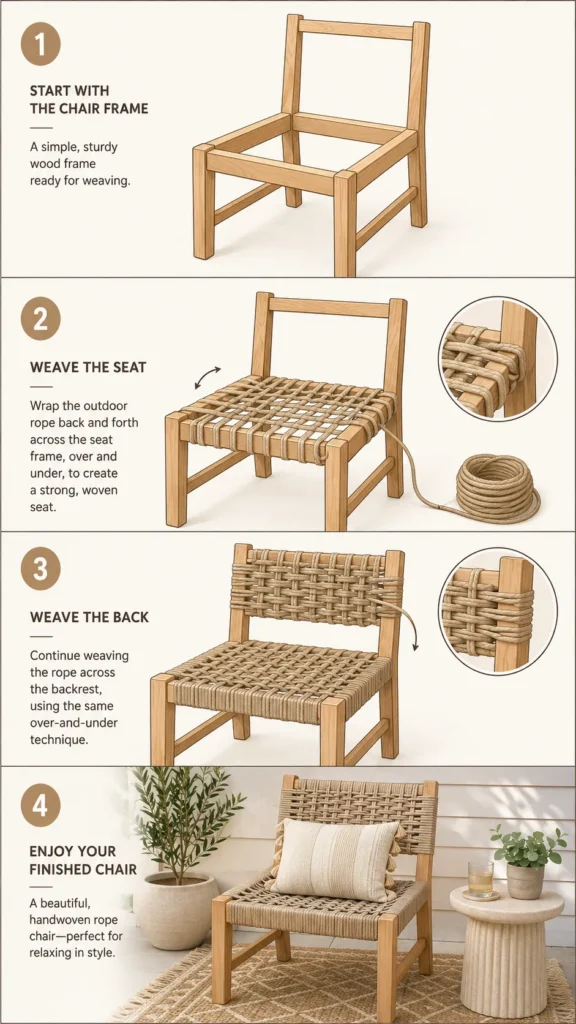
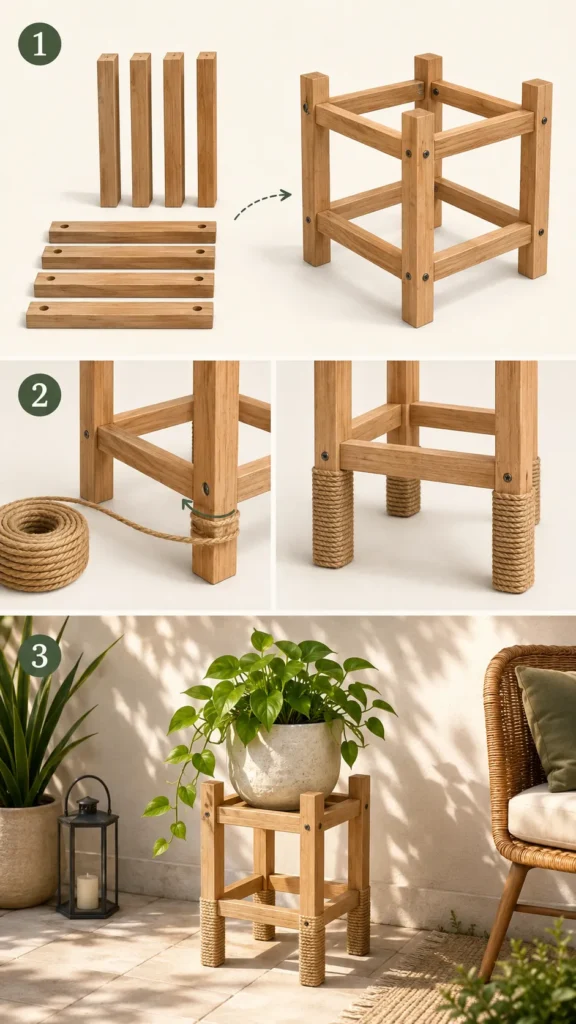
- Outdoor-rated rope for a woven accent chair or plant stand
- PVC pipe, painted, for lightweight side tables
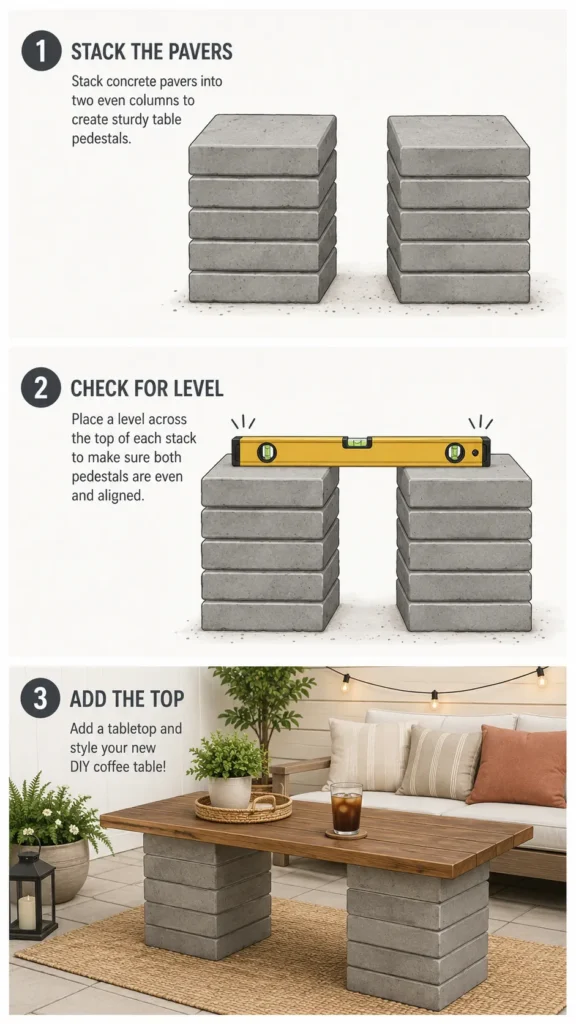
- Concrete pavers stacked for a sturdy little coffee table base
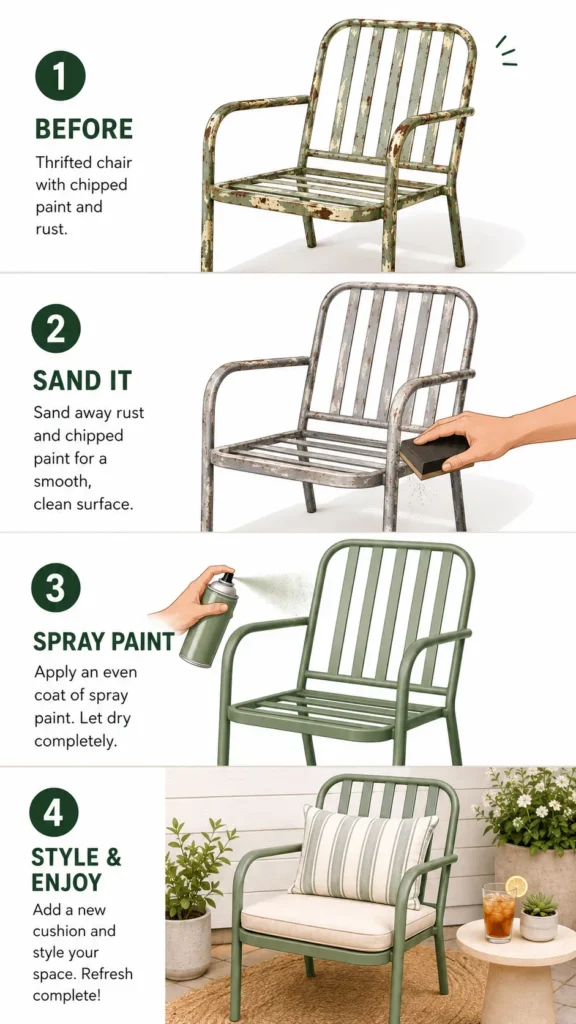
- Weatherproof spray paint in a bold color to tie everything together
None of these cost much. Most hardware stores carry all of them in one trip. I tend to notice that pallets get a bad reputation for looking rough. A light sanding and two coats of stain fix that fast.
Rope is probably my favorite cheat code here. Wrapping it around a plain wood frame instantly makes a chair look designer-made. It’s such a small effort for such a big visual payoff, and it barely costs anything per chair.
One thing I’d tell any beginner: buy a little more material than your project calls for. Measuring outdoor pieces is trickier than indoor furniture because surfaces aren’t always level. Extra wood or rope means you’re not stuck mid-project waiting on a return trip to the store.
Quick gut check before you buy anything: does the material handle rain, sun, and humidity without falling apart? If the answer’s no, skip it, no matter how cheap it looks in the store.
My Favorite Pieces to Start With
If you’re new to DIY patio furniture, please don’t start with a full sectional. I imagined that mistake in my head about ten times before realizing it’s way too much. Start small, get one win under your belt, then build confidence from there.
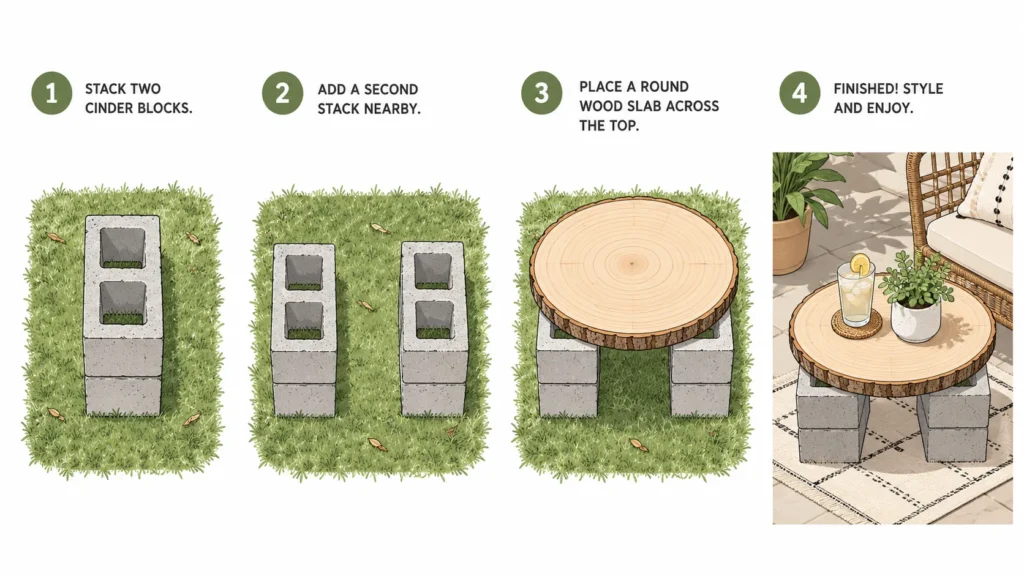
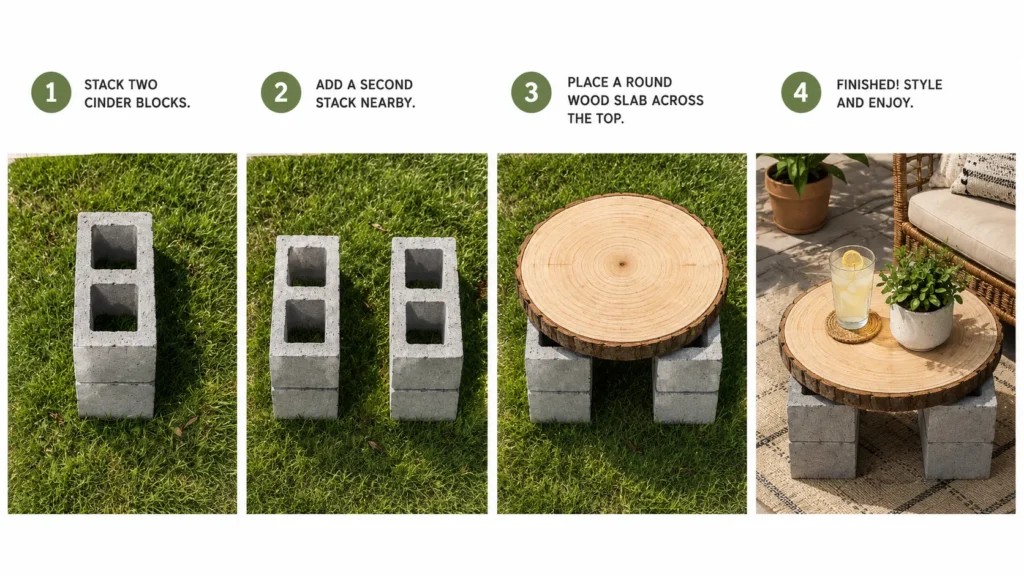
A simple side table is the easiest entry point I know. Stack a few concrete pavers, add a round wood top, and it’s sturdy in under an hour. It looks intentional, holds a drink without wobbling, and costs less than a fancy coffee order.
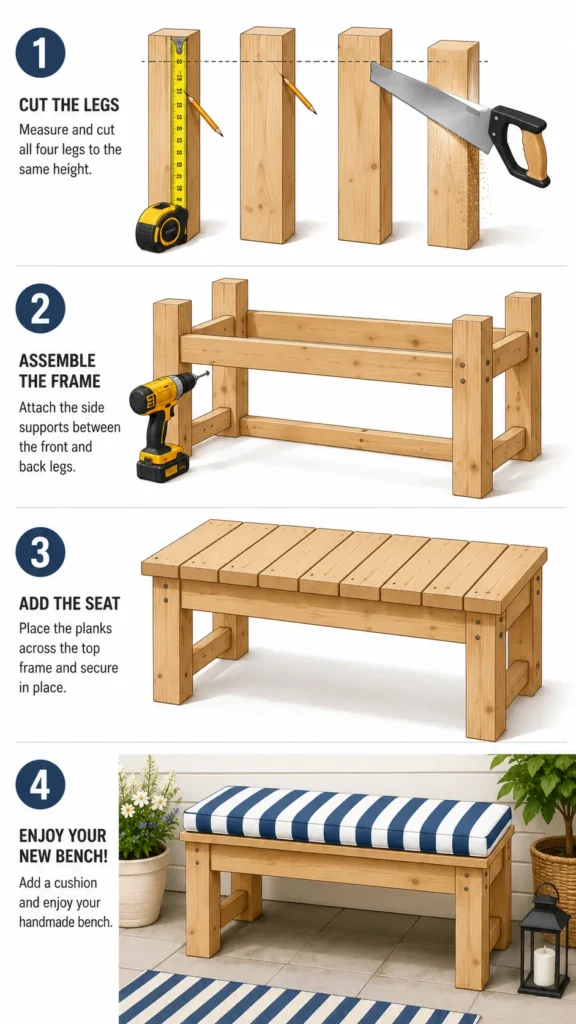
After that, I’d move to a wood bench. Two by fours, some wood screws, and an afternoon are basically all you need. Add a striped outdoor cushion on top, and it instantly looks like a catalog find.
Once you’ve got a table and a bench, a small plant stand rounds things out nicely. I like building these from thick rope or leftover wood scraps. It uses up material from earlier projects. It’s a great way to avoid waste while adding height and texture to your space.
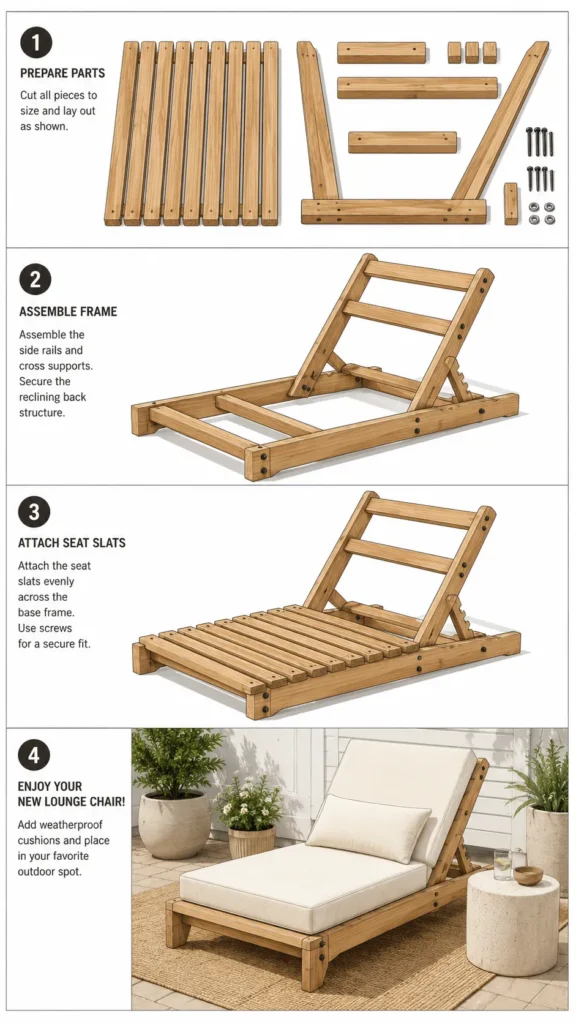
If you’re feeling brave, a lounge chair frame is next on the list. This one takes more patience, since the angles matter for comfort. I’ve found that a simple slanted-back design works better than anything overly fancy. Wood slats and weatherproof cushions are all it needs.
None of these pieces need to happen at once. I like spacing mine out over a few weekends so the whole thing stays manageable. Plus, watching your patio slowly fill in with pieces you built is one of the best parts. It beats scrolling through someone else’s finished project every time.
Building a Basic Bench, Step by Step
Let’s build something now, since reading about furniture only gets you so far. A basic bench is the perfect place to prove this whole DIY patio furniture thing is achievable. It’s sturdy, useful, and forgiving if your cuts aren’t perfectly straight.
Here’s the basic process I follow:
- Grab four wood legs, cut to matching heights for a level seat
- Attach two side supports to connect the front and back legs
- Lay three or four wood planks across the top for the seat
- Secure everything with wood screws and outdoor wood glue
- Sand down any rough edges so nobody snags their clothes
- Finish with a weatherproof stain or paint in your favorite color
That’s really it. No fancy joinery, no complicated measurements, just solid basic steps that anyone can follow with a little patience.
I will say this part loud for the people in the back: measure twice, cut once. It sounds like a cliché because it’s true, and skipping it is how projects go sideways fast. I’ve found that a slightly wobbly leg is almost always a measuring mistake, not a building mistake.
Once your bench frame is solid, don’t rush the finishing step. A good stain protects the wood from sun and rain, which matters a lot here in Florida. Let it dry fully before you sit on it, even if you’re excited to try it out immediately.
Add a cushion or a folded blanket for extra comfort, and you’re done. This one bench alone can anchor a seating area with a table and a chair. It’s proof that basic tools and a weekend can genuinely change how your patio looks and feels.

DIY Patio Furniture Mistakes to Skip
Let’s talk about the stuff that trips people up. I’d rather you skip these than learn them the hard way. The biggest one, by far, is skipping a weatherproof finish. Untreated wood left outside in Florida humidity warps and rots faster than you’d expect.
Another mistake I see constantly is using indoor hardware. Regular screws and nails rust quickly outside, which weakens your furniture over time. Stainless steel or coated outdoor hardware costs a little more. It saves you from rebuilding the same piece next year.
People also tend to underestimate weight and stability. A wobbly table isn’t just annoying, it’s genuinely unsafe with a heavy drink or someone leaning on it. I always test my pieces by pushing on them from different angles before calling them finished.
Here’s a slightly controversial one: don’t obsess over perfection. I used to sand every surface until it was flawless. It slowed me down for no real reason. Patio furniture gets rained on, sat on, and dragged around. A little imperfection barely matters once it’s styled.
Skipping proper drying time is another sneaky mistake. Stain and paint need real time to cure, not just look dry on the surface. Rushing this step means your finish scratches or peels way sooner than it should.
Last one, and this surprised me the first time I heard it: don’t skip planning for drainage. Wood pieces that sit directly on wet ground rot from the bottom up. Raising furniture even slightly, with feet or a paver base, extends its life dramatically. Small fix, huge difference, and it’s one detail almost nobody mentions until it’s already too late.

Making It Look Pulled Together
Building DIY patio furniture pieces is the easy part. Making them look like they belong together is where the real magic happens. I’ve noticed a huge difference between a patio full of random furniture and one that feels curated. Both can use the exact same budget.
Color is where I’d start. Pick two or three shades and stick with them across every piece you build. It keeps things cohesive, even if your bench, table, and chairs came from three totally different projects.
A few small styling moves that make a big visual difference:
- Add outdoor cushions in a repeated pattern or color family
- Layer a small rug underneath your main seating area
- Group plants at different heights near your furniture
- Use string lights to soften the space once the sun goes down
- Keep metal finishes consistent, like all black or all bronze hardware
I tend to notice that lighting gets overlooked constantly. It’s one of the biggest factors in how a space comes together. String lights turn a plain patio into somewhere you genuinely want to sit after dinner.
Texture matters just as much as color, if not more. Mixing rope, wood, and woven fabric keeps things from looking flat or one-note. If everything you build has the same smooth wood finish, the space can start to feel sterile.
Here’s a reset for you: don’t try to match everything perfectly. A slightly mismatched, collected-over-time look is way more charming than a matchy showroom set. That’s the whole appeal of building things yourself instead of buying a boxed set. Give yourself permission to let pieces evolve slowly, one weekend project at a time.

Budget-Friendly DIY Patio Furniture Ideas That Don’t Skimp on Style
Let’s address the elephant on the patio: budget-friendly doesn’t mean boring. I used to assume cheap automatically meant plain, and I was completely wrong about that. Some of the best-looking outdoor setups I’ve come across cost less than one store-bought chair.
Painted cinder block planters doubling as side table bases are a great example. They’re basically free if you already have a few blocks lying around. Top them with a round wood slab, and suddenly you’ve got a piece that looks custom-made.
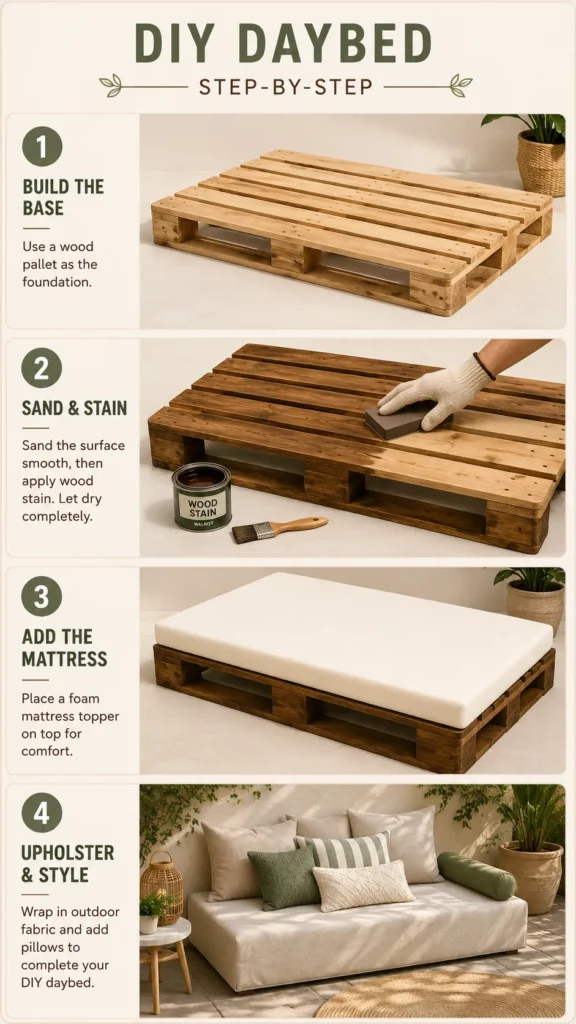
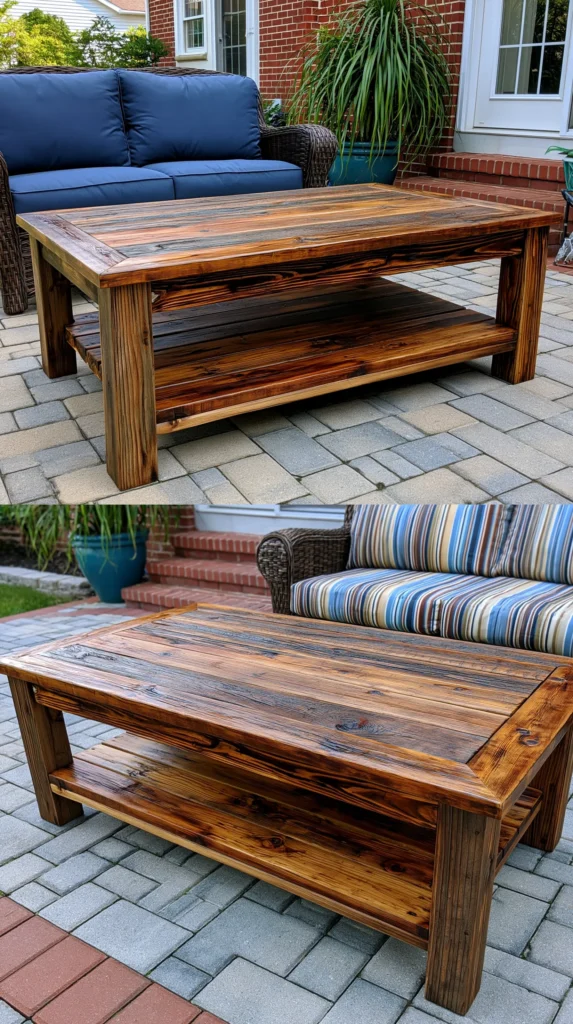
Old wood pallets are another budget hero. I’ve mentioned them already, but they deserve a second shoutout. Break them down for planks, then build a low coffee table or a daybed frame. A coat of stain transforms them completely, and nobody would guess the material’s original life.
Rope-wrapped accent chairs are shockingly affordable too. A basic wood frame plus a roll of outdoor rope costs way less than people expect. The woven texture instantly reads as expensive, which feels like cheating in the best possible way.
Here’s something I didn’t expect when I started this project: secondhand frames are often better than new lumber. Thrifted metal chair frames just need fresh paint and new webbing to look brand new again. Check yard sales and marketplace listings before buying anything new.
One more idea worth trying: build a simple daybed with a wood pallet base and a foam topper. Wrap it in outdoor fabric, add pillows, and it becomes the coziest corner of your entire yard. It costs a fraction of a store version, and it somehow always ends up being everyone’s favorite spot.

Building a Geometric Wood Mosaic Side Table
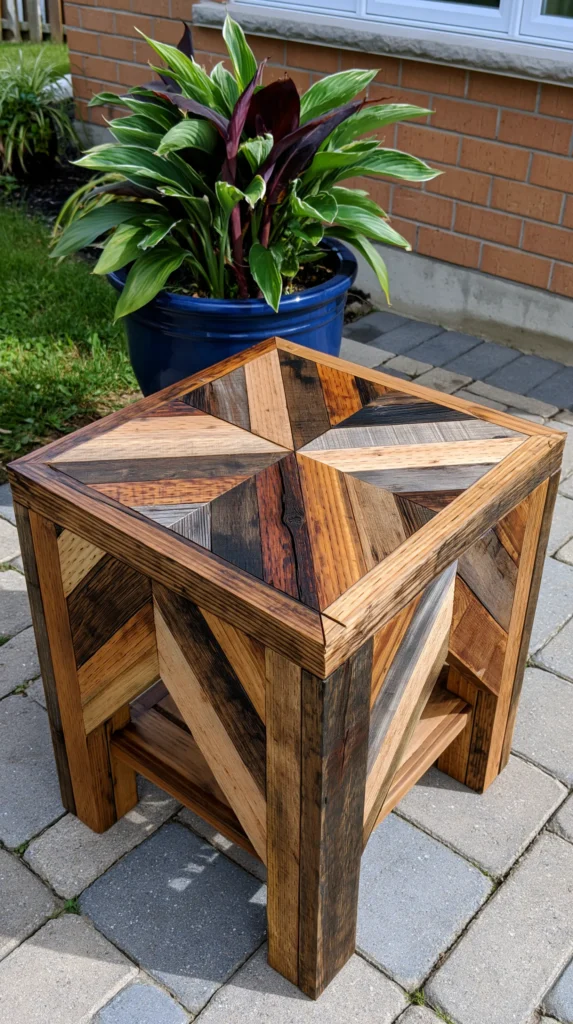
Okay, this one’s a level up, but don’t let the fancy pinwheel top scare you off. It looks like something from a boutique furniture shop, but it’s really just scrap wood cut into strips and arranged with a little patience. I’ve found that the “wow factor” here comes almost entirely from the pattern, not from any advanced skill.
Here’s the general build process:
- Collect scrap wood in a few different tones, since the color variation is what makes the pattern pop
- Cut strips at matching 45-degree angles to form triangle sections
- Arrange four triangles into a pinwheel pattern for each quarter of the tabletop
- Glue the pieces onto a plywood base, then clamp until fully set
- Sand the whole surface flat once the glue dries completely
- Build a simple four-leg base with a lower shelf for extra support
- Attach the mosaic top to the base and finish with a durable outdoor sealant
The pattern looks complicated, but it’s really just repetition. Once you’ve built one quarter-section, you’re just copying the same angles three more times.
Here’s the part that trips people up: don’t rush the sanding step. A belt sander evens out any height differences between wood pieces, which is what makes the top look seamless instead of chunky. Skipping this step is the difference between “handmade and polished” and “handmade and a little rough.”
This piece is proof that DIY patio furniture doesn’t have to stay simple to stay budget-friendly. Scrap wood costs next to nothing, and the real investment here is time, not money. I’d save this build for a weekend when you’re not in a rush, since the payoff is worth the extra patience it takes to get those angles right.
Quick FAQs About DIY Patio Furniture
Let’s knock out a few questions I get asked constantly. Some of these surprised me the first time I looked into them.
Do I need power tools to build my own patio furniture? Not necessarily. Plenty of beginner projects only need a hand saw, screwdriver, and some wood glue. A cordless drill speeds things up, but it isn’t required for simple pieces like benches or side tables. Borrowing tools from a neighbor works just fine for a first project.
How much does it cost to build basic outdoor pieces myself? It varies, but most small projects run between twenty and sixty dollars in materials. Bigger pieces, like a daybed, cost more, though still far less than buying one from a store.
What’s the most beginner-friendly project to start with? A cinder block side table is by far the easiest starting point. It takes under an hour, requires no cutting, and looks polished once it’s styled with a plant.
How do I make sure my furniture survives Florida weather? Use weatherproof stain or paint, stainless hardware, and raise pieces off wet ground. Regular touch-ups once or twice a year also extend the life of everything you build.
Can I really make DIY patio furniture look expensive? Yes, and this one surprises people the most. Consistent color, good lighting, and mixed textures matter more than the price of your materials. Confidence in your styling does a lot of heavy lifting here, more than any single expensive piece could.
Is building outdoor furniture cheaper than buying it? Almost always, especially for bigger pieces like benches or daybeds. You’re paying for materials and your time, not brand markup or shipping costs.
The Real Payoff Isn’t Just the Furniture
Here’s what I keep noticing after project after project: this changes how you see your patio. It stops being a leftover outdoor space and starts feeling like a room you planned on purpose. Every DIY patio furniture piece adds a little more of that feeling.
Living in Orlando, I spend more time outside than in most rooms of my house. That’s especially true once the weather cools enough to sit comfortably. My patio used to read like an afterthought. Now it’s genuinely one of my favorite spots to land at the end of a long day.
I still keep a running board on Pinterest for new ideas, even now. There’s always another bench design or lounge chair idea worth saving for later. That’s part of the fun, since this stuff never really feels finished in a bad way.
If you take one thing from all of this, let it be that budget-friendly doesn’t mean settling. Some of my favorite pieces cost almost nothing and still get compliments from neighbors. Cheap materials, a little patience, and some confident styling choices go further than people expect.
Start with one small project this weekend. Don’t overthink the first piece, and don’t wait for the perfect tools or the perfect weather. You’ll learn more from one finished bench than from a hundred more ideas saved for later.
Your patio doesn’t need a big budget. It just needs you to actually start.