There’s a specific moment every September when the craft aisle starts flirting with me. Tiny felt pumpkins wink from the endcap. Glittery foam leaves promise a magical afternoon. Then I check the price tag and remember that fall crafts for kids shouldn’t cost more than dinner.
Here’s the funny part. Kids don’t care where the googly eyes came from. A toddler will treat a paper plate like a museum canvas and a pinecone like buried treasure. As a mom, I’ve learned that the cheapest supplies often spark the biggest grins.
I tend to notice that my drawers, recycling bin, and backyard already hold most of what we need. (Spoiler: it’s a lot.) Toilet paper tubes, brown paper bags, fallen leaves, and old socks are all fair game. Suddenly, that craft aisle looks a lot less tempting.
And here’s the twist I didn’t expect. Kids tend to love the scrappy projects more than the fancy ones. A lopsided paper owl gets hugged, named, and carried around for days. Meanwhile, the pricey kit owl ends up under the couch by Tuesday. (Rest in peace, foam owl.)
This isn’t a picture-perfect list, though. It’s a real-life list for real-life kids who eat glue sticks and name every leaf “Steve.” One project on here costs about zero dollars, yet it somehow wins every single time. (I’ll get to it. Patience, friend.)
Some of the links on this page are affiliate links, which means I may earn a small commission if you purchase through them. It never costs you extra. You can always peek at my full disclosure if you’d like the details.
Why Fall Crafts For Kids Don’t Need a Big Budget
Let’s start with a slightly spicy opinion. Expensive craft kits are mostly packaging. You pay for a shiny box, a cute font, and enough foam stickers to start a sibling war. Then the project itself wraps up in about eleven minutes.
I’ve found that fall crafts for kids work best when the supplies look a little random. A kid who sees paper bags, yarn, and leaves starts dreaming up ideas. However, a kid holding a kit just copies the picture on the box. One of those builds creativity, and the other builds a very specific foam owl.
Here’s the part that surprised me. More supplies don’t equal more fun. In fact, a giant bin of options can overwhelm little ones fast. Setting out three or four materials tends to keep kids focused longer. (Fewer choices, fewer meltdowns. Math!)
Budget-wise, the dollar store is your best friend this season. Most stores stock googly eyes, pipe cleaners, paper plates, and felt for a buck or two. Beyond that, your recycling bin covers the rest. Cardboard, egg cartons, and paper towel tubes are basically free craft gold.
Of course, some items are worth a small splurge. Washable paint and a sturdy glue stick save you from scrubbing the kitchen table at midnight. Cheap glue sticks crumble, and cheap paint stains. Spending an extra dollar there buys you peace, and peace is priceless.
So before you fill a cart with seasonal craft kits, take a quick lap around your house. You’ll likely find half a craft store hiding in plain sight. And the other half? It’s probably falling off the trees in your yard right now.

Easy Fall Crafts For Kids Under Five
Preschoolers have one crafting goal. They want to use as much glue as humanly possible. And truthfully, I respect the commitment. Easy fall crafts for kids this age should lean into that energy instead of fighting it.
The trick is picking projects with big pieces and zero wrong answers. Tiny hands struggle with scissors, but they’re great at tearing, stamping, and sticking. With that in mind, here are a few winners that cost almost nothing:
- Torn paper leaf collage: Kids rip red, orange, and yellow scraps and glue them onto a leaf outline.
- Bubble wrap corn: Paint bubble wrap yellow and press it onto a paper corn shape.
- Q-tip tree painting: Draw a bare brown trunk, then let kids dot fall-colored “leaves” with cotton swabs.
- Handprint turkey: Paint a palm brown and the fingers in bright colors, then press it onto paper.
- Dot marker acorns: Fill acorn outlines with brown and tan dot markers.
Notice what’s missing from that list? Glitter. I’m not a monster, but glitter plus preschoolers equals a cleanup job that lasts until spring.
Now, here’s the reframe. Many of us think preschool crafts need to look cute when they’re done. They don’t! The process matters far more than the finished product at this age. A “leaf” collage that looks like a lumpy pancake still counts as a win.
I tend to notice that kids this age lose interest after about 15 minutes. So plan short projects and keep a damp towel nearby. Also, let them lead the way. If your kid decides the tree needs purple leaves, well, purple trees exist now.

Pumpkin Crafts That Cost Less Than a Latte
Pumpkins are the unofficial mascot of fall, and kids adore them. Yet real pumpkins get pricey fast, especially once everyone wants their own. Plus, carving with little kids? That’s a hard no from me, because sharp knives and wiggly toddlers don’t mix.
Here’s the good news. You can skip real pumpkins entirely and still get all the orange joy. Below are my favorite budget picks, and each one costs a dollar or less per kid:
- Paper plate pumpkins: Paint a plate orange and glue on a green paper stem.
- Toilet paper roll pumpkins: Wrap a tube in orange yarn and tuck a green pipe cleaner stem on top.
- Coffee filter pumpkins: Color filters with orange marker, spritz them with water, and watch the colors blend.
- Egg carton pumpkin patch: Paint each cup orange and add tiny paper leaves for a mini patch.
- Sock pumpkins: Fill an old sock with rice, tie it off, and poke a stick in the top.
That last one deserves a shoutout. Lonely socks from the laundry basket finally have a purpose! Older kids can handle the rice and rubber bands on their own, too.
Now, a quick thought on real pumpkins. If you do buy a few, skip the carving and grab washable paint instead. Painted pumpkins last weeks longer than carved ones. That means your porch stays cute until Thanksgiving without a moldy surprise.
These might be my favorite fall crafts for kids, since most families already have the basics. Nobody needs a perfect pumpkin, either. Lopsided pumpkins grow in real patches all the time. Frankly, the wonky ones have more charm. (Two more pumpkin projects get full how-tos below, so stay tuned.)

Halloween Crafts For Toddlers (Minus the Chaos)
Toddlers and Halloween crafts sound like a recipe for disaster. Surprisingly, they’re a great match. The trick is keeping things simple, a little silly, and not remotely scary.
I’ve found that toddlers love anything with googly eyes. Stick a few on a paper bag, and suddenly they’ve built a monster puppet. Add some yarn hair and a paper mouth, and you’ve got a full-blown character. Expect a lot of roaring afterward.
Another easy win is the handprint ghost. Paint your little one’s hand white, press it onto black paper, and add two eyes. The fingers turn into a wobbly ghost tail. It’s cute, it’s cheap, and it doubles as a keepsake for grandparents.
Here’s a reframe worth sharing. Many parents skip Halloween crafts with toddlers because they worry about spooky themes. However, crafting lets kids control the “scary” stuff, which can make the holiday less scary overall. A friendly paper plate spider is way easier to love than a giant inflatable one.
Speaking of spiders, try the paper plate version this year. Kids paint a plate black, then glue on eight paper strip legs. Counting the legs sneaks in a little math, too. (Shh, don’t tell them.)
Tape resist bats are another toddler favorite. Stick masking tape in a bat shape on white paper, let kids paint over everything, and then peel. The bat magically appears, and toddlers lose their minds with joy.
Most of these fall crafts for kids use supplies from one quick dollar store trip. So Halloween doesn’t have to haunt your wallet. Save that money for candy instead, because we both know who’s eating the extra peanut butter cups.
Nature Walk Fall Crafts For Kids
Some of the best craft supplies grow right outside your door. Even better, they cost exactly nothing. A quick walk around the block turns into a treasure hunt, and kids go wild for it.
Remember that zero-dollar project I mentioned earlier? Here it is: the nature bracelet. Wrap a strip of masking tape around your kid’s wrist, sticky side out. Then head outside and let them stick on leaves, petals, seeds, and tiny twigs. It sounds almost too simple, but I’ve found kids adore wearing their walk like jewelry.
Once you’ve gathered a bag of goodies, the fun continues at home:
- Leaf rubbings: Place a leaf under paper and rub a peeled crayon over it sideways.
- Pinecone owls: Glue felt wings and googly eyes onto a pinecone.
- Acorn cap paint cups: Use acorn caps as tiny cups for dabs of paint.
- Stick frames: Hot glue four sticks into a square, then frame a fall drawing. (Grown-ups handle the hot glue!)
- Leaf suncatchers: Press leaves between two sheets of contact paper and hang them in a window.
Here’s something most people overlook. Nature crafts slow kids down in the best way. They notice colors, shapes, and textures they’d normally stomp right past. Who knew a crunchy leaf could hold attention?
Fair warning, though. Fresh leaves curl and crumble within a day or two. Press them inside a heavy book overnight for crafts that last longer.
Ultimately, these fall crafts for kids double as outdoor time, which is a bonus for everyone. Kids burn off energy, grown-ups get fresh air, and nobody spends a dime. That’s a triple win in my book.
The Recycling Bin Is a Secret Craft Store
Before you toss that cereal box, hear me out. Your recycling bin might be the best craft store in town. It restocks itself every week, it’s free, and it never runs out of cardboard.
Toilet paper tubes top my list of favorite freebies. Kids turn them into owls, bats, scarecrows, and little turkeys with just paint and paper. Cut two notches at the top, fold the flaps down, and you’ve got owl ears. It’s so easy, it almost seems like cheating.
Cereal boxes come next. Flatten one, and you’ve got sturdy cardboard for leaf stencils, masks, or a mini haunted house. Meanwhile, egg cartons become pumpkin patches, spider bodies, or tiny bat buddies.
Now for my slightly controversial take. I think kids get more creative with trash than with store-bought kits. Nobody hands them an instruction sheet telling them what to make. A juice lid becomes a pumpkin, a bottle cap becomes a spider eye, and boom, imagination takes over.
Brown paper grocery bags deserve a mention, too. Crumple one up, and it turns into rustic “bark” for a fall tree. Cut it flat, and it becomes a scarecrow vest. You can even make a whole paper bag scarecrow puppet in about ten minutes.
One quick tip makes this work smoothly. Keep a craft stash box in a closet and toss clean recyclables in all month. By the time a rainy afternoon hits, you’ll have a full supply ready. That’s how fall crafts for kids go from a shopping trip to a scavenger hunt.
So yes, the recycling bin is officially cool now. Tell your kids it’s a treasure chest, and watch them guard it like tiny dragons.
Thanksgiving Fall Crafts For Kids to Keep the Table Busy
Thanksgiving crafts pull double duty, which makes me very happy. They keep kids busy while dinner cooks, and they decorate the table. That’s efficient, and I love efficient.
Turkeys rule this category, obviously. Yet you can go way beyond the classic handprint version. Here are a few cheap ideas that work all through November:
- Paper plate turkey: Glue colorful paper feathers around a plate and add a brown paper body.
- Pinecone turkey: Tuck felt feathers into the back of a pinecone and add googly eyes.
- Thankful tree: Stand a bare branch in a jar and hang paper leaves with “I’m thankful for” notes.
- Handprint place cards: Write each guest’s name on a paper handprint turkey.
- Leaf wreath: Glue fallen leaves around a paper plate ring with the center cut out.
The thankful tree is my personal favorite. Kids write or draw something they’re grateful for, then hang it up. By Thanksgiving Day, the branch looks full and surprisingly sweet. Grown-up guests usually want to add a leaf, too. Watching Grandpa write “I’m thankful for naps” is a special kind of joy.
Now, a gentle reframe. Many families save Thanksgiving crafts for the holiday itself. But I’ve found that starting early in November gives crafts time to grow into decorations. A thankful tree works best as a month-long project, not a one-day rush.
These fall crafts for kids also make great kids’ table activities. Set out paper, crayons, and a few turkey templates before dinner. Suddenly, the kids’ table becomes the calm table. (A miracle, I know.) Better still, those paper turkeys double as take-home favors for every guest.
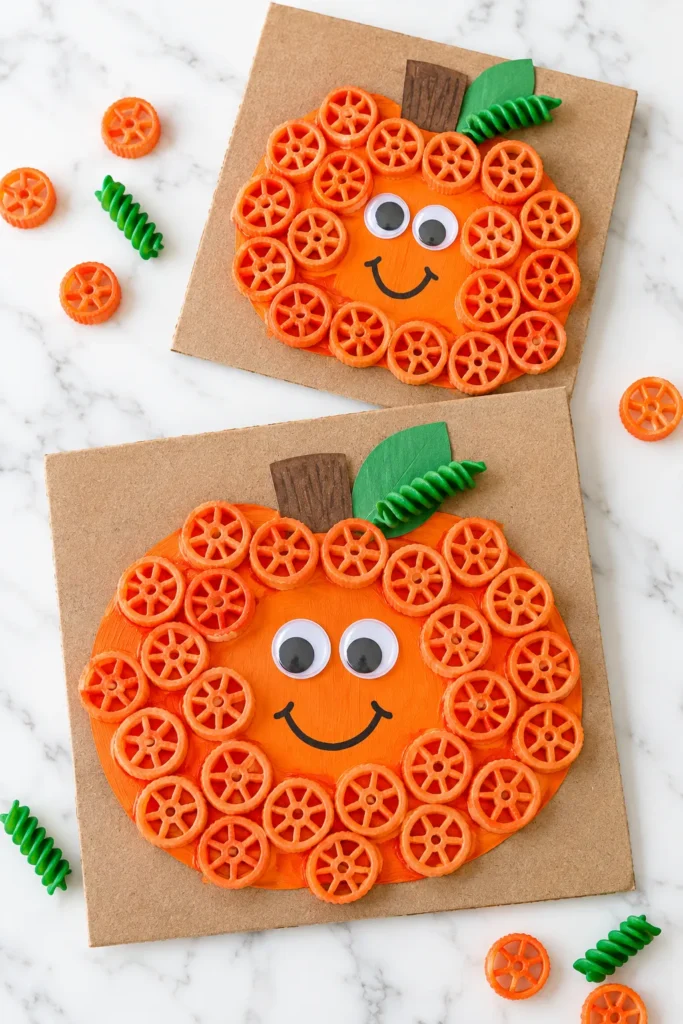
Pasta Wheel Pumpkins From Your Pantry
That half-empty box of wagon wheel pasta is about to become art. It’s one of my favorite fall crafts for kids because the supplies already live in your pantry. The wheels give each pumpkin a bumpy, 3D look that kids can’t stop touching.
Materials:
- Wagon wheel pasta (rotelle)
- A few pieces of rotini pasta
- Orange and green washable paint (or food coloring and vinegar)
- A square of cardboard from a shipping box
- White school glue
- Two large googly eyes
- Brown and green construction paper
- Black marker
- Paint the wagon wheels orange and the rotini green, then let them dry on wax paper.
- Draw a big pumpkin shape on the cardboard square.
- Fill the pumpkin shape with orange paint for a bright base.
- Squeeze glue around the outer edge and press pasta wheels into it.
- Add a brown paper stem and a green paper leaf at the top.
- Tuck a green rotini “vine” beside the leaf with a dab of glue.
- Stick on googly eyes and draw a big smile with the marker.
Here’s a little trick I love. Dyeing pasta in a zip-top bag with vinegar and food coloring takes about five minutes. Just shake, dump, and dry. Painting works fine too, but the bag method gives brighter color and fewer orange fingers.
Leave the middle open for the face, like the photo shows. Otherwise, you’ll run out of room for those googly eyes. (Tragic.) Also, keep loose pasta away from toddlers who still put everything in their mouths.
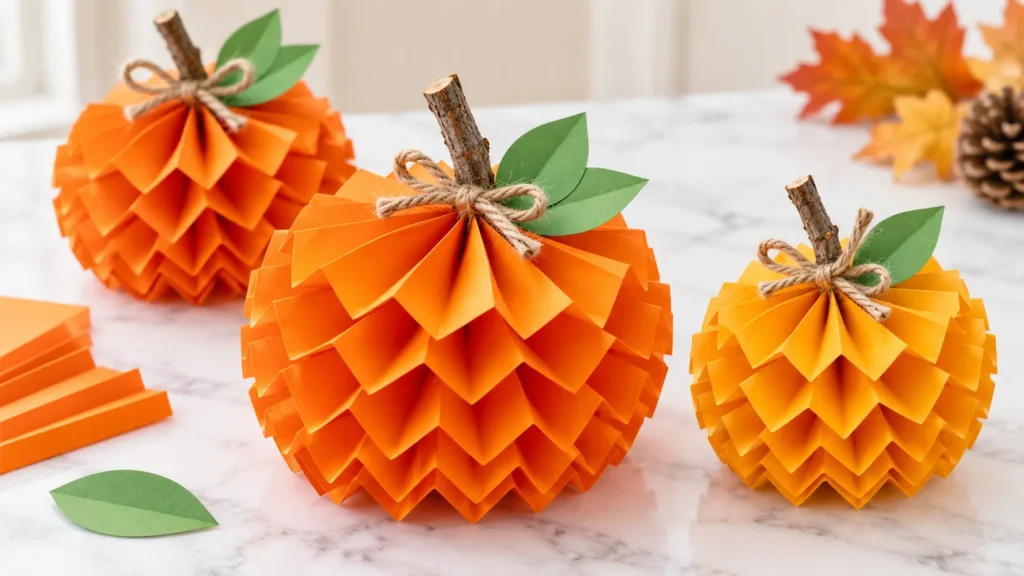
Accordion Paper Pumpkins
Want a pumpkin that sits on a shelf instead of the fridge? These folded paper pumpkins look fancy, yet they’re just paper and patience. Older kids love the folding, and younger kids love the fanning part.
Materials:
- 4 to 6 sheets of orange paper per pumpkin
- Stapler and glue stick
- A short twig from the yard
- Twine
- Green paper for leaves
- Scissors
- Fold each sheet back and forth into a tight accordion, like a paper fan.
- Pinch each folded strip in the middle and staple it.
- Fan out both sides and glue the edges together to make a round circle.
- Stack the circles at angles and glue their centers together to form a ball.
- Push a twig into the top center for the stem.
- Tie a twine bow around the stem and tuck two paper leaves under it.
Different shades of orange make a cute little pumpkin family. Mix bright orange with a softer golden yellow, like in the photo. Smaller paper makes a baby pumpkin, which kids find wildly adorable.
Now, a quick reality check. Step four takes a little grown-up help the first time. Once kids see how the circles lock together, they usually want to make five more. Budget-wise, a whole paper patch costs less than one real pumpkin from the store. Of all the pumpkin-themed fall crafts for kids, this one looks the most like store decor.
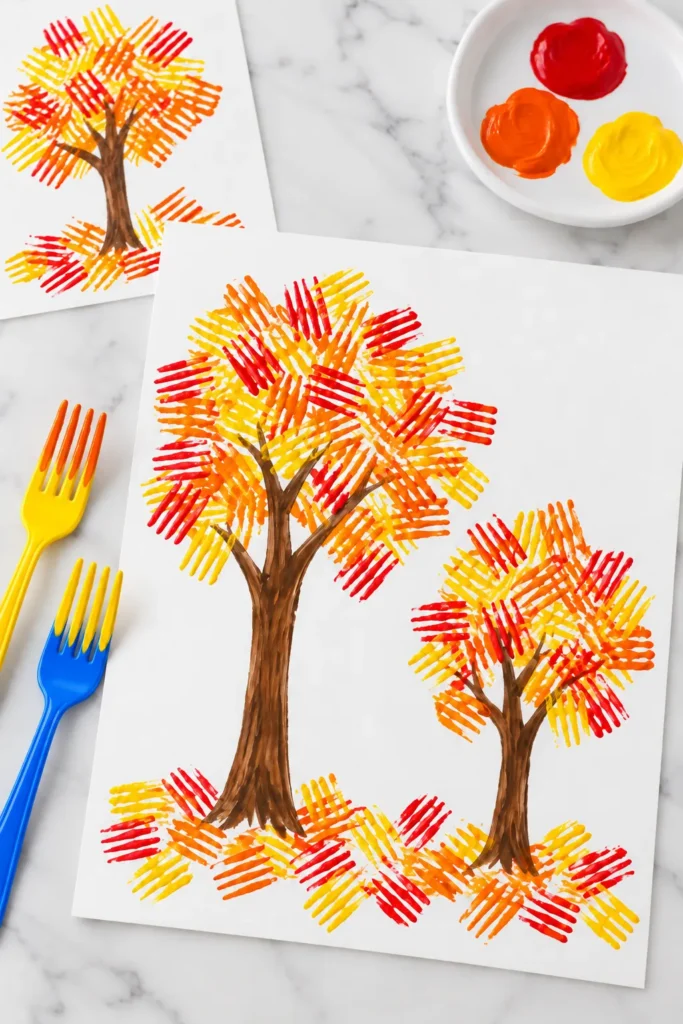
Fork-Painted Fall Tree Craft for Kids
Plastic forks aren’t just for picnic potato salad. Dip them in paint, and they make the most gorgeous leafy texture. I’ve found this project works for toddlers and big kids alike. That makes it one of the easiest fall crafts for kids to set up.
Materials:
- White cardstock
- Plastic forks (one per color)
- Red, orange, and yellow washable paint
- Brown marker or brown paint
- A paper plate for the paint
- Draw a tree trunk and a few branches with the brown marker.
- Squirt small blobs of red, orange, and yellow paint onto the plate.
- Dip the fork tines into one color and press them around the branches.
- Switch colors and keep stamping, turning the fork in different directions.
- Add a row of fork prints along the bottom for fallen leaves.
- Let the painting dry flat for about an hour.
The crisscross strokes are the magic here. Tilting the fork in new directions gives the leaves that fluttery, layered look. Meanwhile, overlapping colors blend right on the paper, so kids don’t need to mix anything.
Here’s my slightly bossy tip: use a separate fork for each color. Otherwise, everything turns into a muddy brownish orange by the third dip. Two trees on one page, one big and one small, make a sweet fall scene. And the whole project costs pennies, because you probably already own the forks.
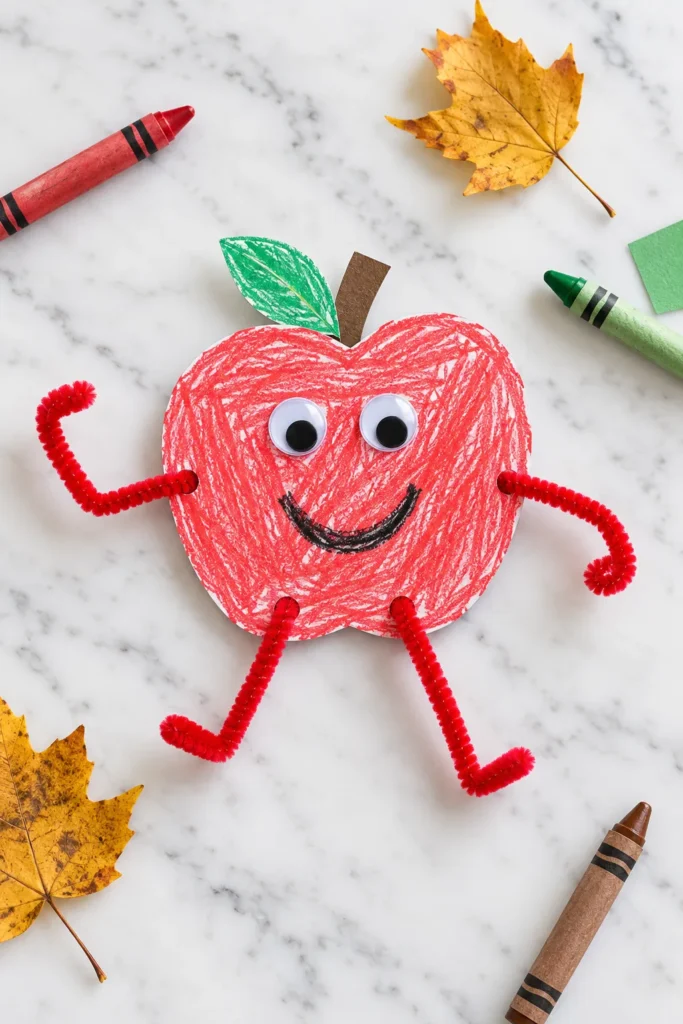
Wiggly Apple Buddies
Apple season deserves a craft, and this one brings serious personality. Pipe cleaner arms and legs make it bendy and silly. Kids pose it in dance moves, superhero stances, and the occasional yoga pose.
Materials:
- White cardstock
- Red and green crayons
- Brown paper scrap
- Two large googly eyes
- Two red pipe cleaners
- Black marker
- Hole punch and glue stick
- Draw a big apple shape on cardstock and cut it out.
- Color the apple red with heavy crayon scribbles.
- Cut a small leaf, color it green, and glue it on top with a brown paper stem.
- Punch two holes on the sides and two holes along the bottom.
- Cut each pipe cleaner in half and twist one piece through each hole.
- Bend the ends into little hands and feet.
- Add googly eyes and a big marker smile.
Those scribbly crayon lines? They’re the best part. Kids don’t need to color neatly, since messy texture looks great here. In fact, the wilder the scribbles, the better it looks in photos.
Grown-ups should handle the hole punch for little ones, since cardstock gets tough. After that, kids can twist the pipe cleaners on their own. I tend to notice they spend more time posing the arms than making the craft. Fair enough! One pack of pipe cleaners costs about a dollar. That’s enough for a whole orchard of these fall crafts for kids.
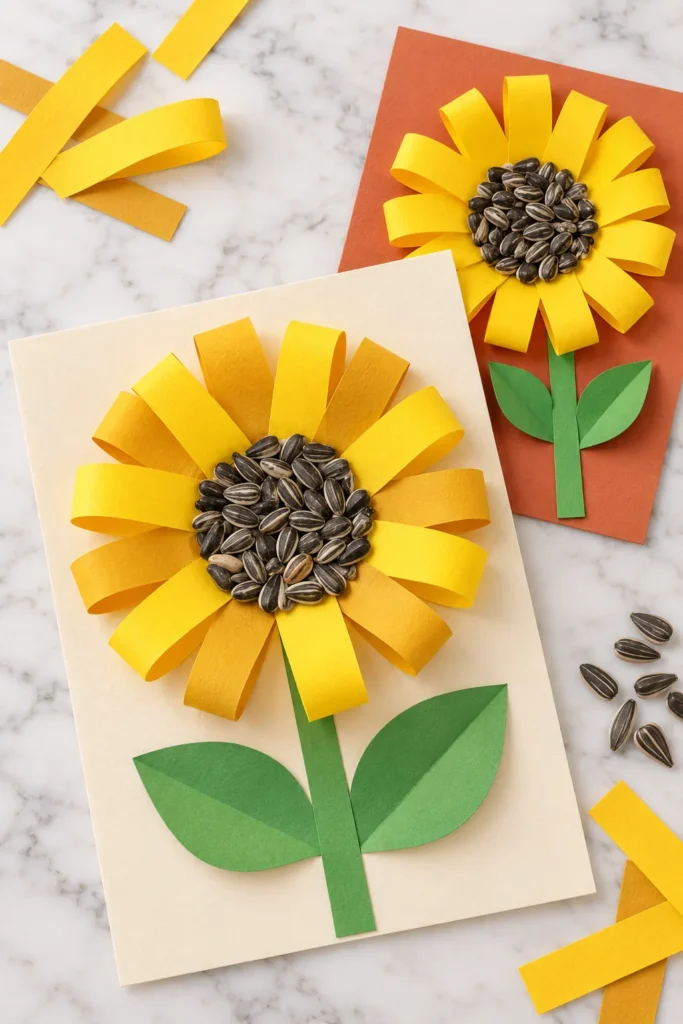
Paper Loop Sunflowers
Sunflowers scream early fall, and these paper versions pop right off the page. The looped petals give them a 3D look without any fancy folding. Plus, real sunflower seeds in the center add great texture. Few fall crafts for kids look this cheerful stuck to a fridge.
Materials:
- Cardstock for the background (cream or rust orange)
- Yellow and gold paper, cut into strips
- Green paper for the stem and leaves
- A small handful of sunflower seeds in the shell
- White school glue and a glue stick
- Cut yellow and gold paper into strips about one inch wide.
- Fold each strip in half to form a loop, and glue the ends together.
- Draw a circle in the center of the background paper.
- Glue the loop ends around the circle, alternating yellow and gold.
- Fill the center with white glue and press sunflower seeds into it.
- Add a green strip for the stem and two leaves on each side.
Here’s where kids get to shine. Some will line up seeds in perfect rows, and some will dump them in a pile. Both look great, so let them do their thing.
A quick safety note for little ones: seeds are a choking hazard for toddlers. Supervise closely, or swap in brown paper circles or buttons. Meanwhile, a bag of seeds costs about a dollar, and you’ll have plenty left over. Grown-ups can snack on the extras while the glue dries. (Crafting perks!)
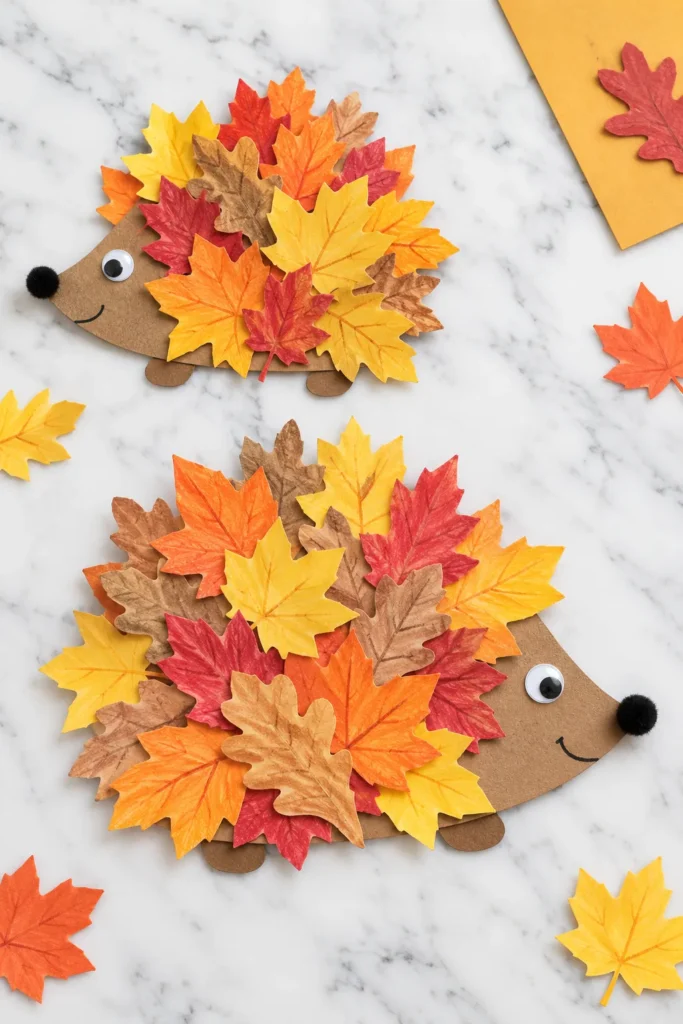
Leafy Hedgehogs Made From Fall Leaves
This might be the cutest craft in the whole post. A simple paper body plus a pile of leaves equals a hedgehog with serious fluff. It’s one of those fall crafts for kids that works for every age, from toddlers to tweens.
Materials:
- Brown kraft paper or a brown paper bag
- Fall leaves, real or paper (red, orange, yellow, and brown)
- One googly eye
- A small black pom pom
- Black marker
- Glue stick or white glue
- Draw a teardrop shape with a pointy nose on the brown paper, then cut it out.
- Cut two small half-circle feet and glue them under the body.
- Starting at the back, glue leaves in overlapping layers across the body.
- Leave the pointy face area bare.
- Glue a googly eye near the nose and a pom pom right on the tip.
- Draw a tiny smile with the marker.
If you’re using paper leaves, crayon veins make them look extra real. Just trace a line down the middle and add a few little branches. Real leaves work too, but press them in a book first so they lie flat.
Here’s a sneaky reframe. Many people think leaf crafts need perfect, unbroken leaves. Not true! Torn and crumpled bits add texture that looks just like prickly quills. So that sad, crunchy pile on your porch? Free hedgehog material.
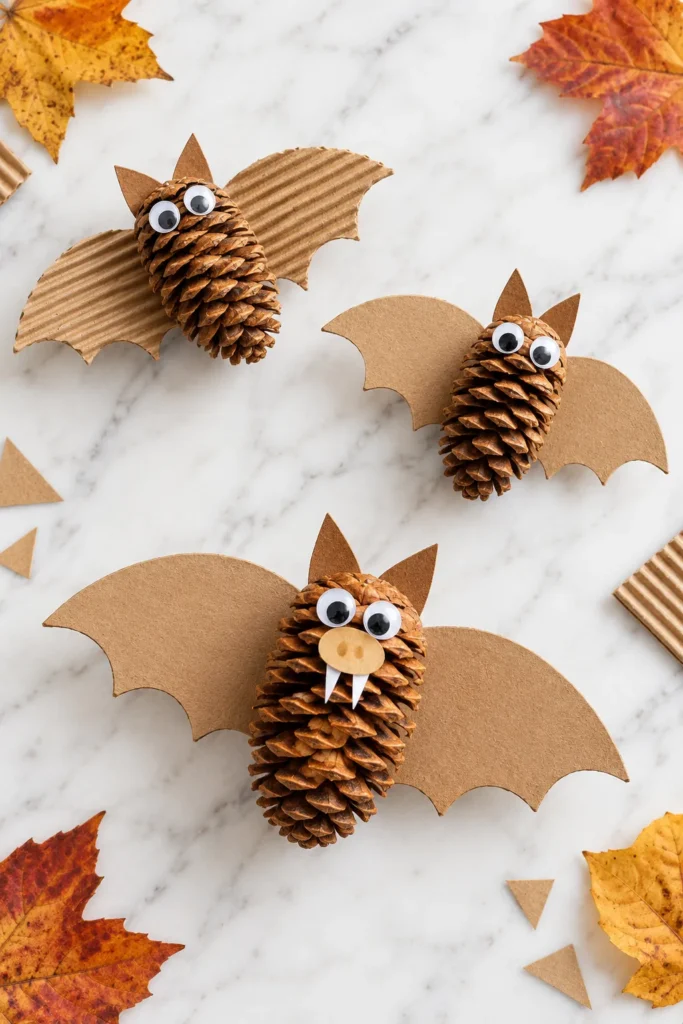
Pinecone Bats for Halloween
Pinecones plus paper wings equal the least scary bats ever. These little guys are perfect for Halloween, and they cost basically nothing. Grab pinecones on your nature walk, and you’re halfway there. They’re perfect fall crafts for kids who want something a little spooky.
Materials:
- Small pinecones
- Brown cardstock or corrugated cardboard
- Googly eyes
- Tan paper scrap for a nose (optional)
- White paper scrap for fangs (optional)
- Tacky glue or a low-temp glue gun
- Draw a bat wing shape with scalloped bottom edges, then cut out two wings.
- Cut two small triangles for the ears.
- Glue the wings to the back of the pinecone.
- Tuck the ears into the top scales with a dab of glue.
- Add googly eyes near the top.
- For a vampire bat, glue on a tan oval nose and two tiny white fangs.
Corrugated cardboard makes the coolest wings, thanks to those ridged lines. Peel off the smooth top layer of a shipping box to find it. Otherwise, plain brown cardstock works just fine.
Hot glue holds best, but a grown-up should handle it. For kids working solo, tacky glue works if you let it dry overnight. Also, bake pinecones at 200°F for about 30 minutes to kill any bugs. (Trust me, you want bug-free bats.) Hang a few from a doorway with string, and you’ve got instant Halloween decor.
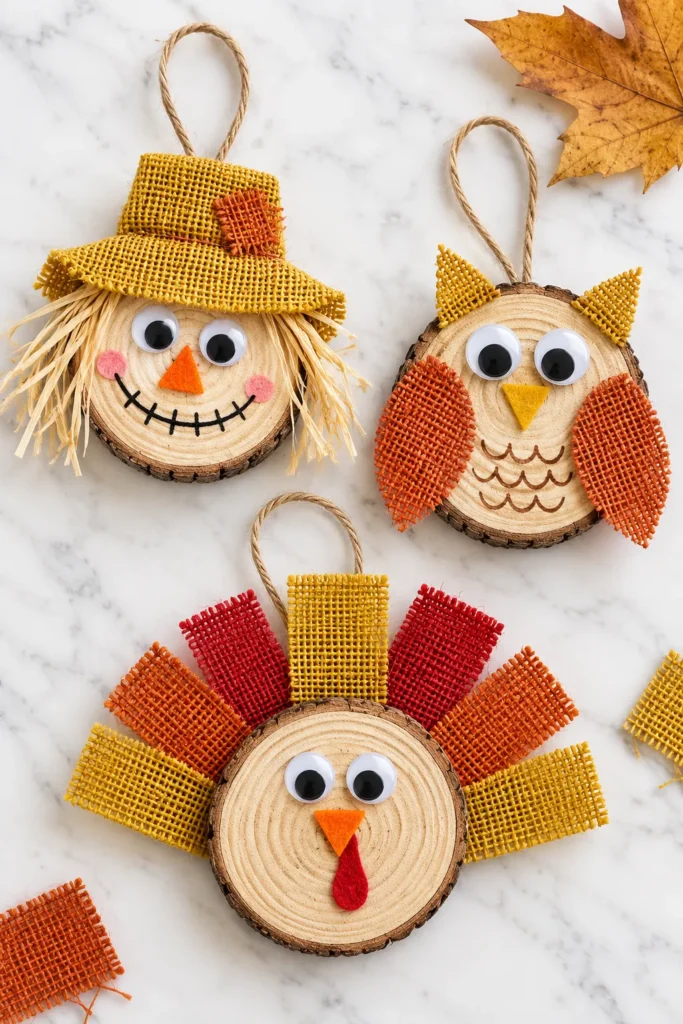
Wood Slice Ornaments: Scarecrow, Owl, and Turkey
These are the fanciest-looking fall crafts for kids on the list, but they stay budget-friendly. A bag of wood slices costs a few dollars and makes a dozen ornaments. Hang them on a branch, a doorknob, or a Thanksgiving centerpiece.
Materials:
- Wood slices (about 3 to 4 inches wide)
- Burlap scraps in mustard, orange, and red
- Raffia for scarecrow hair
- Felt scraps in orange, yellow, red, and pink
- Googly eyes
- Twine for hangers
- Black and brown markers
- Tacky glue or a low-temp glue gun
- Glue a twine loop to the back of each wood slice.
- Scarecrow: Glue raffia along the sides, then fold burlap into a floppy hat on top.
- Add googly eyes, a felt triangle nose, pink felt cheeks, and a stitched marker smile.
- Owl: Glue burlap leaf-shaped wings on the sides and burlap triangle ears on top.
- Add eyes, a yellow felt beak, and brown marker feather scallops.
- Turkey: Glue burlap strips in a fan behind the slice for feathers.
- Finish with eyes, an orange felt beak, and a red felt wattle.
Burlap frays like crazy, and that’s part of the charm. Let the edges stay rough and rustic. Otherwise, a thin line of glue along the cut edges stops major shedding.
These double as sweet keepsakes, too. Write the year and your kid’s name on the back with a marker. Years from now, you’ll pull them out and get a little misty. Nobody warns you about that part.
How to Craft Without Losing Your Mind (or Your Rug)
Let’s talk about the part nobody photographs. The mess! Glue, paint, and paper scraps have a way of spreading beyond the table. Somehow, glitter ends up in your eyebrows even when nobody opened the glitter.
I’ve found that a little prep saves a lot of stress. A cheap plastic tablecloth from the dollar store covers the table in seconds. When crafting ends, you just wipe it down or fold it up. Old T-shirts make perfect art smocks, too, and they cost nothing.
Here’s a reframe worth trying. Mess isn’t a sign that the craft went wrong. It’s usually a sign that the kids had a blast. That shift in thinking makes cleanup a lot less annoying. Also, a few stray paint drips give the table character.
Paint deserves its own strategy. Squirt small amounts onto a paper plate instead of handing over the whole bottle. Kids use less, waste less, and spill less. Washable paint is non-negotiable, by the way. Trust me, your grout will thank you later.
Timing matters more than most people realize. Crafts go best when kids are fed, rested, and not already bouncing off the walls. Right after snack time tends to be the sweet spot. Just before bedtime? Absolutely not. Tired kids plus wet paint is a plot twist nobody needs.
Finally, let the cleanup be part of the craft. Kids can wipe tables, toss scraps, and put caps back on markers. Fall crafts for kids should include a little responsibility, and most little ones love a real job. Hand them a spray bottle of water and a rag, and you’ll have eager helpers.
Fall Craft FAQs
What are the easiest fall crafts for kids?
Leaf rubbings, handprint turkeys, and paper plate spiders top the easy list. They use basic supplies and take about 15 minutes. Plus, even toddlers can handle most of the steps with a little help.
How can I make fall crafts cheaper?
Start with your recycling bin and your backyard. Cardboard tubes, egg cartons, paper bags, and fallen leaves cover a lot of projects. Then fill any gaps with a quick dollar store run.
What fall crafts work best for toddlers?
Toddlers do best with big pieces, paint, and stickers. Handprint ghosts, tape resist bats, and paper bag monsters are all great picks. Skip anything with tiny parts or scissors.
How long should a craft session last?
For preschoolers, 15 to 20 minutes is plenty. Older kids can often stick with a project for 30 minutes or more. Stop while everyone’s still having fun, and you’ll avoid the meltdown.
Which fall crafts for kids make good keepsakes?
Wood slice ornaments top my list, since they last for years. Handprint turkeys and ghosts are sweet ones, too. Write your kid’s name and the year on the back so you never forget.
What supplies should I keep on hand for fall?
Keep washable paint, glue sticks, googly eyes, and orange, red, and brown paper handy. Pipe cleaners and paper plates are smart extras. Add a stash of clean recyclables, and you’re set for weeks.
Save the Leaves, Skip the Craft Aisle
Here’s what I keep coming back to. The best crafts rarely come from a fancy kit. They come from a paper bag, a fistful of leaves, and a kid with big ideas. Somehow, that combo beats the craft aisle every single time.
Being a mom means I’m always balancing fun with a budget, and fall tests that balance hard. Between pumpkin patches, costumes, and holiday meals, the season adds up quickly. So I love that fall crafts for kids can be the one cheap thing on the calendar. They’re low-cost, low-stress, and high on giggles. Plus, they turn a boring Tuesday into a tiny event.
Of course, your crafts won’t look like the photos on Pinterest. Let’s be real, nobody’s do, and that’s fine. A lopsided pinecone owl with one googly eye has way more personality anyway. Kids remember making it, not how neat it looked. That messy version is the one that ends up on the fridge.
If you try just one idea this season, make it the nature bracelet. It costs a strip of tape and a walk around the block. Better yet, it gets everyone outside and moving. Somehow, a simple walk becomes a full-on adventure with snacks.
And when the table is covered in scraps and your kid proudly holds up a purple tree? Snap a picture. Frame it with sticks, even. Someday, that little masterpiece will be the fall decoration you’d never trade for anything store-bought.